It's getting close to the midnight hour! We don't have any plans. Hubby had to work, so he just got home about 20 minutes ago. I doubt that I'd be able to keep my eyes open that late anyway. But for all you young whipper snappers out there, I hope you all have a blast. I use to love getting all dressed up and going out to a big dinner and dance on New Year's eve. But that seems like a life time ago.
I have a something new to share with you. I have a little video tutorial. My first one ever! Danielle had asked a question about perforation lines in Silhouette Studio, so I thought what a better way to dip my toe in the waters and do a short tutorial to answer her question. I hope you find it helpful.
That's it for now. I'll talk to you again in 2013!
HAPPY NEW YEAR!
Cat
Monday, December 31, 2012
Friday, December 28, 2012
Halloween Cards & a layout
I know Halloween is long gone, but I wanted to show you the cards I made. I'm so behind on organizing my posts & my pictures. I'm working on it.
So anyway, I think these cards turned out pretty cute. I made one for my brother and one for my niece. I love these digi images by Sassy Studio which I coloured with my Copic markers. The tag is a graphic I found on the internet a couple years ago, so I don't have the details of where it came from. All the shapes were cut using my CraftRobo and I used my scallop edge punch from SU. The patterned papers are from a Halloween mat stack by K & Co. I bought at Michaels 2 years ago. I love using the mat stacks for my cards because the scale of the design is perfect, and there's very little waste when cutting into a sheet. Here are the cards:
 The layout I want to show you are of pictures of my husband. He's probably not going to like it that I'm putting these pictures up on my blog. I think they're cute. They were taken on his birthday a few years ago and he was listening to some music with the headphones on. All the cardstock is Recollections brand and I don't remember if the patterned paper is My Mind's Eye or SEI. Again, I cut the shapes for the embellishments, the journal tag, and the title all with my Craft Robo. This layout was made for the October tag layout challenge over at the Scrapture site. Here's my layout:

I also used my loopy border punch and a pair of Fiskars deco scissors on the patterned papers. That line of music was a bugger to get on there straight with those skinny strips of paper. It was fun to make though.
Well, that's all for today. I'm working on getting myself organized and trying to get caught up on deciding which projects I want to post. I have quite a few I want to share here, so check back soon. I'll probably have a few posts over the next week or so.
Talk to you later...
Cat
So anyway, I think these cards turned out pretty cute. I made one for my brother and one for my niece. I love these digi images by Sassy Studio which I coloured with my Copic markers. The tag is a graphic I found on the internet a couple years ago, so I don't have the details of where it came from. All the shapes were cut using my CraftRobo and I used my scallop edge punch from SU. The patterned papers are from a Halloween mat stack by K & Co. I bought at Michaels 2 years ago. I love using the mat stacks for my cards because the scale of the design is perfect, and there's very little waste when cutting into a sheet. Here are the cards:


I also used my loopy border punch and a pair of Fiskars deco scissors on the patterned papers. That line of music was a bugger to get on there straight with those skinny strips of paper. It was fun to make though.
Well, that's all for today. I'm working on getting myself organized and trying to get caught up on deciding which projects I want to post. I have quite a few I want to share here, so check back soon. I'll probably have a few posts over the next week or so.
Talk to you later...
Cat
Sunday, December 23, 2012
Ok, So I fibbed...
When I said I wouldn't post again till after Christmas. I haven't wanted to do to much but sleep and just laze around with this cold. So I was playing with the SS software again. I created this cute little reindeer and want to offer it to you guys out there. I realize that its probably a little late for any of your holiday projects, but hopefully if you download it, you can use it for the next holiday season's projects. Here he is:

In the zip file there is this preview .png file, a digi stamp .png file, a .studio cutting file, and a .studio print & cut file. If you take the file, please leave me a comment. I'd really like some feedback on these little drawing/files and I'd like to know if you're using the files. If you do make a project with it, I'd love to see it. You can leave me a link in the comment section of any post on this blog to let me know, or use the contact form in the sidebar to the right. Either way works. :) You can download the files HERE.
Thats all for today. I won't promise to be back before Christmas - or even New Year's if this cold gets any worse - so if I don't see you again before then, have a great Christmas everyone!
Talk to you later...
Cat
Saturday, December 22, 2012
Its looking a lot more like Christmas...
Its turned cold here and we got a little bit of snow, so now we will have a "real" Christmas instead of the brown grass Christmases we've had in the past. And, just because I have a bunch of stuff I wanted to get done before Christmas day, I woke up with a cold this morning. Great...
Well, anyway, I've been playing with the SS software again today and I made this digi stamp for you.

I doubt that I will be able to post before Christmas, so you all have a wonderful day with your family and friends. I'll talk to you after the big day...
Take care
Cat
Well, anyway, I've been playing with the SS software again today and I made this digi stamp for you.

Its a little rudimentary, so I need to brush up on my drawing skills, but I thought someone might be able to use it. The file contains the preview you see above and a blank file. You can download the files from HERE.
I doubt that I will be able to post before Christmas, so you all have a wonderful day with your family and friends. I'll talk to you after the big day...
Take care
Cat
Tuesday, December 18, 2012
Just a quick post
Well, I can't sleep again. Here it is 4am and I'm wide awake. I think I've been going into menopause for about 2 years now. My body just isn't acting the same way anymore and I don't like it one bit. This getting old thing really isn't my cup of tea. I guess it wouldn't be so bad if I would get my fat ass out of this computer chair and do some exercise. I usually didn't have a problem getting to sleep at night the last say 15 years, but these last couple years, I could stay awake all night. Mind you I would sleep until noon the next day. Like today. I was up until 5 this morning and got up at 11:30. You would think I'd be tired. But I'm not. And my husband is sawing logs, so I know he'll just keep me awake if I try to go to bed.
Anyway, this leads me to why I'm here. To pass the time, I was playing around in the Silhouette Studio software testing out some of the upgraded features in the Designer Edition. Oh yeah, did I tell you I won a copy of the designer edition software. I did! From the Bargain Shopper Mom! I made up a couple things I want to share with you. They're not much really, but I thought they were kind of cute.
First, here is a digi stamp I made with the software of, what else, but a cat. :) I'll do up a tutorial after the New Year on how to create digi stamps with your Silhouette software (I have a new video capture software I want to try out courtesy of a recommendation from Bird on her new forum). Here she is (just click on the picture to make it bigger and then save the image to your computer):

Second, I made a cutting file of some lamps. I know its nothing spectacular, but I have a card in mind and didn't want to go hunting for a file on the internet. I also want to become more self-sufficient and make more of my own stuff so I don't have to worry about credits and where I got stuff from, and whether I can use it to make stuff to sell or not, and so on. So here is a picture of the lamp shapes:

They are .rar files and will open with winzip or you can download a trial version of winrar (it never expires, but just keeps popping up a reminder to purchase a full license version). I've included the .studio file as well as an .svg file. Please read my TOU that I've included too. These are for personal use only and may not be shared. If you think someone might like to have the file, please send them to my blog to get it. Here's the link: CatScrapFever Lamp cutting files I should also mention that they are blank shapes. I only filled in the shapes so I could show you what they would look like using patterend paper and cardstock.
I'm using MediaFire now for my downloads. I don't have that many files that I've been giving out, but I want to change that in the new year. I want to try to get back into designing and offering some free digi scrap stuff and digi stamps here and there as well as the occasional cutting file. I'd also like to see how many times the files are being downloaded. I wasn't able to do that with the other methods of delivery I was using, so I think this will be the way to go.
Well, I think I should try to get to bed now. Its getting on towards 5am and I don't want to waste the day tomorrow sleeping. Hubby is on his days off, so I want to spend a little time with him and get some baking done.
Let me know if you use the files and I would really love to see anything you create with them. Just drop me a line using the contact form in the right sidebar.
Talk to you later...
Cat
Thursday, December 13, 2012
Where do you go when you go off your diet??
Ok, so this totally not anything about crafting of any sort, but it is so funny I had to share it with you all. My husband and I were shopping today. First off, my husband NEVER, EVER, in a million years, goes shopping with me. But today he did and even offered to go into the stores with me. So I wanted to go to the dollar store because they sell the kind of hot chocolate he likes (Carnation) for only $2 a box where its about $3.50 a box at Walmart. We're walking down the food aisle and he's looking at all the stuff commenting on how he didn't realize how much stuff they actually carried. Then he spies this bottle of salad dressing, picks it up and starts laughing. He's holds it out to me and says "Fuck it island!" I'm like "What?? Watch what you're saying, there's kids in the store!". Then he says "no look at the bottle!". Well, there it is... Here's a picture to prove it:

I bought it just so I had proof. :) No wonder this product is at the dollar store with a name like that. We're going to try it tomorrow with our salad for dinner. I'll let you know how it tastes.
Talk to you later...
Cat

I bought it just so I had proof. :) No wonder this product is at the dollar store with a name like that. We're going to try it tomorrow with our salad for dinner. I'll let you know how it tastes.
Talk to you later...
Cat
Wednesday, November 21, 2012
My Sweet Kinko
Hi everyone! I have a layout that is special to me. I made this a couple months ago for one of the layout tag challenges over at the Scraptures forum. This one is of my sweet little baby, Kinko. I got Kinko when she was just a tiny little fluff ball at only 4 months old. She was so cute and cuddly. She grew up to be a beautiful cat, albeit somewhat aloof until the last couple years. Unfortuantely, she became ill very quickly and I had to make the choice to have her put to sleep in May of this year. She was almost 17 years old. I'm glad that I was able to give her her forever home. I loved her as if she were my child and I really miss her. Here is the layout:
 The cardstock base is SU, the patterned paper strips are scraps that I had in my stash. I can't remember the name of it off-hand (and I'm too lazy to look it up), but I also used a SU wheel stamp (unmounted of course) along the edge of the base. The black used for the picture mats is Recollections brand (Michaels house brand). The flourishes, butterfly, and Title were cut using my Craft Robo on Wausau Exact Index 110lb scraps. I don't recall if they're files I bought from the Silhouette store of if they're something I traced from an image I found. The paper flowers are from the dollar store & the brads are Recollections brand.
Isn't she pretty? She had the most amazing green eyes and she would often just gaze up at me with such a dreamy look in her eye.
Well, that's all I wanted to share with you today. I'll be back again soon with something else to show you. :)
Talk to you later...
Cat

Isn't she pretty? She had the most amazing green eyes and she would often just gaze up at me with such a dreamy look in her eye.
Well, that's all I wanted to share with you today. I'll be back again soon with something else to show you. :)
Talk to you later...
Cat
Friday, November 09, 2012
Breast Cancer Awareness Cards
Hello again. I'm back today to show you some cards I made for Breast Cancer Awareness month - which is October. I wanted to send these cards to the women that are important in my life and give them a gentle reminder that we need to take care of ourselves and that early detection is the key to surviving this ugly disease.
Here are my cards:

The images are digital stamps from Bugaboo stamps that I coloured with pencil crayons and oms and cut out with my Craft Robo using the print & cut feature. I also put some stickles on the images. All the cardstock and patterned paper is Recollections brand and the ribbon and rhinestones are from the dollar store. The corner punch I used on the image mat is also from the dollar store. I used my Craft Robo to print & cut the tags with the sentiments. The inside sentiment says: "Have you felt yourself up lately? October is Breast Cancer Awareness month. Give yourself a breast exam. Just do it!"
Other than that, I have been in a Christmas card making mood. I'll post them after Christmas though 'cause I don't want the recipients to see them just yet. :) I do have a little surprise for you. I was fooling around making some digital papers, so I thought I would share them with you. They are 300dpi letter size papers, so they are perfect for printing and using just as you would any other patterned paper for your Christmas cards. Here is a preview:

I hope you can use them. I had already picked out all my supplies for my cards, so I didn't get to use these papers. Maybe for next years' cards, but more than likely I will have designed a whole bunch more papers to use. You can download them from here: CatScrapFever Christmas 2012 Papers. Please leave a comment if you download them. I would also really love to see any projects you make with them. You can leave a link in a comment or contact me through the contact form on the right-hand side.
That's it for tonight. Talk to you later...
Cat
Monday, November 05, 2012
A Scrapbook Page...
Hi all! I'm back again to show you a scrapbook page I did a while ago for a layout tag challenge at Scraptures.ca. I hadn't done a scrapbook page in a very long time. I really like these challenges because they only happen once a month so I'm not under the gun to do a whole bunch of pages and they give me a theme or template to follow. It works for me because then I don't have to think. Life is better when I don't have to think. :)
So here is my layout:

Actually, in this photo the pictures are photoshopped in because just as I went to print my photos, my printer decided it was going to go kaput. The final version has these exact pictures and I added the date & place on the journaling spot, so it looks just like this photo. I did finally get my printer working. I thought it was the print head, so I ordered a new one that cost me $60. Waited the 10 days for it to arrive only to find out it wasn't my print head. The continuous ink supply system I have failed. So I thought it was the resettable chips on the cartridges and ordered a new set of self-resetting chips. Nope, not those either. Its the actual ink tanks themselves that aren't working. I don't know how that is, but I refilled an old set of ink tanks and reset the chips and it printed like new again. Well, at least I have a back-up print head and a new set of self-resetting chips. I need to find some new low volume tanks to fix the CISS. If you have ever used a CISS and then had to go back to manually refilling your ink tanks, then you know what a pain in the ass it is.
I don't know what company makes the patterned paper I used on this layout since they were scraps I had left over from other projects. The base cardstock is SU (don't know what colour), and the dark blue and white are Recollections from Michaels. The embellishments are from the dollar store. I used an EK Success punch to punch out the little crab and the pennants are just triangles cut from scraps. I used a marker on plain white kitchen twine to make the twine the pennant is attached to. I did use my Craft Robo to cut the wave shapes for the border along the bottom.
So that's all I have for today. I have more projects I'll be showing you over the next little while - some cards and a few more scrapbook projects. I hope you drop by again to see what I've been up to. :)
Talk to you later...
Cat
Sunday, November 04, 2012
A Couple Cards...
Hello all! Well, its 2am and I can't sleep. So I thought I'd stay up so that I could turn the clocks back. I also wanted to share a couple cards I made recently. They were for a One on One swap over on the Scraptures.ca board. I was quite pleased with this first card.

I used an 8x8 paper pack I got at Michaels, created the rosette, used one of my roses I made with my Penny Duncan cut file and cut the tags with my Craft Robo. Heck, I even pulled out the little sewing machine for this card. I made a nice little box for it so it wouldn't get crushed in the mail - it even has an acetate window so you can see the card. My husband thought the card was a real work of art, although he says that about most of my cards. They have to be really ugly before he'll say anything negative about them. He's sweet that way. But all in all I thought the card turned out nice. So I hurry off to the post office to get it in the mail so its not late for the swap, and was I ever hit in the face with reality. Canada Post wanted almost $16 to send the card. I was flabbergasted. Well, I wasn't going to pay that much to send a card through the mail so I had to go home and re-think my design. Of course I had left everything to the last minute. So in order to get a design banged out quickly so the card could get to the recipient before the deadline, I turned to Pinterest. Within 2 hours I had this next card:

I think its a cute card and it was easy to make. I was just really ticked off that Canada Post wanted so much money to send the first card. I guess, unless I am hand delivering or sending the card in a parcel, I will be making flat cards from now on. I'll be damned it Canada Post is going to extort that much money from me to send a card. No wonder they're crying about losing business. I don't even send parcels anymore that often. The last one I sent was for my niece's birthday. It cost me about $30 for the present and $25 to mail it. Ridiculous! I'll be using my bank's e-transfer and emailing money to my mom & sister for Christmas. Its instant & free. I'll probably send my niece something, but that's it. I can't continue to pay as much, or more, than what the gifts are worth just to send them through the mail.
Ok rant over.
So that's it for today. I have a few more projects that I've made in the last few weeks that I'll come back to show you. Just need to take the time to edit the photos.
Well, talk to you later...
Cat
Sunday, October 14, 2012
How to "Export" Silhouette Studio Files to SVG files
Update 06/02/2014: Wow! I posted this 1.5 yrs ago and its still my most popular post. I also still get a lot of questions about "exporting" your files. If you would like an answer to your question, please, please use the contact form on the right hand side of this blog. I can put answers in the comments section, but usually people don't come back to check for the answer.
Back to our regular scheduled program...
Hello again! What a shocker eh? Two posts in as many days. I'm tellin' ya, I'm on a roll. :) Well, I promised that I would be back today with a tutorial on how to get your Silhouette Studio files into svg format. I'll show you the process, but also note here that, programs like MTC or SCAL can import jpg and png file, so you may not need to go all the way to the end of the process. I'm not completely familiar with MTC, and even less familiar with SCAL, so I'm not certain at this point if there is an advantage to importing the svg rather than just a jpg. My only observation right now is that, at least, with a svg file, the tracing is already done for you and ready to put into different layers (if you choose). Not sure how much of a time saver that is...
So, I think I mentioned that I am going to buy a new KNK Zing cutter early next year. The reason I want to export my Studio files is so I can cut them using the Zing. The Zing come with MTC, which is totally a different file type and can't import the proprietary Silhouette Studio files. Silhouette Studio will allow you to export their files as svg files, but only if you have an older version (v1.9 or v2.0) of their Designer Edition software. I'm a cheap ass and don't want to spend the $50 just so I can export when I can get free programs to do it for me. May be a few more steps, but it works.
Ok, so to begin, there are a couple programs you need. All of them free. You need to have Inkscape and Bullzip PDF printer installed. Here are the links for these:
http://sourceforge.net/projects/inkscape/files/
click on: Looking for the latest version? Download Inkscape-0.48.2-1-win32.exe (35.7 MB)
http://www.bullzip.com/download.php
click on: PDF Printer 4.5 MB Free Freeware (up to 10 users) Download | Donate
Of course, I'm assuming you have Silhouette Studio installed, otherwise why would you want to do this tutorial?? Ok, let's start. Here's what I do:
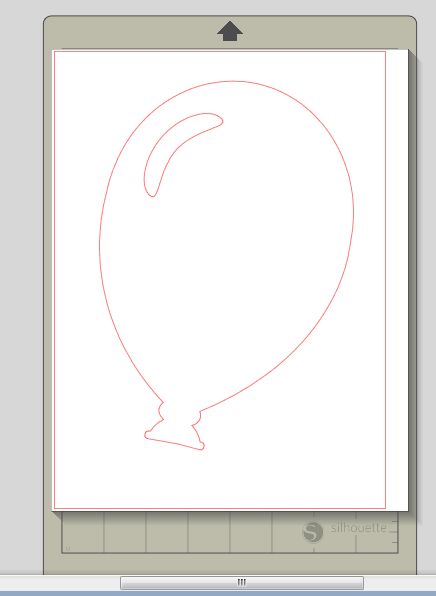
1. Open up Silhouette Studio and open up the file you want to "export". In this case I opened the balloon file that comes with SS:

2. Use Ctrl A to select all images. You could put more than one file on the page, but I wouldn't do too many - maybe 3 or 4 at a time. Just remember if you do more than 1, they will all be part of one file and you will need to save the final converted files separately, and manually.
3. Right click and select ungroup:

4. Select the inner shapes that are cut out. Go to the Fill screen and fill these shapes with white:

5. Now select all the outer shapes and fill these shapes with black:

I chose to use black & white since this will give a really good contrast and make it easier for find the edges of the image. You can choose any colours you want, but I think b&w is probably the best. Also, if your entire image turns black when you fill the outside shapes, you need to "move it to the back" so that the inside shapes are on top and visible.
6. Go to the Lines setup and make sure that the "print cut lines" checkbox is NOT checked:

This is so that when we "export" the image, you won't have the red cutting lines showing (or whatever your default colour is).
7. Now go into your preferences, and then to the output preferences and change the output dpi to whatever you prefer and click the "ok" button. I chose 600 just so I could have a good quality image. I think 300 is probably good enough (that's what most digital scrapbookers use and it gives good resolution for printing, plus your file size will be smaller and load quicker).


8. Now go to File -> Print:

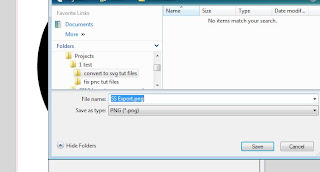
9. Select BullZip PDF Printer and click print (don't worry its not going to actually print a hard copy to your printer):

10. A screen will pop up where you can set the output options for the file. Choose either png or jpeg from the drop down list. I prefer png because they can have a transparent background, but either will work.

11. Click on the Image tab on the pop up window. Here you can change the dpi of the output image. I changed mine to 600, but again, 300 would probably be sufficient. You will change both horizontal and vertical to the same number.


12. Click the Save button and navigate to the folder where you want to save your file.
13. Start Inkscape and open the file you just created.

14. Use Ctrl A to select all your image. Little black arrows will show up around the image. Then go to Path -> Trace Bitmap.

15. A pop up window will open. In the window, change the brightness cutoff setting to 0.500 and then click the ok button. Close the window by clicking the red x in the top right hand corner.

16. Go File -> Save As:

17. Select Inkscape SVG in the drop down list below the name field and then, go to the folder you want to save your svg in and type in the name you want to give the file.

That's all there is to convert your Studio file to svg. The next steps I'm showing are for importing the svg into MTC since that is what I will be using when I get my new Zing. :)
19. Start MTC and go File -> Import -> SVG/SVGZ file

20. Navigate to the folder where you saved your svg file and click on the file. A preview will show up in the preview window if all went well with the export process. Click the open button.

21. This will bring the svg into MTC, but it will be a very, very large image. You will probably have to lower the zoom all the way down to 10% to see it. At this point, you can shrink down the image so that it fits onto your page.

That's it. You can now manipulate the file as you please.
I hope it all made sense and you were able to follow along. As I mentioned earlier, actually converting the file to svg isn't absolutely necessary for MTC or SCAL, so this may be over kill, and you can just use the jpg/png file you created from SS. If you notice any errors, or something doesn't seem right, please contact me using the contact form on the right-hand side of my blog. I'll get back to you with an answer as quickly as I can.
Well, I think I'll try and take some pictures of a few scrapbook pages I made over the last couple months and show them to you in a day or so. I had gotten to the point where I wasn't enjoying blogging for a quite a while, but I've enjoyed doing these last two, so maybe I'll be able to keep it up for a little while. We'll see. I do have a few things I want to show.
That's all for today. See you soon...
Cat
12/21/12: Nicole posted a comment and a question. Nicole, I don't have any way to contact you, so hopefully you see this reply:
You are obviously using the designer edition of Silhouette Studio. You can go into the View menu and turn off the grid so that it doesn't show when you print to pdf.
03/08/14: I've had some questions about the grid marks showing up even though they have been turned off in Silhouette Studio. I've tried to re-create this and can't seem to do it. I'm not sure if its happening with the free version or the DE version since I'm now working in the DE version. I haven't had time to install the free version on a different computer to see if it happening there. The only thing I can tell you at this point is to check to make sure the grid lines are turned off. When I get time to install all the programs on a different computer, I'll report back to let you know if I've been able to duplicate the problem and if I've been able to find a solution.
Cat
Back to our regular scheduled program...
Hello again! What a shocker eh? Two posts in as many days. I'm tellin' ya, I'm on a roll. :) Well, I promised that I would be back today with a tutorial on how to get your Silhouette Studio files into svg format. I'll show you the process, but also note here that, programs like MTC or SCAL can import jpg and png file, so you may not need to go all the way to the end of the process. I'm not completely familiar with MTC, and even less familiar with SCAL, so I'm not certain at this point if there is an advantage to importing the svg rather than just a jpg. My only observation right now is that, at least, with a svg file, the tracing is already done for you and ready to put into different layers (if you choose). Not sure how much of a time saver that is...
So, I think I mentioned that I am going to buy a new KNK Zing cutter early next year. The reason I want to export my Studio files is so I can cut them using the Zing. The Zing come with MTC, which is totally a different file type and can't import the proprietary Silhouette Studio files. Silhouette Studio will allow you to export their files as svg files, but only if you have an older version (v1.9 or v2.0) of their Designer Edition software. I'm a cheap ass and don't want to spend the $50 just so I can export when I can get free programs to do it for me. May be a few more steps, but it works.
Ok, so to begin, there are a couple programs you need. All of them free. You need to have Inkscape and Bullzip PDF printer installed. Here are the links for these:
http://sourceforge.net/projects/inkscape/files/
click on: Looking for the latest version? Download Inkscape-0.48.2-1-win32.exe (35.7 MB)
http://www.bullzip.com/download.php
click on: PDF Printer 4.5 MB Free Freeware (up to 10 users) Download | Donate
Of course, I'm assuming you have Silhouette Studio installed, otherwise why would you want to do this tutorial?? Ok, let's start. Here's what I do:
1. Open up Silhouette Studio and open up the file you want to "export". In this case I opened the balloon file that comes with SS:
2. Use Ctrl A to select all images. You could put more than one file on the page, but I wouldn't do too many - maybe 3 or 4 at a time. Just remember if you do more than 1, they will all be part of one file and you will need to save the final converted files separately, and manually.
3. Right click and select ungroup:

4. Select the inner shapes that are cut out. Go to the Fill screen and fill these shapes with white:

5. Now select all the outer shapes and fill these shapes with black:

I chose to use black & white since this will give a really good contrast and make it easier for find the edges of the image. You can choose any colours you want, but I think b&w is probably the best. Also, if your entire image turns black when you fill the outside shapes, you need to "move it to the back" so that the inside shapes are on top and visible.
6. Go to the Lines setup and make sure that the "print cut lines" checkbox is NOT checked:

This is so that when we "export" the image, you won't have the red cutting lines showing (or whatever your default colour is).
7. Now go into your preferences, and then to the output preferences and change the output dpi to whatever you prefer and click the "ok" button. I chose 600 just so I could have a good quality image. I think 300 is probably good enough (that's what most digital scrapbookers use and it gives good resolution for printing, plus your file size will be smaller and load quicker).


8. Now go to File -> Print:

9. Select BullZip PDF Printer and click print (don't worry its not going to actually print a hard copy to your printer):

10. A screen will pop up where you can set the output options for the file. Choose either png or jpeg from the drop down list. I prefer png because they can have a transparent background, but either will work.

11. Click on the Image tab on the pop up window. Here you can change the dpi of the output image. I changed mine to 600, but again, 300 would probably be sufficient. You will change both horizontal and vertical to the same number.


12. Click the Save button and navigate to the folder where you want to save your file.

13. Start Inkscape and open the file you just created.

14. Use Ctrl A to select all your image. Little black arrows will show up around the image. Then go to Path -> Trace Bitmap.

15. A pop up window will open. In the window, change the brightness cutoff setting to 0.500 and then click the ok button. Close the window by clicking the red x in the top right hand corner.

16. Go File -> Save As:

17. Select Inkscape SVG in the drop down list below the name field and then, go to the folder you want to save your svg in and type in the name you want to give the file.

That's all there is to convert your Studio file to svg. The next steps I'm showing are for importing the svg into MTC since that is what I will be using when I get my new Zing. :)
19. Start MTC and go File -> Import -> SVG/SVGZ file

20. Navigate to the folder where you saved your svg file and click on the file. A preview will show up in the preview window if all went well with the export process. Click the open button.

21. This will bring the svg into MTC, but it will be a very, very large image. You will probably have to lower the zoom all the way down to 10% to see it. At this point, you can shrink down the image so that it fits onto your page.

That's it. You can now manipulate the file as you please.
I hope it all made sense and you were able to follow along. As I mentioned earlier, actually converting the file to svg isn't absolutely necessary for MTC or SCAL, so this may be over kill, and you can just use the jpg/png file you created from SS. If you notice any errors, or something doesn't seem right, please contact me using the contact form on the right-hand side of my blog. I'll get back to you with an answer as quickly as I can.
Well, I think I'll try and take some pictures of a few scrapbook pages I made over the last couple months and show them to you in a day or so. I had gotten to the point where I wasn't enjoying blogging for a quite a while, but I've enjoyed doing these last two, so maybe I'll be able to keep it up for a little while. We'll see. I do have a few things I want to show.
That's all for today. See you soon...
Cat
12/21/12: Nicole posted a comment and a question. Nicole, I don't have any way to contact you, so hopefully you see this reply:
You are obviously using the designer edition of Silhouette Studio. You can go into the View menu and turn off the grid so that it doesn't show when you print to pdf.
03/08/14: I've had some questions about the grid marks showing up even though they have been turned off in Silhouette Studio. I've tried to re-create this and can't seem to do it. I'm not sure if its happening with the free version or the DE version since I'm now working in the DE version. I haven't had time to install the free version on a different computer to see if it happening there. The only thing I can tell you at this point is to check to make sure the grid lines are turned off. When I get time to install all the programs on a different computer, I'll report back to let you know if I've been able to duplicate the problem and if I've been able to find a solution.
Cat
Saturday, October 13, 2012
How to Compensate for Silhouette Print & Cut Inaccuracey
Hello! I have some exciting news for Silhouette Studio users that have been pulling their hair out, like me, and can't get the print & cut to work properly. Silhouette Studio's calibration doesn't work worth beans. For almost a year now, I haven't been able to use my Craft Robo for print & cut because the cut never lines up with the printed image. See here in this image (click images to see them full size):

As the cut gets deeper into the page, the cuts get further away from the printed image in the length, but is fine in the width. I tried using the software's calibration tool, but it didn't solve the issue. So, seeing that the scale is off, I developed this method to compensate and I now get almost perfect cut & prints. I've prepared this tutorial for you so you can get your print & cuts to line up too. I will note that I'm not going to go into detail about where things are in the program. I am assuming you know how to use the Silhouette Studio software and I won't be giving you the path or button locations to activate the various functions we'll be using. Also, I am using 8.5" x 11" paper for those of you trying to follow with a Cameo. My cutter only takes up to an 8.5" wide paper. I also suggest you use regular copy paper and print in draft mode. You don't want to waste cardstock or ink.
The first step is to find out what percentage your cut image is out compared to the actual printed image.
1. Open a new blank document in SS with the registration marks showing.
2. Go into your preferences, then to measurements, and select "dimensions on".
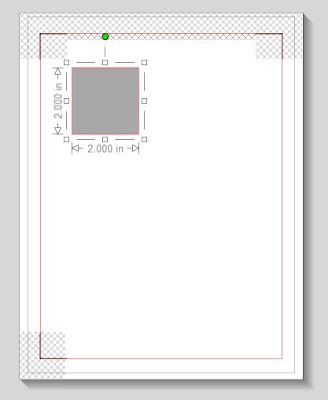
3. Make a 2"x2" square and fill it in with a colour (your choice - I used grey). Use the Scale setup to get your square exactly 2"x2".
4. Go to the line style setup and make sure that the print cut lines is not checked (at the bottom).

5. Use the fill page to duplicate the squares and fill up the page (for some reason mine doesn't show up on the screen, but its at the very bottom of the Replicate setup screen). You must do this so you can get a better measurement of how much you need to shrink/stretch your print image.

5. This is now your "cut file". Use file -> save as and save it in a folder you'll be able to find easily and put "cut file" at the end of the file name (eg. SS calibration - cut file). This will make it easier to differentiate this file from the next one we're going to create.
6. Now use Ctrl A to select all the shapes and group them together. If your page is in portrait (like mine) write down the height of the shapes (along the left side). If your page is in landscape, write down the width (along the bottom).
7. Send this to your cutter using the print & cut and follow the prompts on the screen. Don't take it off the mat when its finished cutting.
8. Once cut, take a ruler and measure the actual cut length of the images. I actually measured mine in millimeters because I could get a more precise measurement that way and just converted it back to inches (to 3 decimal places). SS said my image was 9.315" tall but when I cut it, the final cut was 9.251" tall.
9. Now, we're going to calculate, what I call the "shrink factor". Here's the formula:
actual cut height divided by SS image height.
So mine is 9.251 divided by 9.315 = .994***
*** keep this number handy - I have it on a sticky on my monitor. This is the only time you'll have to calculate this number***
10. With your all your squares still grouped, go into the Move screen and write down the W & H numbers under "Move corner to". (You may have to either close your cut file and re-open it or shut down SS and restart it at this point. For some reason, mine just had a big blue square over where the numbers were, but it worked on other files I tested).
Once you have your cut height measured, you can take your paper off your cutting mat.
11. Now go to the Scale screen and under "specify dimensions" type in your cut length in the field beside "H" (height) and click the "apply" button. This will shift your image slightly on the screen. Leave everything still grouped.
12. Go into the Move screen again, and type in the W & H numbers you wrote down in step 10 and then click the "apply" button.
13. Go File -> save as and save this file with the changes in the same folder you saved the previous folder and put "print file" at the end (eg. SS calibration - print file).
Ok now we are going to check to make sure our measurements and calculations are right and see if our cut lines up with our printed image.
14. Send the "print file" to the printer using the print button (or File -> print) and NOT the send to cutter button. Once its printed, close the file and put your paper on your cutting mat.
15. Open up the "cut file" and send it to your cutter. Skip printing and continue with the screen prompts for the rest of the print & cut.
If everything went well your cut should look like this:

Its pretty much dead on.
So now, if you want to print & cut images other than these squares :), you just follow these steps:
1. Open the file(s) you want to print & cut
2. Arrange on the page making sure they all fit within the cut area
3. Group all the images together & make a note of what SS says the height is.
4. Make a note of the "move to corner" H & W measurements.
5. Save this file as your "cut file"
7. Multiply your SS height by your "shrink factor"
8. Go into scale and change the height to your new calculated number
9. Go into move and change the H number back to the number your noted down in step 4.
10. (optional) File -> save as your "print file"
11. Print it with the print button (not send to cutter).
12. Close the print file, open the "cut file", load your print out, and send it to your cutter, skipping the print part.
You could copy and paste the images/cut lines onto another open document, but personally, I find it easier to keep track of what page I'm on by saving the files with the "cut file" & "print file" in the names because this shows up on the tabs of the open screens. That way I'm less likely to get the files mixed up and cut the print file and print the cut file - know what I mean?? :)
Well, I hope you were able to follow along with this tutorial. I know I'm delighted with the results I'm getting now that I know what my "shrink factor" is and won't be wasting anymore cardstock & ink or going bald from pulling my hair out.
If you come back tomorrow, I'll have another tutorial on how to "export" your Studio files to svg files so that you can use them in other software, like Make The Cut or Sure Cuts A Lot. I will be buying a Zing cutter (yay!) early next year and it uses MTC, so I want to still be able to use my Silhouette files to cut out of the heavier materials the Zing is capable of handling.
So that's all for today. Let me know what you think of the tutorial. And if you notice or find any glitches, please use the contact me form on the right-hand side of my blog to let me know.
Talk to you later...
Cat

As the cut gets deeper into the page, the cuts get further away from the printed image in the length, but is fine in the width. I tried using the software's calibration tool, but it didn't solve the issue. So, seeing that the scale is off, I developed this method to compensate and I now get almost perfect cut & prints. I've prepared this tutorial for you so you can get your print & cuts to line up too. I will note that I'm not going to go into detail about where things are in the program. I am assuming you know how to use the Silhouette Studio software and I won't be giving you the path or button locations to activate the various functions we'll be using. Also, I am using 8.5" x 11" paper for those of you trying to follow with a Cameo. My cutter only takes up to an 8.5" wide paper. I also suggest you use regular copy paper and print in draft mode. You don't want to waste cardstock or ink.
The first step is to find out what percentage your cut image is out compared to the actual printed image.
1. Open a new blank document in SS with the registration marks showing.
2. Go into your preferences, then to measurements, and select "dimensions on".
3. Make a 2"x2" square and fill it in with a colour (your choice - I used grey). Use the Scale setup to get your square exactly 2"x2".

4. Go to the line style setup and make sure that the print cut lines is not checked (at the bottom).

5. Use the fill page to duplicate the squares and fill up the page (for some reason mine doesn't show up on the screen, but its at the very bottom of the Replicate setup screen). You must do this so you can get a better measurement of how much you need to shrink/stretch your print image.

5. This is now your "cut file". Use file -> save as and save it in a folder you'll be able to find easily and put "cut file" at the end of the file name (eg. SS calibration - cut file). This will make it easier to differentiate this file from the next one we're going to create.
6. Now use Ctrl A to select all the shapes and group them together. If your page is in portrait (like mine) write down the height of the shapes (along the left side). If your page is in landscape, write down the width (along the bottom).
7. Send this to your cutter using the print & cut and follow the prompts on the screen. Don't take it off the mat when its finished cutting.
8. Once cut, take a ruler and measure the actual cut length of the images. I actually measured mine in millimeters because I could get a more precise measurement that way and just converted it back to inches (to 3 decimal places). SS said my image was 9.315" tall but when I cut it, the final cut was 9.251" tall.
9. Now, we're going to calculate, what I call the "shrink factor". Here's the formula:
actual cut height divided by SS image height.
So mine is 9.251 divided by 9.315 = .994***
*** keep this number handy - I have it on a sticky on my monitor. This is the only time you'll have to calculate this number***
10. With your all your squares still grouped, go into the Move screen and write down the W & H numbers under "Move corner to". (You may have to either close your cut file and re-open it or shut down SS and restart it at this point. For some reason, mine just had a big blue square over where the numbers were, but it worked on other files I tested).
Once you have your cut height measured, you can take your paper off your cutting mat.
11. Now go to the Scale screen and under "specify dimensions" type in your cut length in the field beside "H" (height) and click the "apply" button. This will shift your image slightly on the screen. Leave everything still grouped.
12. Go into the Move screen again, and type in the W & H numbers you wrote down in step 10 and then click the "apply" button.
13. Go File -> save as and save this file with the changes in the same folder you saved the previous folder and put "print file" at the end (eg. SS calibration - print file).
Ok now we are going to check to make sure our measurements and calculations are right and see if our cut lines up with our printed image.
14. Send the "print file" to the printer using the print button (or File -> print) and NOT the send to cutter button. Once its printed, close the file and put your paper on your cutting mat.
15. Open up the "cut file" and send it to your cutter. Skip printing and continue with the screen prompts for the rest of the print & cut.
If everything went well your cut should look like this:

Its pretty much dead on.
So now, if you want to print & cut images other than these squares :), you just follow these steps:
1. Open the file(s) you want to print & cut
2. Arrange on the page making sure they all fit within the cut area
3. Group all the images together & make a note of what SS says the height is.
4. Make a note of the "move to corner" H & W measurements.
5. Save this file as your "cut file"
7. Multiply your SS height by your "shrink factor"
8. Go into scale and change the height to your new calculated number
9. Go into move and change the H number back to the number your noted down in step 4.
10. (optional) File -> save as your "print file"
11. Print it with the print button (not send to cutter).
12. Close the print file, open the "cut file", load your print out, and send it to your cutter, skipping the print part.
You could copy and paste the images/cut lines onto another open document, but personally, I find it easier to keep track of what page I'm on by saving the files with the "cut file" & "print file" in the names because this shows up on the tabs of the open screens. That way I'm less likely to get the files mixed up and cut the print file and print the cut file - know what I mean?? :)
Well, I hope you were able to follow along with this tutorial. I know I'm delighted with the results I'm getting now that I know what my "shrink factor" is and won't be wasting anymore cardstock & ink or going bald from pulling my hair out.
If you come back tomorrow, I'll have another tutorial on how to "export" your Studio files to svg files so that you can use them in other software, like Make The Cut or Sure Cuts A Lot. I will be buying a Zing cutter (yay!) early next year and it uses MTC, so I want to still be able to use my Silhouette files to cut out of the heavier materials the Zing is capable of handling.
So that's all for today. Let me know what you think of the tutorial. And if you notice or find any glitches, please use the contact me form on the right-hand side of my blog to let me know.
Talk to you later...
Cat
Wednesday, July 25, 2012
Testing a New Craft Technique
Hello! Well, I keep saying this, but long time no see. I don't know what gives, but I just can't seem to get myself motivated enough to sit in my craft room and get something done. I've made a couple little things here and there, but just really haven't had the mojo to put them up on my blog. But today is different. I was looking at a couple things I saw on Pinterest and saw this post on Yvette's blog, Abernathy Crafts, for a white cup decorated with Sharpie markers. Now I had tried to make something similar a couple years ago and coated my image with a clear ceramic sealer by Delta called Air Dry PermaEnamel. Well, it didn't work. Everything came off in the dishwasher. I was so disappointed with the product. Another $8 down the drain. Being the hard-head that I am, I bought another ceramic paint called Vitrea 160 by Pebeo about 6 months ago, but hadn't used it - until the other day. While my results weren't perfect, I think that I may have to try a full scale project now that I've seen the results of my test. Here's what I did:

I used a Sharpie marker and drew on the bottom of a white cup (I didn't want to ruin the whole cup in case it didn't work). I let the ink dry (probably about 30 min just to be sure) then I painted over the image with Vitrea 160 Gloss Medium. It smeared the ink a little, but that might be eliminated by setting the ink by baking it (20min @ 350F). I followed the directions on the bottle for the Vitrea 160 and let it air dry for 24 hrs., then I baked it for 40min @ 325F. I noticed that the ink colour had changed when I took the cup out of the oven. The black ink was now a dark purply-bluish colour, but its kind of pretty. I let the cup cool and stuck it in the dishwasher and washed a load of dishes (one way to get me to load the dishwasher). I was very surprised, and pleased, when I took the cup out of the dishwasher. The image was still there. The last thing that kind of didn't turn out is that there are those brown marks on the cup. Trust me, they weren't there when I started - this is a brand new, never used before cup. I think the water/detergent and heat from the dishwasher kind of turned the coating brown at the edges or where it was thin.
All-in-all, I'm quite pleased with my test results, so I think I will make the cup project I had planned on doing a couple years ago. I will post pictures of the finished project when its done.
So that's all for now. I'll try to come back sooner than later.
Talk to you later....
Cat
P.S. I just did another test on the cup and used one of those plastic pot scrubber thingies on it and it didn't scratch any of the ink off. That's promising for those of you hand washing your dishes. It did scrub off some of the brown marks (which is what I was really trying to do). Just thought I'd let you know...
See ya...
Wednesday, May 02, 2012
Long Time No See!!
Well, I haven't been around for a really long time. I was working a job that I didn't like and it sort of took any life I had out of me. So, now I'm off and looking for something else. In the meantime, I'm going to try and keep up with my blog and post on a regular basis. Hopefully, you missed me. :) I don't have a paper craft project to show you, but I want to show you what I did do last night. I've been spending some time on Pinterest (too much according to my husband) and saw a picture of some pretty manicures. It inspired me to dust off the old cosmetics case and pull out some of my nail polishes. Ombre is really the thing right now, so I thought I would give it a go and do something with that on my nails. Here is how they turned out:

I first applied 2 coats of base coat. My favourite colour is blue, so I used two different shades of blue and then faded into a green applied in stripes on a cosmetic sponge, then dabbed onto the nail. I put a glitter polish over the entire nail after, with a second coat at the bed of the nail. Its all finished with a top coat. I really like the way it turned out.
Here are the products I used:

I love the Pro-FX base coat and top coat. My nails are the healthiest they have ever been since using the base coat. I never thought it would make a difference, but it does. And my nails don't stain when removing the polish as much. The nailpolish colours are: Pier 17 (dark blue, NYC), Blue Me Away (medium blue, Sally Hansen). High Line Green (green, NYC). I bought all the products at WalMart.
Well, thats all for today. I will be back this weekend with a couple paper craft projects to show you. :)
See you then...
Cat
Subscribe to:
Posts (Atom)


