Update 06/02/2014: Wow! I posted this 1.5 yrs ago and its still my most popular post. I also still get a lot of questions about "exporting" your files. If you would like an answer to your question, please, please use the contact form on the right hand side of this blog. I can put answers in the comments section, but usually people don't come back to check for the answer.
Back to our regular scheduled program...
Hello again! What a shocker eh? Two posts in as many days. I'm tellin' ya, I'm on a roll. :) Well, I promised that I would be back today with a tutorial on how to get your Silhouette Studio files into svg format. I'll show you the process, but also note here that, programs like MTC or SCAL can import jpg and png file, so you may not need to go all the way to the end of the process. I'm not completely familiar with MTC, and even less familiar with SCAL, so I'm not certain at this point if there is an advantage to importing the svg rather than just a jpg. My only observation right now is that, at least, with a svg file, the tracing is already done for you and ready to put into different layers (if you choose). Not sure how much of a time saver that is...
So, I think I mentioned that I am going to buy a new KNK Zing cutter early next year. The reason I want to export my Studio files is so I can cut them using the Zing. The Zing come with MTC, which is totally a different file type and can't import the proprietary Silhouette Studio files. Silhouette Studio will allow you to export their files as svg files, but only if you have an older version (v1.9 or v2.0) of their Designer Edition software. I'm a cheap ass and don't want to spend the $50 just so I can export when I can get free programs to do it for me. May be a few more steps, but it works.
Ok, so to begin, there are a couple programs you need. All of them free. You need to have Inkscape and Bullzip PDF printer installed. Here are the links for these:
http://sourceforge.net/projects/inkscape/files/
click on: Looking for the latest version? Download Inkscape-0.48.2-1-win32.exe (35.7 MB)
http://www.bullzip.com/download.php
click on: PDF Printer 4.5 MB Free Freeware (up to 10 users) Download | Donate
Of course, I'm assuming you have Silhouette Studio installed, otherwise why would you want to do this tutorial?? Ok, let's start. Here's what I do:
1. Open up Silhouette Studio and open up the file you want to "export". In this case I opened the balloon file that comes with SS:
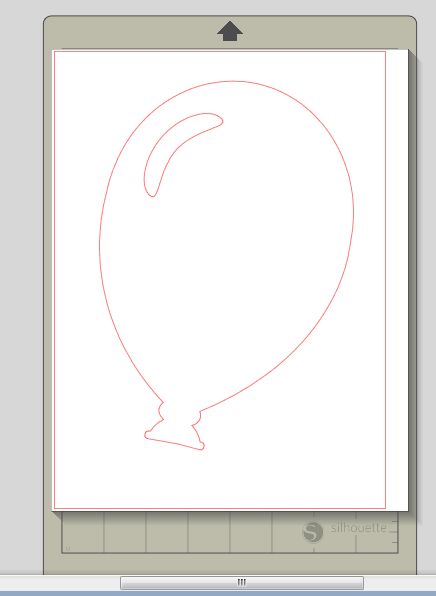
2. Use Ctrl A to select all images. You could put more than one file on the page, but I wouldn't do too many - maybe 3 or 4 at a time. Just remember if you do more than 1, they will all be part of one file and you will need to save the final converted files separately, and manually.
3. Right click and select ungroup:
4. Select the inner shapes that are cut out. Go to the Fill screen and fill these shapes with white:
5. Now select all the outer shapes and fill these shapes with black:
I chose to use black & white since this will give a really good contrast and make it easier for find the edges of the image. You can choose any colours you want, but I think b&w is probably the best. Also, if your entire image turns black when you fill the outside shapes, you need to "move it to the back" so that the inside shapes are on top and visible.
6. Go to the Lines setup and make sure that the "print cut lines" checkbox is NOT checked:
This is so that when we "export" the image, you won't have the red cutting lines showing (or whatever your default colour is).
7. Now go into your preferences, and then to the output preferences and change the output dpi to whatever you prefer and click the "ok" button. I chose 600 just so I could have a good quality image. I think 300 is probably good enough (that's what most digital scrapbookers use and it gives good resolution for printing, plus your file size will be smaller and load quicker).
8. Now go to File -> Print:
9. Select BullZip PDF Printer and click print (don't worry its not going to actually print a hard copy to your printer):
10. A screen will pop up where you can set the output options for the file. Choose either png or jpeg from the drop down list. I prefer png because they can have a transparent background, but either will work.
11. Click on the Image tab on the pop up window. Here you can change the dpi of the output image. I changed mine to 600, but again, 300 would probably be sufficient. You will change both horizontal and vertical to the same number.
12. Click the Save button and navigate to the folder where you want to save your file.
13. Start Inkscape and open the file you just created.
14. Use Ctrl A to select all your image. Little black arrows will show up around the image. Then go to Path -> Trace Bitmap.
15. A pop up window will open. In the window, change the brightness cutoff setting to 0.500 and then click the ok button. Close the window by clicking the red x in the top right hand corner.
16. Go File -> Save As:
17. Select Inkscape SVG in the drop down list below the name field and then, go to the folder you want to save your svg in and type in the name you want to give the file.
That's all there is to convert your Studio file to svg. The next steps I'm showing are for importing the svg into MTC since that is what I will be using when I get my new Zing. :)
19. Start MTC and go File -> Import -> SVG/SVGZ file
20. Navigate to the folder where you saved your svg file and click on the file. A preview will show up in the preview window if all went well with the export process. Click the open button.
21. This will bring the svg into MTC, but it will be a very, very large image. You will probably have to lower the zoom all the way down to 10% to see it. At this point, you can shrink down the image so that it fits onto your page.
That's it. You can now manipulate the file as you please.
I hope it all made sense and you were able to follow along. As I mentioned earlier, actually converting the file to svg isn't absolutely necessary for MTC or SCAL, so this may be over kill, and you can just use the jpg/png file you created from SS. If you notice any errors, or something doesn't seem right, please contact me using the contact form on the right-hand side of my blog. I'll get back to you with an answer as quickly as I can.
Well, I think I'll try and take some pictures of a few scrapbook pages I made over the last couple months and show them to you in a day or so. I had gotten to the point where I wasn't enjoying blogging for a quite a while, but I've enjoyed doing these last two, so maybe I'll be able to keep it up for a little while. We'll see. I do have a few things I want to show.
That's all for today. See you soon...
Cat
12/21/12: Nicole posted a comment and a question. Nicole, I don't have any way to contact you, so hopefully you see this reply:
You are obviously using the designer edition of Silhouette Studio. You can go into the View menu and turn off the grid so that it doesn't show when you print to pdf.
03/08/14: I've had some questions about the grid marks showing up even though they have been turned off in Silhouette Studio. I've tried to re-create this and can't seem to do it. I'm not sure if its happening with the free version or the DE version since I'm now working in the DE version. I haven't had time to install the free version on a different computer to see if it happening there. The only thing I can tell you at this point is to check to make sure the grid lines are turned off. When I get time to install all the programs on a different computer, I'll report back to let you know if I've been able to duplicate the problem and if I've been able to find a solution.
Cat
Sunday, October 14, 2012
Saturday, October 13, 2012
How to Compensate for Silhouette Print & Cut Inaccuracey
Hello! I have some exciting news for Silhouette Studio users that have been pulling their hair out, like me, and can't get the print & cut to work properly. Silhouette Studio's calibration doesn't work worth beans. For almost a year now, I haven't been able to use my Craft Robo for print & cut because the cut never lines up with the printed image. See here in this image (click images to see them full size):
As the cut gets deeper into the page, the cuts get further away from the printed image in the length, but is fine in the width. I tried using the software's calibration tool, but it didn't solve the issue. So, seeing that the scale is off, I developed this method to compensate and I now get almost perfect cut & prints. I've prepared this tutorial for you so you can get your print & cuts to line up too. I will note that I'm not going to go into detail about where things are in the program. I am assuming you know how to use the Silhouette Studio software and I won't be giving you the path or button locations to activate the various functions we'll be using. Also, I am using 8.5" x 11" paper for those of you trying to follow with a Cameo. My cutter only takes up to an 8.5" wide paper. I also suggest you use regular copy paper and print in draft mode. You don't want to waste cardstock or ink.
The first step is to find out what percentage your cut image is out compared to the actual printed image.
1. Open a new blank document in SS with the registration marks showing.
2. Go into your preferences, then to measurements, and select "dimensions on".
3. Make a 2"x2" square and fill it in with a colour (your choice - I used grey). Use the Scale setup to get your square exactly 2"x2".
4. Go to the line style setup and make sure that the print cut lines is not checked (at the bottom).
5. Use the fill page to duplicate the squares and fill up the page (for some reason mine doesn't show up on the screen, but its at the very bottom of the Replicate setup screen). You must do this so you can get a better measurement of how much you need to shrink/stretch your print image.
5. This is now your "cut file". Use file -> save as and save it in a folder you'll be able to find easily and put "cut file" at the end of the file name (eg. SS calibration - cut file). This will make it easier to differentiate this file from the next one we're going to create.
6. Now use Ctrl A to select all the shapes and group them together. If your page is in portrait (like mine) write down the height of the shapes (along the left side). If your page is in landscape, write down the width (along the bottom).
7. Send this to your cutter using the print & cut and follow the prompts on the screen. Don't take it off the mat when its finished cutting.
8. Once cut, take a ruler and measure the actual cut length of the images. I actually measured mine in millimeters because I could get a more precise measurement that way and just converted it back to inches (to 3 decimal places). SS said my image was 9.315" tall but when I cut it, the final cut was 9.251" tall.
9. Now, we're going to calculate, what I call the "shrink factor". Here's the formula:
actual cut height divided by SS image height.
So mine is 9.251 divided by 9.315 = .994***
*** keep this number handy - I have it on a sticky on my monitor. This is the only time you'll have to calculate this number***
10. With your all your squares still grouped, go into the Move screen and write down the W & H numbers under "Move corner to". (You may have to either close your cut file and re-open it or shut down SS and restart it at this point. For some reason, mine just had a big blue square over where the numbers were, but it worked on other files I tested).
Once you have your cut height measured, you can take your paper off your cutting mat.
11. Now go to the Scale screen and under "specify dimensions" type in your cut length in the field beside "H" (height) and click the "apply" button. This will shift your image slightly on the screen. Leave everything still grouped.
12. Go into the Move screen again, and type in the W & H numbers you wrote down in step 10 and then click the "apply" button.
13. Go File -> save as and save this file with the changes in the same folder you saved the previous folder and put "print file" at the end (eg. SS calibration - print file).
Ok now we are going to check to make sure our measurements and calculations are right and see if our cut lines up with our printed image.
14. Send the "print file" to the printer using the print button (or File -> print) and NOT the send to cutter button. Once its printed, close the file and put your paper on your cutting mat.
15. Open up the "cut file" and send it to your cutter. Skip printing and continue with the screen prompts for the rest of the print & cut.
If everything went well your cut should look like this:
Its pretty much dead on.
So now, if you want to print & cut images other than these squares :), you just follow these steps:
1. Open the file(s) you want to print & cut
2. Arrange on the page making sure they all fit within the cut area
3. Group all the images together & make a note of what SS says the height is.
4. Make a note of the "move to corner" H & W measurements.
5. Save this file as your "cut file"
7. Multiply your SS height by your "shrink factor"
8. Go into scale and change the height to your new calculated number
9. Go into move and change the H number back to the number your noted down in step 4.
10. (optional) File -> save as your "print file"
11. Print it with the print button (not send to cutter).
12. Close the print file, open the "cut file", load your print out, and send it to your cutter, skipping the print part.
You could copy and paste the images/cut lines onto another open document, but personally, I find it easier to keep track of what page I'm on by saving the files with the "cut file" & "print file" in the names because this shows up on the tabs of the open screens. That way I'm less likely to get the files mixed up and cut the print file and print the cut file - know what I mean?? :)
Well, I hope you were able to follow along with this tutorial. I know I'm delighted with the results I'm getting now that I know what my "shrink factor" is and won't be wasting anymore cardstock & ink or going bald from pulling my hair out.
If you come back tomorrow, I'll have another tutorial on how to "export" your Studio files to svg files so that you can use them in other software, like Make The Cut or Sure Cuts A Lot. I will be buying a Zing cutter (yay!) early next year and it uses MTC, so I want to still be able to use my Silhouette files to cut out of the heavier materials the Zing is capable of handling.
So that's all for today. Let me know what you think of the tutorial. And if you notice or find any glitches, please use the contact me form on the right-hand side of my blog to let me know.
Talk to you later...
Cat
As the cut gets deeper into the page, the cuts get further away from the printed image in the length, but is fine in the width. I tried using the software's calibration tool, but it didn't solve the issue. So, seeing that the scale is off, I developed this method to compensate and I now get almost perfect cut & prints. I've prepared this tutorial for you so you can get your print & cuts to line up too. I will note that I'm not going to go into detail about where things are in the program. I am assuming you know how to use the Silhouette Studio software and I won't be giving you the path or button locations to activate the various functions we'll be using. Also, I am using 8.5" x 11" paper for those of you trying to follow with a Cameo. My cutter only takes up to an 8.5" wide paper. I also suggest you use regular copy paper and print in draft mode. You don't want to waste cardstock or ink.
The first step is to find out what percentage your cut image is out compared to the actual printed image.
1. Open a new blank document in SS with the registration marks showing.
2. Go into your preferences, then to measurements, and select "dimensions on".
3. Make a 2"x2" square and fill it in with a colour (your choice - I used grey). Use the Scale setup to get your square exactly 2"x2".
4. Go to the line style setup and make sure that the print cut lines is not checked (at the bottom).
5. Use the fill page to duplicate the squares and fill up the page (for some reason mine doesn't show up on the screen, but its at the very bottom of the Replicate setup screen). You must do this so you can get a better measurement of how much you need to shrink/stretch your print image.
5. This is now your "cut file". Use file -> save as and save it in a folder you'll be able to find easily and put "cut file" at the end of the file name (eg. SS calibration - cut file). This will make it easier to differentiate this file from the next one we're going to create.
6. Now use Ctrl A to select all the shapes and group them together. If your page is in portrait (like mine) write down the height of the shapes (along the left side). If your page is in landscape, write down the width (along the bottom).
7. Send this to your cutter using the print & cut and follow the prompts on the screen. Don't take it off the mat when its finished cutting.
8. Once cut, take a ruler and measure the actual cut length of the images. I actually measured mine in millimeters because I could get a more precise measurement that way and just converted it back to inches (to 3 decimal places). SS said my image was 9.315" tall but when I cut it, the final cut was 9.251" tall.
9. Now, we're going to calculate, what I call the "shrink factor". Here's the formula:
actual cut height divided by SS image height.
So mine is 9.251 divided by 9.315 = .994***
*** keep this number handy - I have it on a sticky on my monitor. This is the only time you'll have to calculate this number***
10. With your all your squares still grouped, go into the Move screen and write down the W & H numbers under "Move corner to". (You may have to either close your cut file and re-open it or shut down SS and restart it at this point. For some reason, mine just had a big blue square over where the numbers were, but it worked on other files I tested).
Once you have your cut height measured, you can take your paper off your cutting mat.
11. Now go to the Scale screen and under "specify dimensions" type in your cut length in the field beside "H" (height) and click the "apply" button. This will shift your image slightly on the screen. Leave everything still grouped.
12. Go into the Move screen again, and type in the W & H numbers you wrote down in step 10 and then click the "apply" button.
13. Go File -> save as and save this file with the changes in the same folder you saved the previous folder and put "print file" at the end (eg. SS calibration - print file).
Ok now we are going to check to make sure our measurements and calculations are right and see if our cut lines up with our printed image.
14. Send the "print file" to the printer using the print button (or File -> print) and NOT the send to cutter button. Once its printed, close the file and put your paper on your cutting mat.
15. Open up the "cut file" and send it to your cutter. Skip printing and continue with the screen prompts for the rest of the print & cut.
If everything went well your cut should look like this:
Its pretty much dead on.
So now, if you want to print & cut images other than these squares :), you just follow these steps:
1. Open the file(s) you want to print & cut
2. Arrange on the page making sure they all fit within the cut area
3. Group all the images together & make a note of what SS says the height is.
4. Make a note of the "move to corner" H & W measurements.
5. Save this file as your "cut file"
7. Multiply your SS height by your "shrink factor"
8. Go into scale and change the height to your new calculated number
9. Go into move and change the H number back to the number your noted down in step 4.
10. (optional) File -> save as your "print file"
11. Print it with the print button (not send to cutter).
12. Close the print file, open the "cut file", load your print out, and send it to your cutter, skipping the print part.
You could copy and paste the images/cut lines onto another open document, but personally, I find it easier to keep track of what page I'm on by saving the files with the "cut file" & "print file" in the names because this shows up on the tabs of the open screens. That way I'm less likely to get the files mixed up and cut the print file and print the cut file - know what I mean?? :)
Well, I hope you were able to follow along with this tutorial. I know I'm delighted with the results I'm getting now that I know what my "shrink factor" is and won't be wasting anymore cardstock & ink or going bald from pulling my hair out.
If you come back tomorrow, I'll have another tutorial on how to "export" your Studio files to svg files so that you can use them in other software, like Make The Cut or Sure Cuts A Lot. I will be buying a Zing cutter (yay!) early next year and it uses MTC, so I want to still be able to use my Silhouette files to cut out of the heavier materials the Zing is capable of handling.
So that's all for today. Let me know what you think of the tutorial. And if you notice or find any glitches, please use the contact me form on the right-hand side of my blog to let me know.
Talk to you later...
Cat
Wednesday, July 25, 2012
Testing a New Craft Technique
Hello! Well, I keep saying this, but long time no see. I don't know what gives, but I just can't seem to get myself motivated enough to sit in my craft room and get something done. I've made a couple little things here and there, but just really haven't had the mojo to put them up on my blog. But today is different. I was looking at a couple things I saw on Pinterest and saw this post on Yvette's blog, Abernathy Crafts, for a white cup decorated with Sharpie markers. Now I had tried to make something similar a couple years ago and coated my image with a clear ceramic sealer by Delta called Air Dry PermaEnamel. Well, it didn't work. Everything came off in the dishwasher. I was so disappointed with the product. Another $8 down the drain. Being the hard-head that I am, I bought another ceramic paint called Vitrea 160 by Pebeo about 6 months ago, but hadn't used it - until the other day. While my results weren't perfect, I think that I may have to try a full scale project now that I've seen the results of my test. Here's what I did:
I used a Sharpie marker and drew on the bottom of a white cup (I didn't want to ruin the whole cup in case it didn't work). I let the ink dry (probably about 30 min just to be sure) then I painted over the image with Vitrea 160 Gloss Medium. It smeared the ink a little, but that might be eliminated by setting the ink by baking it (20min @ 350F). I followed the directions on the bottle for the Vitrea 160 and let it air dry for 24 hrs., then I baked it for 40min @ 325F. I noticed that the ink colour had changed when I took the cup out of the oven. The black ink was now a dark purply-bluish colour, but its kind of pretty. I let the cup cool and stuck it in the dishwasher and washed a load of dishes (one way to get me to load the dishwasher). I was very surprised, and pleased, when I took the cup out of the dishwasher. The image was still there. The last thing that kind of didn't turn out is that there are those brown marks on the cup. Trust me, they weren't there when I started - this is a brand new, never used before cup. I think the water/detergent and heat from the dishwasher kind of turned the coating brown at the edges or where it was thin.
All-in-all, I'm quite pleased with my test results, so I think I will make the cup project I had planned on doing a couple years ago. I will post pictures of the finished project when its done.
So that's all for now. I'll try to come back sooner than later.
Talk to you later....
Cat
P.S. I just did another test on the cup and used one of those plastic pot scrubber thingies on it and it didn't scratch any of the ink off. That's promising for those of you hand washing your dishes. It did scrub off some of the brown marks (which is what I was really trying to do). Just thought I'd let you know...
See ya...
I used a Sharpie marker and drew on the bottom of a white cup (I didn't want to ruin the whole cup in case it didn't work). I let the ink dry (probably about 30 min just to be sure) then I painted over the image with Vitrea 160 Gloss Medium. It smeared the ink a little, but that might be eliminated by setting the ink by baking it (20min @ 350F). I followed the directions on the bottle for the Vitrea 160 and let it air dry for 24 hrs., then I baked it for 40min @ 325F. I noticed that the ink colour had changed when I took the cup out of the oven. The black ink was now a dark purply-bluish colour, but its kind of pretty. I let the cup cool and stuck it in the dishwasher and washed a load of dishes (one way to get me to load the dishwasher). I was very surprised, and pleased, when I took the cup out of the dishwasher. The image was still there. The last thing that kind of didn't turn out is that there are those brown marks on the cup. Trust me, they weren't there when I started - this is a brand new, never used before cup. I think the water/detergent and heat from the dishwasher kind of turned the coating brown at the edges or where it was thin.
All-in-all, I'm quite pleased with my test results, so I think I will make the cup project I had planned on doing a couple years ago. I will post pictures of the finished project when its done.
So that's all for now. I'll try to come back sooner than later.
Talk to you later....
Cat
P.S. I just did another test on the cup and used one of those plastic pot scrubber thingies on it and it didn't scratch any of the ink off. That's promising for those of you hand washing your dishes. It did scrub off some of the brown marks (which is what I was really trying to do). Just thought I'd let you know...
See ya...
Wednesday, May 02, 2012
Long Time No See!!
Well, I haven't been around for a really long time. I was working a job that I didn't like and it sort of took any life I had out of me. So, now I'm off and looking for something else. In the meantime, I'm going to try and keep up with my blog and post on a regular basis. Hopefully, you missed me. :) I don't have a paper craft project to show you, but I want to show you what I did do last night. I've been spending some time on Pinterest (too much according to my husband) and saw a picture of some pretty manicures. It inspired me to dust off the old cosmetics case and pull out some of my nail polishes. Ombre is really the thing right now, so I thought I would give it a go and do something with that on my nails. Here is how they turned out:
I first applied 2 coats of base coat. My favourite colour is blue, so I used two different shades of blue and then faded into a green applied in stripes on a cosmetic sponge, then dabbed onto the nail. I put a glitter polish over the entire nail after, with a second coat at the bed of the nail. Its all finished with a top coat. I really like the way it turned out.
Here are the products I used:
I love the Pro-FX base coat and top coat. My nails are the healthiest they have ever been since using the base coat. I never thought it would make a difference, but it does. And my nails don't stain when removing the polish as much. The nailpolish colours are: Pier 17 (dark blue, NYC), Blue Me Away (medium blue, Sally Hansen). High Line Green (green, NYC). I bought all the products at WalMart.
Well, thats all for today. I will be back this weekend with a couple paper craft projects to show you. :)
See you then...
Cat
I first applied 2 coats of base coat. My favourite colour is blue, so I used two different shades of blue and then faded into a green applied in stripes on a cosmetic sponge, then dabbed onto the nail. I put a glitter polish over the entire nail after, with a second coat at the bed of the nail. Its all finished with a top coat. I really like the way it turned out.
Here are the products I used:
I love the Pro-FX base coat and top coat. My nails are the healthiest they have ever been since using the base coat. I never thought it would make a difference, but it does. And my nails don't stain when removing the polish as much. The nailpolish colours are: Pier 17 (dark blue, NYC), Blue Me Away (medium blue, Sally Hansen). High Line Green (green, NYC). I bought all the products at WalMart.
Well, thats all for today. I will be back this weekend with a couple paper craft projects to show you. :)
See you then...
Cat
Sunday, September 18, 2011
Another Nail Art pic
While I haven't had much creativity for anything to do with paper lately, I've been under the weather the last few days, so I decided to treat myself and give myself a manicure. I was pretty sick Friday night with a fever, but I sat up anyway and painted my nails. Here's a picture of how they turned out. I think this would be a good one to do for the Christmas holidays. I have an idea on how to do my nails for halloween, so when I do them for that I'll post another picture.
The gold was more like sparkles so I put a couple coats of yellow on first, then a couple coats of the gold. Let that dry completely (I have a spray that accelerates drying). The I cut masking tape in large circles and taped off the bottom half of the nails, then painted the top half with red. Let that dry and then used my embossing stylus and dipped the tip into the nailpolish to make the dots. It was fairly easy to do.
So that's all I have for today. Once I get over this cold I want to do some cards. I've bought so many new stamps that I haven't even looked at for a long time. Plus this new job is taking up waaaayyyy too much of my time. I've only been there a month and already I've had to stay late 2 or 3 nights each week. I'm not impressed.
Anyway, talk to you later, and have a great weekend!
Cat
The gold was more like sparkles so I put a couple coats of yellow on first, then a couple coats of the gold. Let that dry completely (I have a spray that accelerates drying). The I cut masking tape in large circles and taped off the bottom half of the nails, then painted the top half with red. Let that dry and then used my embossing stylus and dipped the tip into the nailpolish to make the dots. It was fairly easy to do.
So that's all I have for today. Once I get over this cold I want to do some cards. I've bought so many new stamps that I haven't even looked at for a long time. Plus this new job is taking up waaaayyyy too much of my time. I've only been there a month and already I've had to stay late 2 or 3 nights each week. I'm not impressed.
Anyway, talk to you later, and have a great weekend!
Cat
Sunday, September 04, 2011
ATC Card Swap
Hello! Well, I've been very negligent in keeping this blog up over the last 4 months or so. It seemed that when my back problems started I lost my umph! Well, I haven't gotten it back totally, but I did make something a while ago that I thought turned out really pretty. I've been involved in the Stampin' Canada online community for a few years now. They are a great bunch of people and very fun to hang out with. I hosted the first ATC swap on SC a few months back and it was a lot of fun and turned out to be a nice success. It really gave us all a chance to work well outside our comfort zones. Wendy decided to host this next ATC swap and the theme is "the nature of things". It took me a while to come up with an idea, but one finally gelled in my mind. Here is a picture of how it turned out:
The picture really isn't that great and doesn't show the detail very well. I was quite pleased with the results, especially since I haven't had the inspiration to create much lately.
Well, that's all I have for today. I have a craft date with my niece today over Skype. That should be fun.
Talk to you later...
Cat
The picture really isn't that great and doesn't show the detail very well. I was quite pleased with the results, especially since I haven't had the inspiration to create much lately.
Well, that's all I have for today. I have a craft date with my niece today over Skype. That should be fun.
Talk to you later...
Cat
Sunday, August 14, 2011
Disappointed and a bit of a rant...
Rob and I went to a restaurant Friday night to celebrate my new job. It use to be (emphasis on "use to be") my favourite restaurant. The last time we were there was about a year ago. My husband's meal at that time was not good. He usually orders the mussels in tomato sauce as an appetizer and he had so many dead ones and lots of broken shells in the sauce that he almost chipped a tooth on one. As his main course, he ordered the special (which sounded really good). It was mixed seafood in a phyllo pastry. Well, the seafood was so over cooked and it was way too salty. He ate about half of the entree because he really hungry because we had to wait about 45 minutes for our meal, but that's all he could stomach. He mentioned it to the owner's wife when we were leaving and the waitress was like "well, he ate half of it" thinking we were trying to get the meal for free. We ate at that restaurant at least once a month and it seemed every time we went, the food quality dropped each time. For my husband, that was the last time he wanted to go. On the flip side, I hadn't had a bad meal there at all. Up until Friday. I'm so disappointed. I loved the stuffed Calamari in champagne mustard sauce. I loved it so much, that rather than order it in the appetizer size, I decided to get the full entree size this time. Well, it was so over cooked, it was like trying to eat a rubber band. And the sauce didn't have any mustard taste at all - and I highly doubt they used champagne in it too. All I could taste was pepper. The stuffing was originally made with ground chicken, pinenuts, and leeks. There were hardly any pinenuts and no leeks at all. As an appetizer I had the dolmades. It had a sauce (I can't remember the name) that was a creamy lemon. It was good. But, my soup was a greek chicken & rice, which is usually a cream soup with lemon. Well, it tasted like they used the sauce from the dolmades as the soup base and just threw in some chopped chicken and rice and watered it down a bit. Rob ordered the mussels in tomato sauce again, and of course, he had a whole bunch of dead ones and 3 or 4 pieces of broken shell - AGAIN. Even after we told the waitress what had happened the last time. His meal was ok (mousaka), but again, they changed the recipe and it wasn't as good as the original.
I understand trying to cut costs, but really, if it means that you're providing lesser quality, is that really what a restaurant wants to do. I don't think this restaurant is going to last much longer. The clientelle was slowly building, and the time before last when we were there, they had a full house. Friday night - not so much. They had three tables (including us) and 5 wait staff. It irritates me a little, since we would talk to the owner's wife all the time when we were there and let her know that we weren't complaining and wanted to just give them some feedback so they could make it better and that we actually really liked the food for the most part. Just seemed the last few times, all she had was excuses each time we mentioned something that was a little off. The only reason Rob agreed to go was because the first restaurant we went to had too long of a wait time to get a table and because I really liked the food at the greek place. Well, unfortunately, I didn't enjoy my meal this time and I won't be going back and they've lost a couple of patrons.
That's it for today.
Cat
I understand trying to cut costs, but really, if it means that you're providing lesser quality, is that really what a restaurant wants to do. I don't think this restaurant is going to last much longer. The clientelle was slowly building, and the time before last when we were there, they had a full house. Friday night - not so much. They had three tables (including us) and 5 wait staff. It irritates me a little, since we would talk to the owner's wife all the time when we were there and let her know that we weren't complaining and wanted to just give them some feedback so they could make it better and that we actually really liked the food for the most part. Just seemed the last few times, all she had was excuses each time we mentioned something that was a little off. The only reason Rob agreed to go was because the first restaurant we went to had too long of a wait time to get a table and because I really liked the food at the greek place. Well, unfortunately, I didn't enjoy my meal this time and I won't be going back and they've lost a couple of patrons.
That's it for today.
Cat
Tuesday, August 09, 2011
So, I haven't had any crafting juice lately....
I just haven't felt like doing anything with my paper and stamps lately. What I have been doing is reading a few blogs and websites about sustainable living and making/growing your own food. I got the bug last year in the fall when I decided to try my hand and canning some jellies made from fruit grown in my neighbourhood. It was a blast. Over the winter, I've learned to make bread. Its really easy and now my bread turns out every time. I've also been reading on how to try and cut my food costs. Some of you might know that I'm not working right now. I've been unemployed since early last spring so anything that I can do to reduce my household costs is something I need to look at closely right now. One thing I've been exploring is cheaper cuts of meat. The methods I've learned are so easy. Most of the time its either marinating or long, slow cooking, so this has become a way to prepare tasty meals with the less expensive, and usually tougher, cuts of meat. I happened to be watching the food network this afternoon while taking a little break from my cheese making (that will be another post in the near future), and watched two different programs. The first program was Michael Smith's Chef At Home. He made a stew that look so good with a chuck roast. The one ingredient that was highlighted in the stew was beer. Then I watched another show right after that called Glutton For Punishment (can't remember the host's name) and they were highlighting Hawaiian coffee. They showed a recipe for braised short ribs using coffee and cocoa. It looked so good. Well, to make a long story short, I had a huge blade steak in the freezer that I was wondering what to do with. So I decided to make a stew incorporating the ideas from the two shows. How did it all turn out you ask? It was delicious. I paired it with the dark rye bread I made today. The dark flavour from the rye bread matched the stew perfectly. Here's a little picture to get your taste buds going:
Too bad you can't smell it because it made the house smell so good. My husband was super impressed with the meal. Here's the recipe for the stew:
Cat's Beef Stew
1 large blade steak or two small (about 1.5 - 2.0 lbs meat) cubed into about 1" chunks and patted dry (you can use whatever cut of meat you have on hand - I just happened to have blade steaks)
2 large carrots cut into bite size chunks
1 medium onion, diced
2 cloves garlic, finely chopped
1 large potato, peeled and grated
2 celery stalks, chopped
2-3 Tbsp canola oil (for searing the meat)
1 tsp dried rosemary
2 tsp dried thyme
1 cup beer (dark beer or stout is best, but I just used a lager that I had in the fridge)
2 cups beef broth/stock (mine had salt so I omitted adding any more salt)
1 cup cold left over coffee (make an extra cup in the morning and use it for the stew)
1-2 bay leafs
Salt & pepper to taste
2 Tbsp flour
2 Tbsp canola oil
1 can tomato paste or 1/2 cup leftover tomato/spaghetti sauce (which is what I used)
In a heavy bottom 4qt pot, heat 2 or 3 Tbsp oil on medium high heat. Add the beef to the pot making sure it is only a single layer. Brown all sides of the meat cubes. Do the meat in batches if necessary, making sure the pan stays at medium to high heat to sear and brown the meat. You want the meat juices to caramelize and leave those little brown bits in the bottom of the pan. Keep the meat aside in a separate bowl once browned. Add the onions and lower the heat to medium. Sweat the onions so that it picks up all the brown from the pan. Add the garlic, tomato paste, carrots, and celery and cook for a minute or two to cook the garlic. Add the meat back to the pot along with the shredded potato, the liquids, and your spices. The shredded potato will cook down and sort of dissolve into the stew and thicken the liquid. Reduce heat to low and let simmer for at least an hour, stirring occasionally as the ingredients will sink to the bottom of the pot. Once it has simmered for about an hour, stir 2 Tbsp of oil into 2 Tbsp of flour and slowly pour this into the stew while stirring so that you don't get any lumps. This will thicken the stew if the potato hasn't thickened it enough. Cook another 15 minutes to make sure the flour is cooked and serve.
I think this is such an easy and versatile recipe since you can use whatever cut of beef you have on hand; you can switch up the herbs & spices; and you use whatever vegetables you have in the fridge. I was going to add some kale (collard greens), but I forgot. I think next time I make it I'm going to add a little worchestshire sauce and maybe a little dijon mustard just to see how that tastes.
I really hope you try this stew. It was so delicious. And if you do, let me know how you liked it. :)
Talk to you later...
Cat
Too bad you can't smell it because it made the house smell so good. My husband was super impressed with the meal. Here's the recipe for the stew:
Cat's Beef Stew
1 large blade steak or two small (about 1.5 - 2.0 lbs meat) cubed into about 1" chunks and patted dry (you can use whatever cut of meat you have on hand - I just happened to have blade steaks)
2 large carrots cut into bite size chunks
1 medium onion, diced
2 cloves garlic, finely chopped
1 large potato, peeled and grated
2 celery stalks, chopped
2-3 Tbsp canola oil (for searing the meat)
1 tsp dried rosemary
2 tsp dried thyme
1 cup beer (dark beer or stout is best, but I just used a lager that I had in the fridge)
2 cups beef broth/stock (mine had salt so I omitted adding any more salt)
1 cup cold left over coffee (make an extra cup in the morning and use it for the stew)
1-2 bay leafs
Salt & pepper to taste
2 Tbsp flour
2 Tbsp canola oil
1 can tomato paste or 1/2 cup leftover tomato/spaghetti sauce (which is what I used)
In a heavy bottom 4qt pot, heat 2 or 3 Tbsp oil on medium high heat. Add the beef to the pot making sure it is only a single layer. Brown all sides of the meat cubes. Do the meat in batches if necessary, making sure the pan stays at medium to high heat to sear and brown the meat. You want the meat juices to caramelize and leave those little brown bits in the bottom of the pan. Keep the meat aside in a separate bowl once browned. Add the onions and lower the heat to medium. Sweat the onions so that it picks up all the brown from the pan. Add the garlic, tomato paste, carrots, and celery and cook for a minute or two to cook the garlic. Add the meat back to the pot along with the shredded potato, the liquids, and your spices. The shredded potato will cook down and sort of dissolve into the stew and thicken the liquid. Reduce heat to low and let simmer for at least an hour, stirring occasionally as the ingredients will sink to the bottom of the pot. Once it has simmered for about an hour, stir 2 Tbsp of oil into 2 Tbsp of flour and slowly pour this into the stew while stirring so that you don't get any lumps. This will thicken the stew if the potato hasn't thickened it enough. Cook another 15 minutes to make sure the flour is cooked and serve.
I think this is such an easy and versatile recipe since you can use whatever cut of beef you have on hand; you can switch up the herbs & spices; and you use whatever vegetables you have in the fridge. I was going to add some kale (collard greens), but I forgot. I think next time I make it I'm going to add a little worchestshire sauce and maybe a little dijon mustard just to see how that tastes.
I really hope you try this stew. It was so delicious. And if you do, let me know how you liked it. :)
Talk to you later...
Cat
Sunday, July 03, 2011
In a slump...
I've been trying to think of something crafty to do, but just haven't had any inspiration come to me lately. My back has been well enough for over a week for me to get back into my craft room and do something, but all that seems to happen is that I end up surfing the web for some ideas. So I figured I'd take a look at all my digital supplies to see if that would spark any ideas. Not really, but I did find a pretty scrapbook kit that I haven't used yet. I decided to use it to do a page about my dad. He'll be gone 10 years this coming September and I miss him a lot. Its not a very fancy page, but its a start. I have a bunch of pictures that I scanned from an old photo album my Mom has. Mostly pictures of us kids when we were little. But there were also some of my dad's retirement party. That's where this picture was taken and it was 18 years ago that my father retired.
The kit is called La Creme from 300dpi.com. The font I used to do the journaling is Juice ITC. The picture frame was created using stock frames in PSPX and then adding borders, and then finally bevelling the outside border. The little curlicues on the frame are elements from the kit. I used a stock filter to change the photo to a sepia tone picture to match the kit.
So thats all I have for now.
See you later...
Cat
The kit is called La Creme from 300dpi.com. The font I used to do the journaling is Juice ITC. The picture frame was created using stock frames in PSPX and then adding borders, and then finally bevelling the outside border. The little curlicues on the frame are elements from the kit. I used a stock filter to change the photo to a sepia tone picture to match the kit.
So thats all I have for now.
See you later...
Cat
Sunday, June 19, 2011
Just the cutest dog in the whole world!
I was going through some pictures on one of my sd cards and I came across this picture of my little girl Mitzy. She is soooooo cute. Here she is sitting on my lap while I was doing something on the computer. I just had to share this picture.
Just look at that face! That's love with fur!
Cat
Just look at that face! That's love with fur!
Cat
Friday, June 17, 2011
Another Nail Art attempt...
I've been having problems sleeping the last couple nights, so I've been watching you-tube videos on nail art. I tried out one of the tutorials because it looked so pretty and I had the basic colours and embellishements. Here's a picture of how it turned out.
The base blue needs to be lighter, but this is what I had already. Basically, you put on your base coat colour, then with a little darker colour (purple in this case) sponge on some colour about 1/2 way down the nail, then with the darkest colour (cobalt blue) just sponge the tip. This gives a nice gradient effect. I let my nails dry, then I put glitter polish over it, concentrating the glitter near the tip of the nail at the darkest colour and let that dry. I dug out some sequins I have and used the little centres for glitter and some of my tiny rhinestones. To attach the little sequins, I used a wooden skewer tip dipped in a little top coat then touched the sequin/rhinestone and placed it on my nail. I guess I should mention, I put a top coat on and was putting the sequins & rhinestones on while it was still wet. Once I got everything in place and the way I liked it, I put on another layer of the top coat to seal the sequins and rhinestone.
There are thousands of you-tube videos on nail art and I'm finding it fun to have pretty nails again. Its been so long since I've grown my nails out. My old nail polish is getting used again. :)
Thanks for stopping by. I'll be posting up a few past projects this weekend, so come by again and take a peek. I think I might actually get into my craft room this weekend and try do a couple scrapbook pages. I have a couple ideas floating around and there's a couple sketches I want to give a try.
Talk to you later...
Cat
The base blue needs to be lighter, but this is what I had already. Basically, you put on your base coat colour, then with a little darker colour (purple in this case) sponge on some colour about 1/2 way down the nail, then with the darkest colour (cobalt blue) just sponge the tip. This gives a nice gradient effect. I let my nails dry, then I put glitter polish over it, concentrating the glitter near the tip of the nail at the darkest colour and let that dry. I dug out some sequins I have and used the little centres for glitter and some of my tiny rhinestones. To attach the little sequins, I used a wooden skewer tip dipped in a little top coat then touched the sequin/rhinestone and placed it on my nail. I guess I should mention, I put a top coat on and was putting the sequins & rhinestones on while it was still wet. Once I got everything in place and the way I liked it, I put on another layer of the top coat to seal the sequins and rhinestone.
There are thousands of you-tube videos on nail art and I'm finding it fun to have pretty nails again. Its been so long since I've grown my nails out. My old nail polish is getting used again. :)
Thanks for stopping by. I'll be posting up a few past projects this weekend, so come by again and take a peek. I think I might actually get into my craft room this weekend and try do a couple scrapbook pages. I have a couple ideas floating around and there's a couple sketches I want to give a try.
Talk to you later...
Cat
Monday, June 13, 2011
Not exactly a paper craft...
But I had a little bit of time to kill today so I decided to give myself a manicure. I usually have my nails cut short, but since I haven't been doing to much because of my back/hip problems, my nails have grown quite a bit in the last month. I wanted something a little funky and out of the box for what I usually do (plain colours usually in the pink/red range or a french manicure). This is what I came up with:
I bought some Wet&Wild nail polish the other day when I was at Walmart just because its so cheap. I thought that if I didn't like the way it looked, at least I didn't waste a bunch on money on nail polish I would never wear again. I like the way this turned out. Now, I'm wondering if there are nail stencils out there. I just may let my nails grow a bit. But they're such a pain to type with... :)
Well, that's as far as I got for creativity for now. I've been sketching out a new project that I want to get into. I have some photos of projects I completed before my back issues that I want to edit and post later (hopefully tomorrow or Wed).
That's all for now. Talk to you later...
Cat
I bought some Wet&Wild nail polish the other day when I was at Walmart just because its so cheap. I thought that if I didn't like the way it looked, at least I didn't waste a bunch on money on nail polish I would never wear again. I like the way this turned out. Now, I'm wondering if there are nail stencils out there. I just may let my nails grow a bit. But they're such a pain to type with... :)
Well, that's as far as I got for creativity for now. I've been sketching out a new project that I want to get into. I have some photos of projects I completed before my back issues that I want to edit and post later (hopefully tomorrow or Wed).
That's all for now. Talk to you later...
Cat
Thursday, June 09, 2011
Back Issues Update
I'm still recuperating from my back issues. What happened was that, basically, I sprained my sacroiliac joint. That's the joint that joins the hip to the spine. The inflammation and the pain in the joint has gone, but I'm still having some minor issues with the muscles in the rest of my back seizing up just because they had to work so hard to support my body. As a result also, I now have some pain in one of my knees just because of the way I had to twist my body and use my legs to get myself standing. If I had any inkling that I had to go the bathroom, I started to head there early because it was taking about 5 minutes to get up, walk to the bathroom, and then get seated again. What a chore! :) I don't wish this kind of torture on anyone.
So, needless to say, I haven't really been in the crafty mood for the last 3 weeks. I'm starting to get the urge to be in my room, but under doctor's orders, I'm not suppose to sit for long periods of time. So, I'll have to wait another week or two until I'm completely healed before I can really get some crafting time in.
Well, thanks for dropping by. I'll be back - hopefully in the not too distant future.
Take care...
Cat
So, needless to say, I haven't really been in the crafty mood for the last 3 weeks. I'm starting to get the urge to be in my room, but under doctor's orders, I'm not suppose to sit for long periods of time. So, I'll have to wait another week or two until I'm completely healed before I can really get some crafting time in.
Well, thanks for dropping by. I'll be back - hopefully in the not too distant future.
Take care...
Cat
Wednesday, June 01, 2011
Getting better...
I finally had a relatively pain-free day today. I was even able to take the dog for a short walk around the block this afternoon. Poor thing has been having to wait until hubby got home from work to go for her walk. Its been very draining fighting the pain and using my arms and legs to do everything. My arms & shoulders especially are so tired. I've been going to the chiropractor and massage and that has helped tremendously. Without that, I don't think I would have been able to walk at all these last couple weeks. I'm looking forward to when I'll be able to sit for more than a few minutes at a time and get back in my craft room. But, for now I'm just glad to rest and get better.
I'll be back soon...
Cat
I'll be back soon...
Cat
Thursday, May 19, 2011
Out of Commission...
Hey everyone. I just wanted to stop by and let you know that I'm not dead, but I feel like it. I put my back out on Sunday and haven't been able to walk for a couple days. I've only been able to sit up for about 5 minutes at a time with the aid of some groovy pain killers :). I have a few projects I want to post, so hopefully, I'll be able to do that early next week.
Take care & talk to you later...
Cat
Take care & talk to you later...
Cat
Friday, May 06, 2011
Last Card for I Brake for Digis...
This will be my last "official" DT card for I Brake For Digis. Unfortunately, Della has decided to close the shop. Its too bad. I really like the digis she has available, but if things aren't working out, then she needs to take care of her interests. The good thing is that the I Brake for Stamps shop is still going strong, so you can still get some of the images in rubber. And she just introduced some of the Freddie the Frog images in rubber. They're too cute.
I made this card for the challenge #26 over at the Brakefast Club (which will still be up and running as far as I am aware). The challenge is to use things on your card that start with the letter "B". Here's my card with all my "B"s:
Supplies:
Stamps: Wedding Cake (I Brake For Digis)
Papers: coloured cardstock (Recollections), white cardstock (Wausau Exact Index 110#)
Tools & Embellishments: butterfly trio punch (Martha Stewart), corner ticket punch (SU), embossing folder (Floral Flourishes & Vines set by Sizzix), "Love" brad (Dollar Store), mini flat back pearls (Recollections), rhinestones (Walmart), satin ribbon (Michaels), pop up adhesive squares (Dollar Store), Gloo (KI Memories), ATG, pencil crayons (Martha Stewart), oms, Star Dust glitter glue (Stickles)
The card is pretty basic in design. When I purchased my MS colouring pencils, the info on the box said that they are blendable pigment pencils. So I tested it out on the image. I first used a base of a light peachy skin colour, then near the bottom, I used a darker peach colour, then I used brown along the bottom of the layers of the cake. I guess I'm not that good at blending because I had to go back in with my oms and a blending stump to smooth out the colours and blend them to get the lines to blend away. But I do like the way the colour graduates to a darker colour. The last thing I did was put some stickles on the image. So my "B"s for the challenge are: brown, bling, butterflies, and brads. I hope you like it.
The IBFD shop is still open at the time I am writing this post. If you're at all interested in the image I used for this card, or any of the other images, hurry - no, RUN! - over to the shop to snag it before they're gone for good. Della didn't have a specific time/day she was going to shut down the site. The 10% off discount code is also still available in my sidebar and still valid. Don't miss out on your last chance to get some of the great digis offered in the IBFD shop.
Well, I had a great time working with Della - she's so nice. And I loved working with the images I got to use for my DT assignments. Good luck to the rest of the DT team and I'm sure I'll see you around the blogosphere. :) I still have a ton of I Brake for Stamps rubber stamps I haven't had a chance to play with yet, so I'll still participate in the occasional challenge over at The Brakefast Club.
Take care & talk to you later...
Cat
I made this card for the challenge #26 over at the Brakefast Club (which will still be up and running as far as I am aware). The challenge is to use things on your card that start with the letter "B". Here's my card with all my "B"s:
Supplies:
Stamps: Wedding Cake (I Brake For Digis)
Papers: coloured cardstock (Recollections), white cardstock (Wausau Exact Index 110#)
Tools & Embellishments: butterfly trio punch (Martha Stewart), corner ticket punch (SU), embossing folder (Floral Flourishes & Vines set by Sizzix), "Love" brad (Dollar Store), mini flat back pearls (Recollections), rhinestones (Walmart), satin ribbon (Michaels), pop up adhesive squares (Dollar Store), Gloo (KI Memories), ATG, pencil crayons (Martha Stewart), oms, Star Dust glitter glue (Stickles)
The card is pretty basic in design. When I purchased my MS colouring pencils, the info on the box said that they are blendable pigment pencils. So I tested it out on the image. I first used a base of a light peachy skin colour, then near the bottom, I used a darker peach colour, then I used brown along the bottom of the layers of the cake. I guess I'm not that good at blending because I had to go back in with my oms and a blending stump to smooth out the colours and blend them to get the lines to blend away. But I do like the way the colour graduates to a darker colour. The last thing I did was put some stickles on the image. So my "B"s for the challenge are: brown, bling, butterflies, and brads. I hope you like it.
The IBFD shop is still open at the time I am writing this post. If you're at all interested in the image I used for this card, or any of the other images, hurry - no, RUN! - over to the shop to snag it before they're gone for good. Della didn't have a specific time/day she was going to shut down the site. The 10% off discount code is also still available in my sidebar and still valid. Don't miss out on your last chance to get some of the great digis offered in the IBFD shop.
Well, I had a great time working with Della - she's so nice. And I loved working with the images I got to use for my DT assignments. Good luck to the rest of the DT team and I'm sure I'll see you around the blogosphere. :) I still have a ton of I Brake for Stamps rubber stamps I haven't had a chance to play with yet, so I'll still participate in the occasional challenge over at The Brakefast Club.
Take care & talk to you later...
Cat
Wednesday, May 04, 2011
Long time no see!
Hi everyone! Well, I've been MIA for a couple weeks here. Life is taking its toll and I haven't been keeping up with blogging lately. I finally said enough is enough and I took some time to create something. It felt really good to play with my paper again. I have two cards I want to show you.
This first card is one I started a couple weeks ago for the Brakefast Club Challenge #24. I got as far as punching the edge along the patterned paper and printing off the image. But that's all I got done. So tonight I picked everything up again and finally finished the card. Its amazing how quickly it came together. Sometimes, a card can take me hours - yes hours... I've been known to spend 8 hours making one card - and this one came together in about 40 minutes once I pulled out the papers and tools. Here's the card:
Supplies:
Stamps: Rosebud Vase (I Brake For Digis)
Papers: patterned paper (K&Company), linen texture cardstock (American Crafts), white cardstock (Wausau Exact Index 110#)
Tools & Embellishments: colouring pencils (Martha Stewart), oms, ribbon (Michaels), flat back pearls (Recollections), Loops border punch (Martha Stewart), Gloo (KI Memories), pop up adhesive squares (Dollar Store), Glue Dots, ATG
I don't remember who the patterned paper is made by - it was in my scraps. The image is coloured with pencil crayons & oms. I've been experimenting with using different colours as a shadow around the image other than the usual grey. For this image, I used a pinky peach colour and I don't think the picture shows it well, but it does look nice with all the pink paper and ribbon.
The second card came together really quickly as well. I always told people I worked well under pressure, so I think I actually proved that to myself tonight. This card really only took about an hour to do. I made this card for the Brakefast Club challenge #25: One for the Kids. Here it is:
Supplies:
Stamps: Jack in the Box (I Brake for Digis)
Papers: Digital Paper (Jeanelle Paige - A Cherry on Top), Presentation paper (Epson), coloured cardstock (Recollections), white cardstock (Wausau Exact Index 110#)
Tools & Embellishments: Pencil crayons (Martha Stewart), oms, buttons (Walmart), Cornice edge punch (Martha Stewart), Corner decorative scissors (Fiskars), Gloo (KI Memories), pop up adhesive squares (Dollar Store), ATG, red Stickles
I changed the line colours of the image in my graphics program to blue so that it would match the papers I chose. After colouring it with my Martha Stewart pencil crayons, again, I used a colour other than grey for the shadow around the image. I used a light bluish green that I thought complimented the colours nicely. I used red Stickles on the crown to give it a little zing. Other than that, the card is pretty straight forward.
Well, its pretty late here and I have an early start tomorrow. Thanks for popping by. I'll have another card or two to show you by the end of the week, so come and visit again. If you're interested in either of the images I used for my cards, they're available in the I Brake For Digis shop. Don't forget to grab your 10% discount code in the sidebar before you head off shopping.
See you later...
Cat
This first card is one I started a couple weeks ago for the Brakefast Club Challenge #24. I got as far as punching the edge along the patterned paper and printing off the image. But that's all I got done. So tonight I picked everything up again and finally finished the card. Its amazing how quickly it came together. Sometimes, a card can take me hours - yes hours... I've been known to spend 8 hours making one card - and this one came together in about 40 minutes once I pulled out the papers and tools. Here's the card:
Supplies:
Stamps: Rosebud Vase (I Brake For Digis)
Papers: patterned paper (K&Company), linen texture cardstock (American Crafts), white cardstock (Wausau Exact Index 110#)
Tools & Embellishments: colouring pencils (Martha Stewart), oms, ribbon (Michaels), flat back pearls (Recollections), Loops border punch (Martha Stewart), Gloo (KI Memories), pop up adhesive squares (Dollar Store), Glue Dots, ATG
I don't remember who the patterned paper is made by - it was in my scraps. The image is coloured with pencil crayons & oms. I've been experimenting with using different colours as a shadow around the image other than the usual grey. For this image, I used a pinky peach colour and I don't think the picture shows it well, but it does look nice with all the pink paper and ribbon.
The second card came together really quickly as well. I always told people I worked well under pressure, so I think I actually proved that to myself tonight. This card really only took about an hour to do. I made this card for the Brakefast Club challenge #25: One for the Kids. Here it is:
Supplies:
Stamps: Jack in the Box (I Brake for Digis)
Papers: Digital Paper (Jeanelle Paige - A Cherry on Top), Presentation paper (Epson), coloured cardstock (Recollections), white cardstock (Wausau Exact Index 110#)
Tools & Embellishments: Pencil crayons (Martha Stewart), oms, buttons (Walmart), Cornice edge punch (Martha Stewart), Corner decorative scissors (Fiskars), Gloo (KI Memories), pop up adhesive squares (Dollar Store), ATG, red Stickles
I changed the line colours of the image in my graphics program to blue so that it would match the papers I chose. After colouring it with my Martha Stewart pencil crayons, again, I used a colour other than grey for the shadow around the image. I used a light bluish green that I thought complimented the colours nicely. I used red Stickles on the crown to give it a little zing. Other than that, the card is pretty straight forward.
Well, its pretty late here and I have an early start tomorrow. Thanks for popping by. I'll have another card or two to show you by the end of the week, so come and visit again. If you're interested in either of the images I used for my cards, they're available in the I Brake For Digis shop. Don't forget to grab your 10% discount code in the sidebar before you head off shopping.
See you later...
Cat
Wednesday, April 13, 2011
The Brakefast Club Challenge #23 - Three
I'm back with a new project to show you all. That was quick eh? (Yes, I'm Canadian...) This week's challenge over at the Brakefast Club is to use 3 of something on your project. Three buttons, three different papers... you get the gist of it. I had an Easter card to make for a fellow member on the Stampin' Canada board, so I kinda cheated and combined both projects into one. Here is my card for this week's challenge:
Supplies
Stamps: Lilies (I Brake For Digis), sentiment (SU! Well Scripted set)
Papers, coloured cardstock (SU!), white cardstock (Wausau Exact Index 110#)
Tools & Embellishments: Craft Robo, Elegant Bouquet embossing folder (SU!), embossing ink (VersaMark), clear embossing powder (Stampendous), Copic markers, Liquid Pearls, Onyx ink pad (Stampology - Autumn Leaves), embossing stylus
To create the background on the yellow cardstock, I first embossed it with the Elegant Bouquet embossing folder. Then I took my VersaMark re-inker and used a paint brush to paint on the ink over the design. Initially, I tried to use the ink pad and rub it on so that it only hit the high spots, but that was a disaster. Painting the ink on worked sooooo much better. Then I poured on the embossing powder, shook off the excess, and hit it with the heat gun. I like the way it turned out. I cut my "faux nesties" with my CraftRobo. To finish off the image, I put three little "pearls" with the Liquid Pearls on the bottom side. Its pretty simple in design, but I really like the colour combo. And it also fits into the challenge - 3 colours (also the 3 little "pearls" works too).
Thanks for stopping by today. I'll be back soon with something new to show you again.
Take care...
Cat
Supplies
Stamps: Lilies (I Brake For Digis), sentiment (SU! Well Scripted set)
Papers, coloured cardstock (SU!), white cardstock (Wausau Exact Index 110#)
Tools & Embellishments: Craft Robo, Elegant Bouquet embossing folder (SU!), embossing ink (VersaMark), clear embossing powder (Stampendous), Copic markers, Liquid Pearls, Onyx ink pad (Stampology - Autumn Leaves), embossing stylus
To create the background on the yellow cardstock, I first embossed it with the Elegant Bouquet embossing folder. Then I took my VersaMark re-inker and used a paint brush to paint on the ink over the design. Initially, I tried to use the ink pad and rub it on so that it only hit the high spots, but that was a disaster. Painting the ink on worked sooooo much better. Then I poured on the embossing powder, shook off the excess, and hit it with the heat gun. I like the way it turned out. I cut my "faux nesties" with my CraftRobo. To finish off the image, I put three little "pearls" with the Liquid Pearls on the bottom side. Its pretty simple in design, but I really like the colour combo. And it also fits into the challenge - 3 colours (also the 3 little "pearls" works too).
Thanks for stopping by today. I'll be back soon with something new to show you again.
Take care...
Cat
Tuesday, April 12, 2011
Blog Candy Update
I just got a message from Laura and she did get the blog candy - yay! I'm always worried about sending things through the mail. If they get lost, there's really no way to recover the items. So anyway, here's what she said:
"I did get the package. Thank you so much.I love everything you sent.I can use it all. thanks again..."
I'm glad she likes what was in the package. Ok, Laura, lets see what you make out the shtuff!
Till next time...
Cat
"I did get the package. Thank you so much.I love everything you sent.I can use it all. thanks again..."
I'm glad she likes what was in the package. Ok, Laura, lets see what you make out the shtuff!
Till next time...
Cat
Sunday, April 10, 2011
The Brakefast Club Challenge # 22 - Primary Colours
Hi everyone! Today I want to show you my project for the Brakefast Club challenge that ran last week. I know I'm a little late with this, but this project took waaaaayyyy longer than I had expected. The challenge was to create something using primary colours. I love bright colours, and I thought this would be a great combination for a project that had something to do with kids. So I decided to do a scrapbook page with pictures of my niece. Here it is:
Supplies:
Stamps: Beach Toys (I Brake for Digis)
Papers: Coloured cardstocks (Recollections), Domtar Cougar 130# white cardstock (picture matts), Wausau Exact Index 110# white cardstock (journalling), Matte finish photo paper (Kodak), Glossy finish photo paper (Canon), Digital patterned paper (Summertime Designs)
Tools & Embellishments: Craft Robo, Silhouette cutting files, Sharpie Markers, Zig Memory Writer markers, red, green, & gold Stickles, Mod Podge Dimensional Magic, paper crimper, plastic wave template, foam letter stickers, rhinestones, pop dots
The title is some foam letter stickers I've had in my stash for about 5 years (finally used them - yay!) and all the other embellishments were cut with my CraftRobo. The sunglasses have Mod Podge dimensional magic on the lenses to make them shiny. I added a little bit of stickles on the rims to glam them up a little bit. The digi stamp was coloured with Sharpie markers and traced & cut on my CraftRobo. I also created a white mat around it so it would stand out a bit and adhered it to the page with pop dots. The patterned paper is a digi paper from Summertime Designs and cut in a large square scallop on my CraftRobo. The little flipflops (Silhouette cutting file) have rhinestones glued to the strap at the toe. I used a plastic template to trace and cut the wave design, and I used my wavy paper crimper on the banner going across the page. The journalling block is, again, another Silhouette shape.
Here are a few close up pics of the different elements on the page:
Well, that's all I have for today. You can pick up the Beach Toys digi stamp in the I Brake For Digis shop. Its a great stamp to have for all those summer projects I know you'll all be creating here shortly. :) Don't forget to grab the discount code in my sidebar before you head off shopping. Another challenge starts today over at the Brakefast Club. So pop on over there too to join in this week's fun.
Take care & talk to you later...
Cat
Supplies:
Stamps: Beach Toys (I Brake for Digis)
Papers: Coloured cardstocks (Recollections), Domtar Cougar 130# white cardstock (picture matts), Wausau Exact Index 110# white cardstock (journalling), Matte finish photo paper (Kodak), Glossy finish photo paper (Canon), Digital patterned paper (Summertime Designs)
Tools & Embellishments: Craft Robo, Silhouette cutting files, Sharpie Markers, Zig Memory Writer markers, red, green, & gold Stickles, Mod Podge Dimensional Magic, paper crimper, plastic wave template, foam letter stickers, rhinestones, pop dots
The title is some foam letter stickers I've had in my stash for about 5 years (finally used them - yay!) and all the other embellishments were cut with my CraftRobo. The sunglasses have Mod Podge dimensional magic on the lenses to make them shiny. I added a little bit of stickles on the rims to glam them up a little bit. The digi stamp was coloured with Sharpie markers and traced & cut on my CraftRobo. I also created a white mat around it so it would stand out a bit and adhered it to the page with pop dots. The patterned paper is a digi paper from Summertime Designs and cut in a large square scallop on my CraftRobo. The little flipflops (Silhouette cutting file) have rhinestones glued to the strap at the toe. I used a plastic template to trace and cut the wave design, and I used my wavy paper crimper on the banner going across the page. The journalling block is, again, another Silhouette shape.
Here are a few close up pics of the different elements on the page:
Well, that's all I have for today. You can pick up the Beach Toys digi stamp in the I Brake For Digis shop. Its a great stamp to have for all those summer projects I know you'll all be creating here shortly. :) Don't forget to grab the discount code in my sidebar before you head off shopping. Another challenge starts today over at the Brakefast Club. So pop on over there too to join in this week's fun.
Take care & talk to you later...
Cat
Subscribe to:
Posts (Atom)


