Now, the craft sale. It wasn't as successful as I had hoped. I did sell a couple things, but only a couple things. I sold $41 worth of stuff and my table fees were $35. I haven't figured out what my material costs were yet for the stuff I sold (I do have all the info to do - just haven't yet), but I'd say I probably just broke even for the stuff I sold. Now, all I have to do is sell the stuff I have left to make back the money I spent on supplies. I think there was probably only about 100 people (and probably 40 of them were kids and men - they don't buy stuff at these things). For the first couple hours, I was the only one who sold anything. That was fun. The only other thing that sold were home dec items. One lady had a table with sofa pillows and pillow covers and she was really the only other person who sold things. I was talking to a couple other vendors at the craft sale and they said that this particular one doesn't do that well because of the location, but that there are two others in the south end that do well. So I will be booking tables for those ones for next month. I'll do up some Halloween and Thanksgiving items and see how well it goes.
So, here are a couple more pictures of some of the things I had up at the craft sale. This first card is one of my favourites I made this last month. Its a free colouring page I downloaded and coloured with copics. I added glitter to the tail feathers. The background cardstock is embossed using a Fiskars texture plate with a feather design. Its a fairly simple card, but its very vibrant IRL.

Supplies:
Cardstock: Recollections brand
Ribbon: Dollar store
Glitter: Craft Decor brand
Copic Markers
Fiskars feather texture plate
This next card is a variation on the previous one. Its the same image, but I wanted something different than the typical blue/green peacock. In person, this card is actually really nice if I do say so myself.

Supplies:
Cardstock: Recollections and Bazzil
Pattern paper: paper stack from Michaels
Stamps: Darcey Collection - Anna Griffin
Glitter: Craft Decor brand
Copic Markers
Another card design that I really like how it turned out is this next card. Again, its a downloaded colouring page. I tried to make a lot of masculine cards since most of my cards tend to be very feminine. I think this one really hit that target.

Supplies:
Cardstock: DCWV (brown), Dollar store (foil), Office Depot (cream & white)
Pattern paper: Graphic 45
Stamps: Studio G, SU!, Downloaded colouring page
Copic Markers
Fiskars Threading Water border punch
I did make a few altered items, but not that many. Here is one of the altered journals I made (I made 6 altogether). There is a matching pen, but I didn't take a picture of it. Again, I tried to make it more masculine. What is interesting about the stamp I used on this item is that the stamp is actually a soap stamp. I've been making soap for about 5 years and I was checking out the soap making supplies at Michaels one day and saw this stamp. It works excellent as a rubber stamp. What is also nice is that it was part of a set of 8 stamps for about $8.50. With their usual 40% off coupon you can get it for about $5. They have two different soap stamp sets and they both work great for stamping.

Supplies:
Cardstock: Stampin' Up
Pattern paper: DCWV
Stamps: Life of the Party soap embossing stamps
Ink: Colourbox black pigment ink
Stampendous black detail embossing powder
Martha Stewart Arch Lattice border punch
Fiskars Threading Water border punch
Ribbon: Michaels
The next cards are sets that I made using a 6"x6" One Sheet Wonder template from Verve Stamps. I made them very simple so that I could price them reasonably in a set. I made 4 sets in different colours, but I like this set the best:

Supplies:
Cardstock: Stampin' Up
Pattern paper: unknown
Stamps: Studio G
Ink: Stazon black
These two next card sets were made with another 6x6 OSW template by Susan Roberts. I only made two sets, but I made them a little more elaborate than the other ones.

Cardstock: Recollections
Pattern paper: paper stack from Michaels
Stamps: Lots of Thoughts - SU!
Ink: SU! Creamy Caramel
Ribbon: Walmart
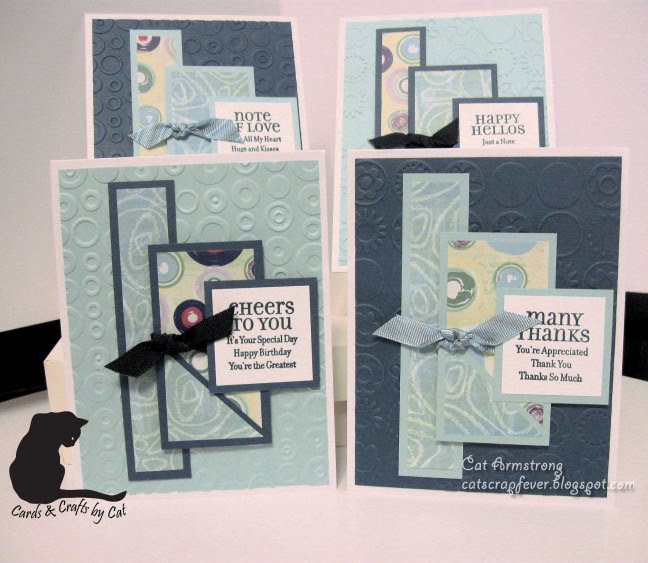
Supplies:
Cardstock: Stampin' Up
Pattern paper: Daisy D
Stamps: Lots of Thoughts - SU!
Ink: SU! Not Quite Navy
Ribbon: Walmart
The next altered item I made were coasters. I made round and square. I wanted to make tile coasters, but I didn't make it to Home Depot to see if they had the tumbled marble tiles, so I used cork ones I bought at the Dollar store and covered them with 130# coated cardstock (Domtar paper). These are the one's I like the best. I'm surprised at how well they actually turned out. I used the Adirondack alcohol inks to make the background (I've never used these inks before). I wasn't sure I'd like this colour combination, but it really looks like stone in real life.

Supplies:
Cardstock: Domtar 130# coated
Stamps: Garden Delight - Inkadinkado
Ink: Stazon black, Adirondack Alcohol inks (Butterscotch, Meadow, Slate)
Mod Podge
These next coasters are done using the same technique with the alcohol inks, but the colours came out way more intense than I had anticipated. Even using the blending solution didn't tone them down that much. You can just barely make it out in the picture, but I stamped dragonflies with gold ink over the background. They're kind of almost holographic looking. It looks cool in person.

Supplies:
Cardstock: Domtar 130# coated
Stamps: Life of the Party soap embossing stamps
Ink: Colourbox gold pigment ink, Adirondack Alcohol inks (Wild Plum, Stream, Currant)
Mod Podge
This next item was one of the items that sold at the craft sale. I actually sold two of these (to one of the other vendors). I made 6 of these altered note pads with a matching pen. I think they turned out really well. I created the cover from ideas I saw on various blogs to suit what I had for the note pads and dimensions.

Supplies:
Cardstock: Recollections
Patterned paper: paper stack from Costco
Ribbon: Michaels
RSVP pens
Sentiment is computer generated
Medallion designed & cut with my Craft Robo
This last item (you're probably getting bored by now) is an altered coaster/sticky note holder. I've seen these all over the place so I just adapted my design to what I had. I used the 130# coated cardstock as the base. I just cut squares and used my corner rounder, then covered the base with pp and decorated; attached the sticky notes and added a big paper clip. They were pretty easy to make and very quick, plus as an added bonus they use up your paper scraps.

I tried taking pictures of the beaded RSVP pens I made, but the patterned paper doesn't show up very well through the beads so I'm not going to bother posting a picture right now until I can get one that shows up well. Could be that I didn't use pp with a strong/dark enough pattern.
So that's all I have for now. I'm going to work on some Halloween & Thanksgiving stuff over the next couple weeks. I'll post pics as I go along.
Take care & talk to you later...
Cat