I'll have to settle for this template. Hopefully, its not too hard on the eyes. I might try a different colour scheme, but the layout is ok for now.
Come on Blogger - get your $h!t together!
Tuesday, February 22, 2011
Ack!!! My blog is still messed up...
And I can't seem to fix it. There must be something wrong with blogger or they changed something because everytime I try to edit the HTML I get a stupid error. I may have to go back to one of their templates until I can get it sorted out. Bummer.
Friday, February 18, 2011
IBFD - Brakefast Club Challenge #15 - Bare or Bear
This week's challenge at the BrakeFast Club is to create a card that either has a bear on it, or is bare - as in clean & simple. I'm not feeling the clean and simple thing theses days, especially since I've been making a lot of flowers to put on everything, so I had to settle for a bear. :) Here is the card I made for the challenge:
 Supplies:
Stamps: Buzzing Bee Bear (I Brake For Digis)
Papers: Wausau Exact Index 110#, Recollections cardstock, Gratitude papers/digital scrapbooking kit (Summertime Designs), matte finish brochure paper (Staples)
Tools & Embellishments: Waterfall & gold Stickles, home made flowers, CraftRobo, Copic markers, black sharpie marker, Scalloped Scallop edge punch (EK Success), Baby Kruffy font, small flower punch (Fiskars), small daisy punch (Fiskars)
I printed the image on Wausau cardstock and coloured it with my copic markers - pretty straight forward. I double matted it; the first mat is cut from the digital papers I had printed out and then the bottom mat is from plain Recollections cardstock that I used the Scalloped Scallop edge punch on. Luckily, I happened to get it lined up pretty much perfect and I had nice neat corner scallops on it. The background paper is also a digi paper from the scrapbooking kit I printed out. The sentiment is lettering I cut on my Craft Robo using the Baby Kruffy font out of the same patterned paper I used to mat the image. I also cut a mat for the lettering in white. It didn't show up that well, so I took a black sharpie marker an outlined the letters, and now it stands out better and makes it look more like paper piecing. Finally, I made the little flowers using a couple small Fiskars flower punches I had been neglecting. I used gold stickles for the centre of the flowers. The scrolls are Sizzix die images I recreated in my RoboMaster software and cut with my Craft Robo. The final touch was to use Waterfall Stickles to highlight the bumble bee's flight path.
So, I don't think I really I accomplished bare with this card. But, at least, I have a bear on it. :)
Take care and have a great weekend everyone!
Cat
A Day For Daisies First Ever BLOG HOP!!!
Hey everyone. Its the ADFD first ever blog hop. We're going to send you along an exciting trail to see some great works from the design team. You have a week to work your way through all the blogs, so take your time and visit (& comment) along the way. :)

Make sure you leave a comment at each stop. Anyone who leaves a comment at all the participant stops will be entered to win a set of images from the new releases today! Yay! And they are fantastic as usual. There are three sets to choose from. Here's a peek of this week's new images:


Aren't they great!? Don't forget that today also marks the start of a new challenge on the ADFD blog - Very Vintage. This is the card I made with the Vintage Rose Blooming image (available now in the ADFD shop).
 Supplies:
Stamps: Vintage Rose Blooming (A Day For Daisies), Hanging by a Thread set (stitching around edge - Technique Tuesday), How Do I Love Thee digital paper (CatScrapFever Designs)
Papers: Recollections cardstock, Domtar coated 200# ivory cardstock (base), Matte finish brochure paper (Staples), Wausau Exact Index 110# (main image printed on this)
Tools & Embellishments: CraftRobo, rhinestone corner sticker (Dollar Store), gold glitter glue (Studio G), homemade glimmer mist (DecoArts paint - Rich Espresso), crotchet ribbon (Dollar Store), ivory satin ribbon (Michaels), white Liquid Pearls, pencil crayons (Martha Stewart), oms, heat gun, black Stazon ink
The card itself is fairly simple in design. However, the little embellishments are where all the work was. I made the little roses out of scrap cardstock. I researched about 50 different ways they were done on different tutorials and you-tube videos. Once I figured I knew what I needed to do I created a cut file and cut them with my CraftRobo. I sprayed some of my homemade glimmer mist onto a piece of sponge and sponged the edges of all the flower pieces, let them try, and then assembled the flowers. They really are easy and once I get my craft room cleaned up, I want to do up a little video tutorial to show you how easy they are. The corner pieces were also cut on my CraftRobo. (I found the cut file on ukscrappers.com. They have thousands of free files there if you have a CraftRobo/Wishblade/Silhoulette. Its a great resource for cutting files.) Once cut from cream cardstock, I put gold glitter glue all over. I was impatient and used my heat gun to dry the glitter glue and it made the glitter glue bubble which was kind of a happy mishap because it gave it a really cool texture that you can't see in the picture. I hand cut the main image out after I coloured it using my Martha Stewart pencil crayons and oms. Again, I could have used my CraftRobo, but I already had the image printed, so I didn't want to reprint it with the cut&print feature on my CR because it uses more paper and I don't like to waste paper - even if it is fairly inexpensive. The Nestability shapes were cut on my CR and I used my "faux nestability" templates to emboss the edges to make them look even more like the real thing. I used my How Do I Love Thee valentine paper for the top layer just because it has a nice vintage look to it and it worked well with my colour scheme. I used the sponge again with my homemade glimmer mist around the edges to give it a little distressed look and some glimmer. I put small pearls on the scallops using white Liquid Pearls.
TIP: To get the Liquid Pearls to dome properly without the little "horns", I flicked the backside of the paper gently and that gets rid of those pesky little "horns".
Once the Liquid Pearls was dry, I used pop dots to adhere the image to the centre of the nestability shapes, and pop-dotted the focal piece to the cardfront.
I should mention that I also used the sponge and glimmer mist around the edges of the "stitched" cardstock as well. I love this colour of homemade glimmer mist - Rich Espresso. The "stitching" was done with a stamp and black stazon ink.
If you're following along the path of the blog hop, you should have arrived here from the talented Candy's blog. The next stop on the hop is the amazing Jen's blog. Don't forget to leave your comments along the way to be entered for the grand prize. :) If you miss a stop or get lost, you can head back to the ADFD blog and the list of participants for the blog hop will be posted there.
Have fun everyone!
Cat

Make sure you leave a comment at each stop. Anyone who leaves a comment at all the participant stops will be entered to win a set of images from the new releases today! Yay! And they are fantastic as usual. There are three sets to choose from. Here's a peek of this week's new images:


Aren't they great!? Don't forget that today also marks the start of a new challenge on the ADFD blog - Very Vintage. This is the card I made with the Vintage Rose Blooming image (available now in the ADFD shop).

Stamps: Vintage Rose Blooming (A Day For Daisies), Hanging by a Thread set (stitching around edge - Technique Tuesday), How Do I Love Thee digital paper (CatScrapFever Designs)
Papers: Recollections cardstock, Domtar coated 200# ivory cardstock (base), Matte finish brochure paper (Staples), Wausau Exact Index 110# (main image printed on this)
Tools & Embellishments: CraftRobo, rhinestone corner sticker (Dollar Store), gold glitter glue (Studio G), homemade glimmer mist (DecoArts paint - Rich Espresso), crotchet ribbon (Dollar Store), ivory satin ribbon (Michaels), white Liquid Pearls, pencil crayons (Martha Stewart), oms, heat gun, black Stazon ink
The card itself is fairly simple in design. However, the little embellishments are where all the work was. I made the little roses out of scrap cardstock. I researched about 50 different ways they were done on different tutorials and you-tube videos. Once I figured I knew what I needed to do I created a cut file and cut them with my CraftRobo. I sprayed some of my homemade glimmer mist onto a piece of sponge and sponged the edges of all the flower pieces, let them try, and then assembled the flowers. They really are easy and once I get my craft room cleaned up, I want to do up a little video tutorial to show you how easy they are. The corner pieces were also cut on my CraftRobo. (I found the cut file on ukscrappers.com. They have thousands of free files there if you have a CraftRobo/Wishblade/Silhoulette. Its a great resource for cutting files.) Once cut from cream cardstock, I put gold glitter glue all over. I was impatient and used my heat gun to dry the glitter glue and it made the glitter glue bubble which was kind of a happy mishap because it gave it a really cool texture that you can't see in the picture. I hand cut the main image out after I coloured it using my Martha Stewart pencil crayons and oms. Again, I could have used my CraftRobo, but I already had the image printed, so I didn't want to reprint it with the cut&print feature on my CR because it uses more paper and I don't like to waste paper - even if it is fairly inexpensive. The Nestability shapes were cut on my CR and I used my "faux nestability" templates to emboss the edges to make them look even more like the real thing. I used my How Do I Love Thee valentine paper for the top layer just because it has a nice vintage look to it and it worked well with my colour scheme. I used the sponge again with my homemade glimmer mist around the edges to give it a little distressed look and some glimmer. I put small pearls on the scallops using white Liquid Pearls.
TIP: To get the Liquid Pearls to dome properly without the little "horns", I flicked the backside of the paper gently and that gets rid of those pesky little "horns".
Once the Liquid Pearls was dry, I used pop dots to adhere the image to the centre of the nestability shapes, and pop-dotted the focal piece to the cardfront.
I should mention that I also used the sponge and glimmer mist around the edges of the "stitched" cardstock as well. I love this colour of homemade glimmer mist - Rich Espresso. The "stitching" was done with a stamp and black stazon ink.
If you're following along the path of the blog hop, you should have arrived here from the talented Candy's blog. The next stop on the hop is the amazing Jen's blog. Don't forget to leave your comments along the way to be entered for the grand prize. :) If you miss a stop or get lost, you can head back to the ADFD blog and the list of participants for the blog hop will be posted there.
Have fun everyone!
Cat
Thursday, February 17, 2011
Guess what's coming tomorrow!
ADFD first blog hop! Yup, I'm excited. I've never been part of a blog hop. So, starting tomorrow, get on over to the ADFD blog and start hopping. You'll have one week to finish the hop and at the end, there will be a draw from all the participants to win a set of images from the new release. That's fantastic! Looking forward to seeing everyone along the way. :)


Wednesday, February 16, 2011
Maintenance...
I'm doing a little work on my blog, so if things look a little wonky, it should only be temporary - I hope. :) Everything for my side bar is now at the bottom after all the posts. I'll have that fixed up in a day or two. So, please, don't let the "construction" keep you away. I will still be posting my regular stuff for you to see. :)
Monday, February 14, 2011
Valentine Gift to You
SORRY! THE FREE PAPER IS NO LONGER AVAILABLE.
Tuesday, January 25, 2011
I was busy making some Valentine's cards today and I needed a paper, but I didn't have one of the design I wanted, so I had to design it myself. I haven't taken a picture of the card yet, so I'll post that later this week, but I wanted to share the paper I designed. Here is a small preview of it:

I used a few "stock" brushes in PSPX and then typed in the poem "How do I Love Thee" over top, and then did a little more distressing and overlay blending. I really like how the paper turned out. Now, if you would like to receive a link to download the paper, use the contact me form in my sidebar, with the subject "How do I Love Thee" and provide a return email address, and I will send you the link to download this paper. The paper will be offered until February 14, 2011 and I'll keep this post on top. I'll delete the file after that date and it won't be available for download.
I hope you like the paper, and if you use it, I'd love to see your creations.
Take care...
Cat
Sunday, February 13, 2011
Just a Quick Reminder
I you want the link to download the How Do I Love Thee paper, you will need to email me before the end of tomorrow (use the contact form in my sidebar). After tomorrow, its gone. :)
Friday, February 11, 2011
ADFD New Release 02/11/11
Hi everyone! Its time again for another great release from ADFD. This week's images are, as usual, very pretty. You just can't go wrong with them. Here's a peek at the new release:


The card I made this week is in my usual style: simple and straight forward.
 Supplies:
Stamps: Daddy's Little Princess (A Day For Daisies), birthday sentiment (Michaels clear stamp)
Papers: Recollections cardstock, Wausau Exact Index 110#, Energy digital paper collection (Summertime Designs), Staples matte finish brochure paper
Tools & Embellisments: Prisma pencil crayons, oms, ribbon (dollar store), coral craft ink (unknown - dollar store), paper crimper (Fiskars), edge distresser tool (Heidi Swapp)
I really like using digital papers these days. There are thousands of talented designers out there and they put out some beautiful work. What I love about digital papers is that I never run out of a cherished design because as long as I have paper and ink to print with, I have another piece of that gorgeous paper. It really isn't as expensive as you think. How much do you pay for a piece of patterned paper at the craft store? Usually, anywhere from $0.50 to $1.99 for name brand designer papers (plus your time and gas running around to the craft stores). Even if you pay for a digital paper (because there are thousands of beautiful free ones), plus the cost of of paper and ink, you will end up paying anywhere from $0.45 to $0.75 for a sheet of letter size paper. I don't think that is all that much. So anyway, I'm not going to go on about the benefits of digital. I'm digressing from my topic today.
Like I said, this card is pretty simple and straight forward. I printed my patterned paper out, cut it down to size to cover my card front, then tore it in half. I used a coral colour chalk ink and sponged around the edges to distress it a little more. For the ribbon treatment, I adhered my ribbon to a piece of cardstock, then I ran it through my crimper. Make sure the ribbon is well adhered to the cardstock, because it will pull away from the cardstock as I learned in my first attempt. I used Sobo white glue the second time and let it dry for about an hour before running through the crimper. I used my edge distress tool on all the edges and then assembled my card. Pretty easy.
I hope you pop over to the ADFD store and check out these images as well as all the other fabulous images Tammy has in the shop. And don't forget, there is still another week to get in on the challenge over at the ADFD blog. You could win yourself an image from the store, plus there is a free image for you on the blog just for playing along in the challenge.
Have a great weekend everyone! Talk to you later...
Cat


The card I made this week is in my usual style: simple and straight forward.

Stamps: Daddy's Little Princess (A Day For Daisies), birthday sentiment (Michaels clear stamp)
Papers: Recollections cardstock, Wausau Exact Index 110#, Energy digital paper collection (Summertime Designs), Staples matte finish brochure paper
Tools & Embellisments: Prisma pencil crayons, oms, ribbon (dollar store), coral craft ink (unknown - dollar store), paper crimper (Fiskars), edge distresser tool (Heidi Swapp)
I really like using digital papers these days. There are thousands of talented designers out there and they put out some beautiful work. What I love about digital papers is that I never run out of a cherished design because as long as I have paper and ink to print with, I have another piece of that gorgeous paper. It really isn't as expensive as you think. How much do you pay for a piece of patterned paper at the craft store? Usually, anywhere from $0.50 to $1.99 for name brand designer papers (plus your time and gas running around to the craft stores). Even if you pay for a digital paper (because there are thousands of beautiful free ones), plus the cost of of paper and ink, you will end up paying anywhere from $0.45 to $0.75 for a sheet of letter size paper. I don't think that is all that much. So anyway, I'm not going to go on about the benefits of digital. I'm digressing from my topic today.
Like I said, this card is pretty simple and straight forward. I printed my patterned paper out, cut it down to size to cover my card front, then tore it in half. I used a coral colour chalk ink and sponged around the edges to distress it a little more. For the ribbon treatment, I adhered my ribbon to a piece of cardstock, then I ran it through my crimper. Make sure the ribbon is well adhered to the cardstock, because it will pull away from the cardstock as I learned in my first attempt. I used Sobo white glue the second time and let it dry for about an hour before running through the crimper. I used my edge distress tool on all the edges and then assembled my card. Pretty easy.
I hope you pop over to the ADFD store and check out these images as well as all the other fabulous images Tammy has in the shop. And don't forget, there is still another week to get in on the challenge over at the ADFD blog. You could win yourself an image from the store, plus there is a free image for you on the blog just for playing along in the challenge.
Have a great weekend everyone! Talk to you later...
Cat
Tuesday, February 08, 2011
The Brakefast Club Challenge #14 - Fancy Folds
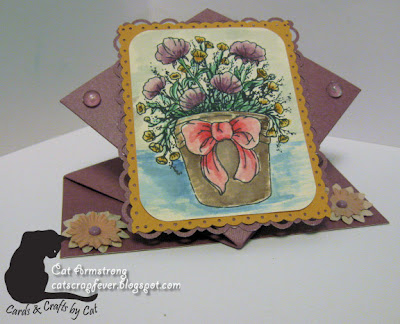
Woohooo! I'm ahead of schedule this week with this card. Last week was a disaster for me trying to get caught up. I got through it and now I've hit the pavement running. The Brakefast Club's challenge this week is to use a "fancy fold" - something other than your plain card. The I Brake For Stamps shop has a Technique CD you can purchase that has tutorials and examples of a lot of different card folds. Here is my card for this week's challenge:
 Supplies:
Stamps: Pot of Flowers (I Brake for Digis)
Papers: DCWV, Recollections, Office Depot (cream cardstock for the image)
Tools & Embellishments: Dotted Scallop edge punch (EK Success), Scallop Trim edge punch (Stampin' Up)generic dew drops (Dollar Store), paper flowers (Dollar store), Marvy markers, fine paint brush
This is called a spring card because of the way its folded the card springs up. I altered the dimensions a little from a tutorial I found on the Splitcoast Stampers. For the card base, I cut my cardstock 5" wide and 9" long. I cut and folded according to the following dimensions:
 Both fold lines going straight across the cardstock are valley folds, and the lines that make the "x" are mountain folds. The top two triangles are cut off to create a diamond. Put adhesive on the bottom triangle formed by the folds and adhere it to the very bottom rectangle. You should have a diamond that stands up on the base. (If my instructions aren't clear to you, you can search for the tutorial in the Splitcoast resource section of their website - it haqs pictures you can follow along with & a video).
I hadn't used my Marvy markers for a little while, so I decided to use them to colour this image. But I didn't want the dark bold colours they would create by colouring directly to the paper with them, so I decided to use them to watercolour with. I got a very thin fine paint brush and a little cup of water and a small acetate sheet I had left over from a stamp set (any piece of plastic will do) to use as a palette. I scribbled the colour I wanted to use on the acetate and then wet my brush and picked up some of the ink off the acetate, then painted my image. You can't use too much water on regular cardstock (which is what I used) since it will warp quite a bit from the water. If you use watercolour paper, you could probably do quite a bit more shading than what I was able to achieve with the paper I used.
To make the matting around the image, I cut my first colour cardstock 1/2" larger on both sides, then the second colour 1" larger on both sides than the dimensions of the image. On the first mat layer, I used the dotted scallop punch, and on the second layer mat I used the scallop trim punch. Glued all the layers together, then adhered it to the top diamond of the card base, centering it on the diamond. To finish it off, I used a couple generic dew drops on either side of the image on the points of the diamond, and layered a couple paper flowers together with a matching brad, and adhered those to the sides on the base.
Once you get the way the folds are suppose to go, this card is very easy to do. If you're going to give this card a try, I would suggest practicing on a piece of copy paper first so that you can practice the folds and not ruin your good cardstock. If you want to use the same image I did for this card, you can get it at the I Brake For Digis shop. They have a lot of great images.
Well, that's all I have for today. Take care...
Cat

Stamps: Pot of Flowers (I Brake for Digis)
Papers: DCWV, Recollections, Office Depot (cream cardstock for the image)
Tools & Embellishments: Dotted Scallop edge punch (EK Success), Scallop Trim edge punch (Stampin' Up)generic dew drops (Dollar Store), paper flowers (Dollar store), Marvy markers, fine paint brush
This is called a spring card because of the way its folded the card springs up. I altered the dimensions a little from a tutorial I found on the Splitcoast Stampers. For the card base, I cut my cardstock 5" wide and 9" long. I cut and folded according to the following dimensions:

I hadn't used my Marvy markers for a little while, so I decided to use them to colour this image. But I didn't want the dark bold colours they would create by colouring directly to the paper with them, so I decided to use them to watercolour with. I got a very thin fine paint brush and a little cup of water and a small acetate sheet I had left over from a stamp set (any piece of plastic will do) to use as a palette. I scribbled the colour I wanted to use on the acetate and then wet my brush and picked up some of the ink off the acetate, then painted my image. You can't use too much water on regular cardstock (which is what I used) since it will warp quite a bit from the water. If you use watercolour paper, you could probably do quite a bit more shading than what I was able to achieve with the paper I used.
To make the matting around the image, I cut my first colour cardstock 1/2" larger on both sides, then the second colour 1" larger on both sides than the dimensions of the image. On the first mat layer, I used the dotted scallop punch, and on the second layer mat I used the scallop trim punch. Glued all the layers together, then adhered it to the top diamond of the card base, centering it on the diamond. To finish it off, I used a couple generic dew drops on either side of the image on the points of the diamond, and layered a couple paper flowers together with a matching brad, and adhered those to the sides on the base.
Once you get the way the folds are suppose to go, this card is very easy to do. If you're going to give this card a try, I would suggest practicing on a piece of copy paper first so that you can practice the folds and not ruin your good cardstock. If you want to use the same image I did for this card, you can get it at the I Brake For Digis shop. They have a lot of great images.
Well, that's all I have for today. Take care...
Cat
Saturday, February 05, 2011
BrakeFast Club Challenge - Book Marks
This past Sunday, a new challenge started at the BrakeFast Club. I know. I'm running behind with all my stuff - again - this week. I did make a book mark from the tutorial the Chrissy posted on her blog. She has it laid out nicely with easy to follow instructions and pictures (which is great for me since I look at the pictures more than read the directions). These bookmarks are also a great way to use up scraps which I also love to do since they are taking over my storage area. Here is my version of the bookmark:
 Supplies:
Stamps: Purse (I Brake for Digis)
Papers: patterned paper (I think its Daisy D, but I got it at the Dollar Store), Recollections cardstock (pink & red), Wausau Exact Index 110# (white cardstock), glitter cardstock (unknown - ordered it a couple years ago from a lady in the UK), paper flowers (Prima), brad (Recollections), rhinestone (Michaels), Wrought Iron corner punch (EK Success), Tulips deep edge punch (EK Success), Butterfly trio punch (Martha Stewart), copic markers
These bookmarks are fun to make and they take very little time. The most complicated thing on this particular bookmark is my trim and the swirls I created. I took the guide off my corner punch, and then punched the edge of my cardstock, visually lining up the design by turning the punch over and looking through the bottom. I hand drew some swirls on scrap cardstock and cut those out with some small scissors. Then assembled all the pieces. Quick & easy.
There is still today left if you want to get in on this week's challenge. There will be a new challenge up tomorrow and the fun starts all over again. If you're looking for this cute purse stamp, you can find it in the I Brake For Digis shop.
Take care...
Cat
ADFD - New Release & a New Challenge
Its that time again. ADFD has released some more awesome images. With spring (hopefully) around the corner, the images are perfect for getting ready for gardening, flowers, and warner weather in general. Here's a peek at what is up for new images this week:


I'm still in the Valentine mode, so I wanted to incorporate some of these images into some of the cards I needed to make to send to family & friends for Valentine's Day. Then all of a sudden, two cosmic forces came together: this week's stamp releases and a new movie release. There is a new movie being released called "Gnomeo & Juliette". Fabulous! Just the quote I needed to get my idea off the ground. Here it is:
 Supplies:
Stamps: Daisy Gnome, Mushroom Gnome, Potted Gerber Daisies (A Day for Daisies)
Papers: Recollections cardstock (red & pink), Wausau Exact Index 110# (white), Bazzil (yellow), Angel Mother digital paper collection (Summertime Designs - printed on brochure paper), matte finish brochure paper (Staples)
Tools & Embellishements: CraftRobo, Doily edge punch (Martha Stewart), Edwardian Script font (sentiment), ribbon (Michaels), copics, Lace Heart edge punch (Martha Stewart)
I used my CraftRobo to cut the circle, scalloped circle, and oval shapes. I created my "faux" nestie templates to make the embossed rims around the circle and scalloped circle. The main image is coloured with my copics. The little boy gnome's wheelbarrow originally had mushrooms in it, but I thought he should be hauling a load of hearts to his sweetie for Valentine's. I used the lace heart edge punch to get all the little hearts since I didn't have a single punch small enough. Other than that the card is very straight forward. You can get any of the new released images in the ADFD shop along with all the other fabulous images for sale there.
The next card is one I created for the new challenge running Challenge #11 - "Heavy Metal Rocks". The challenge is to use "metal" in your creations. The image I chose for my card is an image that was offered as a freebie a while ago. Its such a sweet image and I have plans to use it again when Stampede rolls around here in Calgary. Here is the card I created for the challenge:
 Supplies:
Stamps: My Little Cowboy (A Day For Daisies)
Papers: Stampin' Up (black cardstock), Angel Mother digital paper collection (Summertime Designs - printed on brochure paper), brushed gold cardstock (Dollar Store), shiny gold cardstock (Dollar Store), matte finish brochure paper (Staples)
Tools & Embellishments: Scroll Lace edge punch (Martha Stewart), Sheriff's badge image (coloring-pages-kids.com), flat back pearls (Dollar Store), embossing stylus, copic markers, black sharpie marker
The hardest thing to create on this card was the sheriff's badge. I found a free colouring page and printed it off in mirror image. Then I taped it to the back of my shiny gold cardstock, and followed the lines on the image with my stylus so that it would emboss the image through to the front of the cardstock. Once, I had the image completely embossed, I cut it out, then I traced over the lettering with a thin black sharpie. The image is matted with a scrap of black SU! cardstock, and then with a piece of brushed gold cardstock. I seem to be on this theme of simple cards lately and this one fits into that category.
I hope you join in on the challenge. Its a lot of fun and as usual, Tammy has a great free image for you to play along. You can also win an image of your choice from the store for playing, so join in.
Talk to you later...
Cat


I'm still in the Valentine mode, so I wanted to incorporate some of these images into some of the cards I needed to make to send to family & friends for Valentine's Day. Then all of a sudden, two cosmic forces came together: this week's stamp releases and a new movie release. There is a new movie being released called "Gnomeo & Juliette". Fabulous! Just the quote I needed to get my idea off the ground. Here it is:

Stamps: Daisy Gnome, Mushroom Gnome, Potted Gerber Daisies (A Day for Daisies)
Papers: Recollections cardstock (red & pink), Wausau Exact Index 110# (white), Bazzil (yellow), Angel Mother digital paper collection (Summertime Designs - printed on brochure paper), matte finish brochure paper (Staples)
Tools & Embellishements: CraftRobo, Doily edge punch (Martha Stewart), Edwardian Script font (sentiment), ribbon (Michaels), copics, Lace Heart edge punch (Martha Stewart)
I used my CraftRobo to cut the circle, scalloped circle, and oval shapes. I created my "faux" nestie templates to make the embossed rims around the circle and scalloped circle. The main image is coloured with my copics. The little boy gnome's wheelbarrow originally had mushrooms in it, but I thought he should be hauling a load of hearts to his sweetie for Valentine's. I used the lace heart edge punch to get all the little hearts since I didn't have a single punch small enough. Other than that the card is very straight forward. You can get any of the new released images in the ADFD shop along with all the other fabulous images for sale there.
The next card is one I created for the new challenge running Challenge #11 - "Heavy Metal Rocks". The challenge is to use "metal" in your creations. The image I chose for my card is an image that was offered as a freebie a while ago. Its such a sweet image and I have plans to use it again when Stampede rolls around here in Calgary. Here is the card I created for the challenge:

Stamps: My Little Cowboy (A Day For Daisies)
Papers: Stampin' Up (black cardstock), Angel Mother digital paper collection (Summertime Designs - printed on brochure paper), brushed gold cardstock (Dollar Store), shiny gold cardstock (Dollar Store), matte finish brochure paper (Staples)
Tools & Embellishments: Scroll Lace edge punch (Martha Stewart), Sheriff's badge image (coloring-pages-kids.com), flat back pearls (Dollar Store), embossing stylus, copic markers, black sharpie marker
The hardest thing to create on this card was the sheriff's badge. I found a free colouring page and printed it off in mirror image. Then I taped it to the back of my shiny gold cardstock, and followed the lines on the image with my stylus so that it would emboss the image through to the front of the cardstock. Once, I had the image completely embossed, I cut it out, then I traced over the lettering with a thin black sharpie. The image is matted with a scrap of black SU! cardstock, and then with a piece of brushed gold cardstock. I seem to be on this theme of simple cards lately and this one fits into that category.
I hope you join in on the challenge. Its a lot of fun and as usual, Tammy has a great free image for you to play along. You can also win an image of your choice from the store for playing, so join in.
Talk to you later...
Cat
Subscribe to:
Posts (Atom)