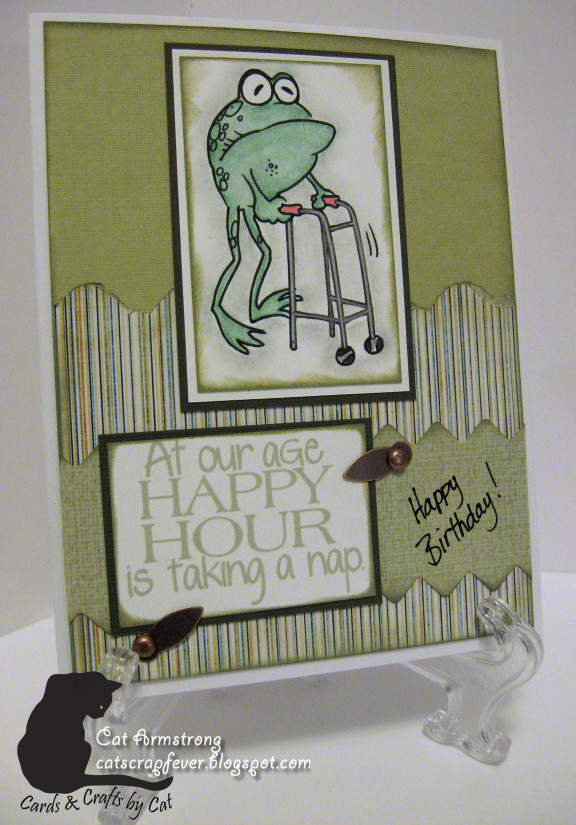
That's the theme of this week's challenge over at the Drunken Stampers blog.
It was a hard choice this week as to which stamp to use. I have (had) so many stamps that I could use that fit this theme in both digital and rubber/clear. I decided to pull out a stamp I haven't used yet from my stash. This poor stamp has been sitting in a box in its wrapper for almost 2 years without being used. So, I thought it was high time, and a very appropriate theme to use it on. Its a La Blanche stamp and I really love the detail. I only have a couple La Blanche stamps and the detail on these stamps is amazing. One thing I find neat about these stamps is that they are made from silicone. Most people associate silicone stamps with the cheap and poor quality clear stamps. But, believe me, these are nice quality and the images are beautiful.
So anyway, here's a look at my card for this week:
Well, my stint as the guest designer is now over. Its been a lot of fun playing along with you all and seeing all the talent each week. I hope you had as much fun with the challenges as I did and pushed yourself. I'm sure I'll be popping by every now and then to say hey and to check out all the amazing projects you all post there.
Take care and we'll see you again...
Cat
Showing posts with label Cards. Show all posts
Saturday, June 29, 2013
Saturday, June 15, 2013
Monty Python & the Holy Grail
Hi again! I'm back for another challenge at the Drunken Stampers challenge blog. This week's theme is Monty Python & the Holy Grail (or rabbits).
I remember as a teenager I saw the Monty Python movie "The Meaning of Life". I thought it was hilarious. I did see The Holy Grail, but I'm somewhat embarrassed to say, I don't really remember it. I was a bit of wild child in my mid teen years (well really, right up to my 40's) and may have been extremely inebriated when I saw it. For some reason, I really never did get into the Monty Python show though. Everyone else thought it was the funniest thing on tv. So given my lack of knowledge about all things Monty Python, I decided to go with the rabbit theme. More specifically, cute little bunnies. :) Although, doing the kind of steampunk, head chopped off and full of a bunch of weird stuff, theme on a card would probably be fun. Maybe next time I'll jump out of my comfort zone and do something wild and crazy. For now, I have a card using some cute little bunnies by from House Mouse. They are so cute. Here's the card:
I left it kind of generic so it could be used for a couple of different occasions. I think it could be used for a baby shower, just to send a hug, easter... Its really an all purpose card.
Well, I hope you get over to the Drunken Stampers and check out the current challenge. There's always a lot of fun happening over there and you'll see some wonderful creations. I hope you check it out this weekend.
Don't forget to pop over to my store blog to check out the blog train freebies I have up for grabs now until the end of the month. I'm pretty happy with how the kits & the doodle packs turned out, so I'm sure you'll find something you'll like and will be able to use.
So, thats it for me today. Pop back in next week and I'll have another project to show you.
Take care...
Cat
Saturday, June 08, 2013
I'm feeling BLUE!
Hey everyone! I'm not depressed - really. I'm feeling blue because its another Drunken Stampers Challenge - My Best Friend's Wedding or the colour blue. :) That's why I'm feeling blue!
This challenge was really a challenge for me. Blue is my favourite colour, but I have a hard time working with what I call masculine colours. I left the card a little more plain, but I still had to put some bling in it with the glittered stars. You may notice the two tone "twine" on there. I used some #10 crochet cotton and coloured it with a blue & beige copic to match the colour scheme of the card. That technique is a great way to get custom colours and custom matching to your projects. I just happened to grab a couple copics, but you could use any type of marker you have handy. I have done it with Marvy markers and Crayola as well and both worked great too. So without much further a do, here's the card:
I hope you will stop by next week to see what I have in store for the next challenge. Make sure you head over to the Drunken Stampers blog and put in your entry for the challenge. I see from all the players of the last challenge that a lot of very talented people hang out there. At least all the cool one's do. :)
See you next week...
Cat
I want to show you the card I made this week for the challenge. Since Father's day is just around the corner, I thought I would also use this challenge to try give you all a little inspiration. Sadly, my dad passed away almost 12 years ago. I miss him every day. He was a wonderful person and his gentleness and generosity is something that I looked up to.
This challenge was really a challenge for me. Blue is my favourite colour, but I have a hard time working with what I call masculine colours. I left the card a little more plain, but I still had to put some bling in it with the glittered stars. You may notice the two tone "twine" on there. I used some #10 crochet cotton and coloured it with a blue & beige copic to match the colour scheme of the card. That technique is a great way to get custom colours and custom matching to your projects. I just happened to grab a couple copics, but you could use any type of marker you have handy. I have done it with Marvy markers and Crayola as well and both worked great too. So without much further a do, here's the card:
See you next week...
Cat
Saturday, June 01, 2013
Guest Designer - Drunken Stampers
Well! I can finally let Cat out of the bag (yes, I intentionally left the word "the" out of the phrase). I'm going to be a guest designer on the Drunken Stampers challenge blog for the month of June. I'm really excited about it. I've never been a "guest designer" before, so I'm going to try and wow you all with some great stamped projects.
The first challenge for June is Breakfast at Tiffany’s – Bling! You can make something representative of the movie or the theme (and who doesn't love bling?) I opted for da bling of course. I made a sweet little thank you card for someone special. I hope you like it.
Unfortunately, I can't seem to get a better picture of it. The picture really doesn't show off how sparkly it is. I added stickles to random dots on the patterned paper and then I made swirls and dots on the pink cardstock too. The chipboard letter was already a glittered chipboard piece, but I wanted even MORE bling, so I loaded it up with rhinestones. Even the ribbon has a little metallic thread running along the edges (that my photo didn't pick up). With all that excitement going on on the card, I wanted the word "Thank" to stand out, so I use a plain font alpha stamp for the word.
I really hope you join in the Drunken Stampers challenges along with me this month. Its going to be a fun time. And, just a little teaser to leave off with you. I've been on this blog for about 8 years I think and I don't often post pictures of myself. Usually because I'm the one behind the camera. I get a lot of people asking me what I look like. Well, they'll be posting a snapshot of me over on Drunken Stampers. So if you want to see the face behind that green cat all over the internet, you'll be able to see the real me.
So that's all for today. Stop back again next week for another fun challenge card. Also, you can stop by my store blog to pick up some fun free digi scrapping kits for a couple of blog trains I'm participating in.
Talk to you later...
Cat
Tuesday, January 08, 2013
Christmas 2012 Cards
Hey everyone! Before I show you the cards I made for the Christmas card swap over at Scraptures, I wanted to let you know how the MFT contest went. Well, I wasn't chosen. :( I really didn't have my hopes up, but I do admit that I would have really liked to be on that DT just for the experience of being on a highly visible DT like that one. Oh well, I'll keep trying. They have a contest every month, so I'll keep at it. :) I've never been called a quitter.
So I found Sassy Cheryl's digi stamps a couple years ago, and I always thought they were really cute, but I just had so many digi stamps that I never got around to buying any of them. Then she had a sale on her stuff and I couldn't pass it up. The couple I bought were an absolute steal for 50¢ each. Her stuff is so cute and whimsical and I love the snowman images. I only used one of the stamps (saving the other one for next Christmas) and I used a free colouring page for the digi stamp on the other card. Here are the two cards I made:
Supplies Used:
Stamps: Play it Again Sam - Sassy Cheryl's digital stamp
Paper: Recollections cardstock, Recollection Christmas stack, watercolour paper
Tools: Watercolour pencils, Snowflake embossing folder, SU scallop border punch
I hadn't used my watercolour pencils in a really long time, so I thought it was time to put them to use. It took a bit of practice to get the shading the way I wanted it, but it worked out. I discovered that there was enough pigment in my rinse water that I could actually use it to paint the shadow around my image.
This next card was one that I had pictured in my head, and I even had printed the image out last Christmas, but I didn't end up using it. I really wanted to put this card together, so I thought it would be a nice one to use for the swap. Here it is:
Supplies used:
Stamps: Free downloaded colouring page, Michaels stamps - sentiment
Paper: Recollections cardstock, Daisy Dee 6x6 Christmas stack, Wausau Exact Index 110#
Tools: Colored pencils - Crayola/Prismacolor, oms, CraftRobo, Frosted Lace stickles, EK Success Morrocco Lace edge punch, EZ Cutter oval templates, EZ Cutter swivel knife, Versamark ink, gold embossing powder - Stampendous.
I love Christmas images. I don't know why, but I especially like snowman images. I just think they are so cute. This card is made with an older Stamps Happen stamp that I bought on clearance at Michaels a few years ago and this year was the first time it saw ink. I made it for the November One on One swap at Scraptures. Here's the card.
Supplies used:
Stamps: Festive Snowmen - Stamps Happen
Paper: Recollections cardstock, Recollections Christmas paper stack
Tools & Embellishments: Copic markers, Stampology Onyx black ink, Stardust stickles, ribbon - Michaels, Fiskars large and small scallop decorative scissors.
So that's everything for today. I've been working on a layout, but its just not gelling. I think I'm going to work on a digital one to see how that goes. I was playing around with some templates the other day, and boy, I can see that they would sure help a layout come together quickly. I've never used templates before (although I use to make them when I was designing) to put together layouts, but I may just start. They're even better than sketches - at least for digital scrapbooking they are.
I'll be back soon.
Talk to you later...
Cat
Sunday, January 06, 2013
MFT DT Contest & My Entries...
Hi all! My Favorite Things is have a contest for a guest design team spot. I'm so excited by the chance to win a spot as a guest designer for MFT. I love their products, although I don't have very many of the dies. I do have quite a few of their stamps though. I debated whether I was going to submit anything for this contest because, lets face it, the girls on their design are like crafting geniuses. I love looking at all the things they create. I have made cards for their monthly contests, but never have time to finish them before they're due or chicken out and don't submit them. Well, damn it! This time I'm not going to chicken out. I think that if I were to win a spot on the DT, it would really push my creativity. And lets face it, I have been in a really big slump the last year or so. So I put together 3 cards to enter. My dear, sweet husband says they're really nice (and that I should put them up for sale). He always says that.
Here is the first card I made. I cut the label shapes with my CraftRobo and then stamped the image on the one label and coloured it with Copic markers. I also cut the tag with my CraftRobo and then stamped the sentiment onto it. It doesn't show up well in the picture, but the tag is quite a bit wider than the label, so I adhered the ends of the tag to the sides of the label so it would bow out from the image. It looks pretty cute in real life. :)
Papers: Shery K Designs - Penguins in Love (Digital Papers), Recollections cardstock, Wausau Exact Index 110#
Inks: Stampology - Onyx
Embellishments: Rhinestones (Michaels)
Tools: Copics - RV000,RV02, RV04, RV29, R29, C0, C3, C7, 100, 0, E00, E02, E33, E35, E37, Primsmacolor - Cool Grey 10%, Sharpie - Dark Grey, Magenta, Rose Red, Bic Mark Its - Rambunctious Red, Craft Robo, pop up squares (Michaels), ribbon (unknown - from my stash), Martha Stewart Lace Heart edge punch
I had to fiddle with the settings on my printer to get the papers to print the colours properly since I was using plain white cardstock. Once I got the intensity and the contrast set to where I liked how it was printing, I went to town and printed a whole bunch. I also used digi papers on this next card:
Papers: Aprilisa Designs - Funky Mama (Digital Papers), Recollections cardstock, Wausau Exact Index 110#
Ink: Stampology - Onyx, Cats Eye - Blue Lagoon
Embellishments: Dew Drops (Michaels)
Tools: Copics - E00, E02, E04, E33, C3, C7, 0, BG05, BG10, BG15, Primsmacolor - Cool Grey 10%, Sharpie - Dark Grey, Tan, Bic Mark Its - Cloud 9 Grey, MFT Designer Label 1 dies, pop up squares (Michaels), EK Success ZigZag Stitch edge punch, Martha Stewart Scallop with 2 dots edge punch, Stampin' Up Scallop edge punch, Stampin' Up Square Lattice embossing folder
This next card is a bit different for me. I almost never make square cards. I would have to say that 95% of my cards are A2 size and 4% are 5x7, just because the envelopes are readily available and I don't have to pay extra postage if I make them flat enough. This card is definitely a "hand deliver" card.
The card is pretty straight forward. I inked and distressed the edges of all the papers. I was going to use all three sizes of the flowers, but they were a little too big, so I just went with the two smaller layers. I think they have a good balance with the rest of the card. I left the inside fairly simple since there was so much going on on the front of the card:
Papers: Stampin' Up (Riding Hood Red, & White)
Ink: Stampin' Up - Riding Hood Red
Embellishments: Rhinestones (Michaels)
Tools: MFT Botanical Beauty dies, MFT Vertical Greetings die, pop up squares (Michaels), Fiskars Large Scallop decorative edge scissors, Heidi Swapp distresser tool
I know I'm going to be checking out what the other entries look like once I get these uploaded to the SCS gallery. I try not to look at the other submissions just so I don't get influenced by the other designs and can have something to enter that I created totally on my own. I'll be on pins and needles as well until they announce the winner.
That's all I have for now. I'm working on a couple layouts and I'm hoping I'll have those done by the middle of the week. So, check back then to see what I've been up to.
Talk to you later...
Cat
Here is the first card I made. I cut the label shapes with my CraftRobo and then stamped the image on the one label and coloured it with Copic markers. I also cut the tag with my CraftRobo and then stamped the sentiment onto it. It doesn't show up well in the picture, but the tag is quite a bit wider than the label, so I adhered the ends of the tag to the sides of the label so it would bow out from the image. It looks pretty cute in real life. :)
I also decorated the inside of the card. I've been trying to do this with all my cards now. I think it just makes it so much nicer and gives it a more professional finish. It also uses up my little scraps so I'm not wasting or storing a whack of tiny pieces of paper (I know I have a problem! I'm a pack rat.) Here's the inside:
Supplies used:
Stamps: MFT Key to my Heart setPapers: Shery K Designs - Penguins in Love (Digital Papers), Recollections cardstock, Wausau Exact Index 110#
Inks: Stampology - Onyx
Embellishments: Rhinestones (Michaels)
Tools: Copics - RV000,RV02, RV04, RV29, R29, C0, C3, C7, 100, 0, E00, E02, E33, E35, E37, Primsmacolor - Cool Grey 10%, Sharpie - Dark Grey, Magenta, Rose Red, Bic Mark Its - Rambunctious Red, Craft Robo, pop up squares (Michaels), ribbon (unknown - from my stash), Martha Stewart Lace Heart edge punch
I had to fiddle with the settings on my printer to get the papers to print the colours properly since I was using plain white cardstock. Once I got the intensity and the contrast set to where I liked how it was printing, I went to town and printed a whole bunch. I also used digi papers on this next card:
I used 3 different colours of copic markers to create the dotted background on the label that the main image sits on. I stamped one image on scrap and cut around that to use as a mask so I knew where to put the dots. Then, I cut out the image and popped it up over the dots. I stuck together the sentiments from two sets to get the sentiment I wanted - "Feel Better Soon" - for the panel running across the top of the card. I inked the edges of the cardstock and patterned papers as well as embossed the upper panel on the card. Again, I finished the inside of the card:
Supplies used:
Stamps: MFT Pure Innocence World's Best Doctor set. MFT Pure Innocence Girl Doctor setPapers: Aprilisa Designs - Funky Mama (Digital Papers), Recollections cardstock, Wausau Exact Index 110#
Ink: Stampology - Onyx, Cats Eye - Blue Lagoon
Embellishments: Dew Drops (Michaels)
Tools: Copics - E00, E02, E04, E33, C3, C7, 0, BG05, BG10, BG15, Primsmacolor - Cool Grey 10%, Sharpie - Dark Grey, Tan, Bic Mark Its - Cloud 9 Grey, MFT Designer Label 1 dies, pop up squares (Michaels), EK Success ZigZag Stitch edge punch, Martha Stewart Scallop with 2 dots edge punch, Stampin' Up Scallop edge punch, Stampin' Up Square Lattice embossing folder
This next card is a bit different for me. I almost never make square cards. I would have to say that 95% of my cards are A2 size and 4% are 5x7, just because the envelopes are readily available and I don't have to pay extra postage if I make them flat enough. This card is definitely a "hand deliver" card.
The card is pretty straight forward. I inked and distressed the edges of all the papers. I was going to use all three sizes of the flowers, but they were a little too big, so I just went with the two smaller layers. I think they have a good balance with the rest of the card. I left the inside fairly simple since there was so much going on on the front of the card:
Supplies used:
Stamps: MFT Vertical Greetings setPapers: Stampin' Up (Riding Hood Red, & White)
Ink: Stampin' Up - Riding Hood Red
Embellishments: Rhinestones (Michaels)
Tools: MFT Botanical Beauty dies, MFT Vertical Greetings die, pop up squares (Michaels), Fiskars Large Scallop decorative edge scissors, Heidi Swapp distresser tool
I know I'm going to be checking out what the other entries look like once I get these uploaded to the SCS gallery. I try not to look at the other submissions just so I don't get influenced by the other designs and can have something to enter that I created totally on my own. I'll be on pins and needles as well until they announce the winner.
That's all I have for now. I'm working on a couple layouts and I'm hoping I'll have those done by the middle of the week. So, check back then to see what I've been up to.
Talk to you later...
Cat
Labels:
Cards,
challenges and contests,
Craft Robo,
digi papers,
DT Calls,
MFT
Friday, December 28, 2012
Halloween Cards & a layout
I know Halloween is long gone, but I wanted to show you the cards I made. I'm so behind on organizing my posts & my pictures. I'm working on it.
So anyway, I think these cards turned out pretty cute. I made one for my brother and one for my niece. I love these digi images by Sassy Studio which I coloured with my Copic markers. The tag is a graphic I found on the internet a couple years ago, so I don't have the details of where it came from. All the shapes were cut using my CraftRobo and I used my scallop edge punch from SU. The patterned papers are from a Halloween mat stack by K & Co. I bought at Michaels 2 years ago. I love using the mat stacks for my cards because the scale of the design is perfect, and there's very little waste when cutting into a sheet. Here are the cards:
The layout I want to show you are of pictures of my husband. He's probably not going to like it that I'm putting these pictures up on my blog. I think they're cute. They were taken on his birthday a few years ago and he was listening to some music with the headphones on. All the cardstock is Recollections brand and I don't remember if the patterned paper is My Mind's Eye or SEI. Again, I cut the shapes for the embellishments, the journal tag, and the title all with my Craft Robo. This layout was made for the October tag layout challenge over at the Scrapture site. Here's my layout:
I also used my loopy border punch and a pair of Fiskars deco scissors on the patterned papers. That line of music was a bugger to get on there straight with those skinny strips of paper. It was fun to make though.
Well, that's all for today. I'm working on getting myself organized and trying to get caught up on deciding which projects I want to post. I have quite a few I want to share here, so check back soon. I'll probably have a few posts over the next week or so.
Talk to you later...
Cat
Friday, November 09, 2012
Breast Cancer Awareness Cards
Hello again. I'm back today to show you some cards I made for Breast Cancer Awareness month - which is October. I wanted to send these cards to the women that are important in my life and give them a gentle reminder that we need to take care of ourselves and that early detection is the key to surviving this ugly disease.
Here are my cards:
The images are digital stamps from Bugaboo stamps that I coloured with pencil crayons and oms and cut out with my Craft Robo using the print & cut feature. I also put some stickles on the images. All the cardstock and patterned paper is Recollections brand and the ribbon and rhinestones are from the dollar store. The corner punch I used on the image mat is also from the dollar store. I used my Craft Robo to print & cut the tags with the sentiments. The inside sentiment says: "Have you felt yourself up lately? October is Breast Cancer Awareness month. Give yourself a breast exam. Just do it!"
Other than that, I have been in a Christmas card making mood. I'll post them after Christmas though 'cause I don't want the recipients to see them just yet. :) I do have a little surprise for you. I was fooling around making some digital papers, so I thought I would share them with you. They are 300dpi letter size papers, so they are perfect for printing and using just as you would any other patterned paper for your Christmas cards. Here is a preview:
I hope you can use them. I had already picked out all my supplies for my cards, so I didn't get to use these papers. Maybe for next years' cards, but more than likely I will have designed a whole bunch more papers to use. You can download them from here: CatScrapFever Christmas 2012 Papers. Please leave a comment if you download them. I would also really love to see any projects you make with them. You can leave a link in a comment or contact me through the contact form on the right-hand side.
That's it for tonight. Talk to you later...
Cat
Sunday, November 04, 2012
A Couple Cards...
Hello all! Well, its 2am and I can't sleep. So I thought I'd stay up so that I could turn the clocks back. I also wanted to share a couple cards I made recently. They were for a One on One swap over on the Scraptures.ca board. I was quite pleased with this first card.
I used an 8x8 paper pack I got at Michaels, created the rosette, used one of my roses I made with my Penny Duncan cut file and cut the tags with my Craft Robo. Heck, I even pulled out the little sewing machine for this card. I made a nice little box for it so it wouldn't get crushed in the mail - it even has an acetate window so you can see the card. My husband thought the card was a real work of art, although he says that about most of my cards. They have to be really ugly before he'll say anything negative about them. He's sweet that way. But all in all I thought the card turned out nice. So I hurry off to the post office to get it in the mail so its not late for the swap, and was I ever hit in the face with reality. Canada Post wanted almost $16 to send the card. I was flabbergasted. Well, I wasn't going to pay that much to send a card through the mail so I had to go home and re-think my design. Of course I had left everything to the last minute. So in order to get a design banged out quickly so the card could get to the recipient before the deadline, I turned to Pinterest. Within 2 hours I had this next card:
I think its a cute card and it was easy to make. I was just really ticked off that Canada Post wanted so much money to send the first card. I guess, unless I am hand delivering or sending the card in a parcel, I will be making flat cards from now on. I'll be damned it Canada Post is going to extort that much money from me to send a card. No wonder they're crying about losing business. I don't even send parcels anymore that often. The last one I sent was for my niece's birthday. It cost me about $30 for the present and $25 to mail it. Ridiculous! I'll be using my bank's e-transfer and emailing money to my mom & sister for Christmas. Its instant & free. I'll probably send my niece something, but that's it. I can't continue to pay as much, or more, than what the gifts are worth just to send them through the mail.
Ok rant over.
So that's it for today. I have a few more projects that I've made in the last few weeks that I'll come back to show you. Just need to take the time to edit the photos.
Well, talk to you later...
Cat
Friday, May 06, 2011
Last Card for I Brake for Digis...
This will be my last "official" DT card for I Brake For Digis. Unfortunately, Della has decided to close the shop. Its too bad. I really like the digis she has available, but if things aren't working out, then she needs to take care of her interests. The good thing is that the I Brake for Stamps shop is still going strong, so you can still get some of the images in rubber. And she just introduced some of the Freddie the Frog images in rubber. They're too cute.
I made this card for the challenge #26 over at the Brakefast Club (which will still be up and running as far as I am aware). The challenge is to use things on your card that start with the letter "B". Here's my card with all my "B"s:
Supplies:
Stamps: Wedding Cake (I Brake For Digis)
Papers: coloured cardstock (Recollections), white cardstock (Wausau Exact Index 110#)
Tools & Embellishments: butterfly trio punch (Martha Stewart), corner ticket punch (SU), embossing folder (Floral Flourishes & Vines set by Sizzix), "Love" brad (Dollar Store), mini flat back pearls (Recollections), rhinestones (Walmart), satin ribbon (Michaels), pop up adhesive squares (Dollar Store), Gloo (KI Memories), ATG, pencil crayons (Martha Stewart), oms, Star Dust glitter glue (Stickles)
The card is pretty basic in design. When I purchased my MS colouring pencils, the info on the box said that they are blendable pigment pencils. So I tested it out on the image. I first used a base of a light peachy skin colour, then near the bottom, I used a darker peach colour, then I used brown along the bottom of the layers of the cake. I guess I'm not that good at blending because I had to go back in with my oms and a blending stump to smooth out the colours and blend them to get the lines to blend away. But I do like the way the colour graduates to a darker colour. The last thing I did was put some stickles on the image. So my "B"s for the challenge are: brown, bling, butterflies, and brads. I hope you like it.
The IBFD shop is still open at the time I am writing this post. If you're at all interested in the image I used for this card, or any of the other images, hurry - no, RUN! - over to the shop to snag it before they're gone for good. Della didn't have a specific time/day she was going to shut down the site. The 10% off discount code is also still available in my sidebar and still valid. Don't miss out on your last chance to get some of the great digis offered in the IBFD shop.
Well, I had a great time working with Della - she's so nice. And I loved working with the images I got to use for my DT assignments. Good luck to the rest of the DT team and I'm sure I'll see you around the blogosphere. :) I still have a ton of I Brake for Stamps rubber stamps I haven't had a chance to play with yet, so I'll still participate in the occasional challenge over at The Brakefast Club.
Take care & talk to you later...
Cat
Wednesday, May 04, 2011
Long time no see!
Hi everyone! Well, I've been MIA for a couple weeks here. Life is taking its toll and I haven't been keeping up with blogging lately. I finally said enough is enough and I took some time to create something. It felt really good to play with my paper again. I have two cards I want to show you.
This first card is one I started a couple weeks ago for the Brakefast Club Challenge #24. I got as far as punching the edge along the patterned paper and printing off the image. But that's all I got done. So tonight I picked everything up again and finally finished the card. Its amazing how quickly it came together. Sometimes, a card can take me hours - yes hours... I've been known to spend 8 hours making one card - and this one came together in about 40 minutes once I pulled out the papers and tools. Here's the card:
Supplies:
Stamps: Rosebud Vase (I Brake For Digis)
Papers: patterned paper (K&Company), linen texture cardstock (American Crafts), white cardstock (Wausau Exact Index 110#)
Tools & Embellishments: colouring pencils (Martha Stewart), oms, ribbon (Michaels), flat back pearls (Recollections), Loops border punch (Martha Stewart), Gloo (KI Memories), pop up adhesive squares (Dollar Store), Glue Dots, ATG
I don't remember who the patterned paper is made by - it was in my scraps. The image is coloured with pencil crayons & oms. I've been experimenting with using different colours as a shadow around the image other than the usual grey. For this image, I used a pinky peach colour and I don't think the picture shows it well, but it does look nice with all the pink paper and ribbon.
The second card came together really quickly as well. I always told people I worked well under pressure, so I think I actually proved that to myself tonight. This card really only took about an hour to do. I made this card for the Brakefast Club challenge #25: One for the Kids. Here it is:
Supplies:
Stamps: Jack in the Box (I Brake for Digis)
Papers: Digital Paper (Jeanelle Paige - A Cherry on Top), Presentation paper (Epson), coloured cardstock (Recollections), white cardstock (Wausau Exact Index 110#)
Tools & Embellishments: Pencil crayons (Martha Stewart), oms, buttons (Walmart), Cornice edge punch (Martha Stewart), Corner decorative scissors (Fiskars), Gloo (KI Memories), pop up adhesive squares (Dollar Store), ATG, red Stickles
I changed the line colours of the image in my graphics program to blue so that it would match the papers I chose. After colouring it with my Martha Stewart pencil crayons, again, I used a colour other than grey for the shadow around the image. I used a light bluish green that I thought complimented the colours nicely. I used red Stickles on the crown to give it a little zing. Other than that, the card is pretty straight forward.
Well, its pretty late here and I have an early start tomorrow. Thanks for popping by. I'll have another card or two to show you by the end of the week, so come and visit again. If you're interested in either of the images I used for my cards, they're available in the I Brake For Digis shop. Don't forget to grab your 10% discount code in the sidebar before you head off shopping.
See you later...
Cat
Wednesday, April 13, 2011
The Brakefast Club Challenge #23 - Three
I'm back with a new project to show you all. That was quick eh? (Yes, I'm Canadian...) This week's challenge over at the Brakefast Club is to use 3 of something on your project. Three buttons, three different papers... you get the gist of it. I had an Easter card to make for a fellow member on the Stampin' Canada board, so I kinda cheated and combined both projects into one. Here is my card for this week's challenge:
Supplies
Stamps: Lilies (I Brake For Digis), sentiment (SU! Well Scripted set)
Papers, coloured cardstock (SU!), white cardstock (Wausau Exact Index 110#)
Tools & Embellishments: Craft Robo, Elegant Bouquet embossing folder (SU!), embossing ink (VersaMark), clear embossing powder (Stampendous), Copic markers, Liquid Pearls, Onyx ink pad (Stampology - Autumn Leaves), embossing stylus
To create the background on the yellow cardstock, I first embossed it with the Elegant Bouquet embossing folder. Then I took my VersaMark re-inker and used a paint brush to paint on the ink over the design. Initially, I tried to use the ink pad and rub it on so that it only hit the high spots, but that was a disaster. Painting the ink on worked sooooo much better. Then I poured on the embossing powder, shook off the excess, and hit it with the heat gun. I like the way it turned out. I cut my "faux nesties" with my CraftRobo. To finish off the image, I put three little "pearls" with the Liquid Pearls on the bottom side. Its pretty simple in design, but I really like the colour combo. And it also fits into the challenge - 3 colours (also the 3 little "pearls" works too).
Thanks for stopping by today. I'll be back soon with something new to show you again.
Take care...
Cat
Friday, March 25, 2011
ADFD New Releases - Birdwatching & Spring
Another fabulous set of images released today by ADFD. They are super sweet and you will just love them. Here's a peek at the new images:
For this weeks release, I used one of the birdhouse images. I don't know what it is, but I just adore birdhouse images. I don't particularly like having one in my yard because I have two cats and that just means dead birds in my yard - not good. So, I'll stick to pictures of birdhouses. :) Here's the card I made for this week's release:
Supplies: Birdhouse image (A Day for Daisies), sentiment (Create With TLC)
Papers: Recollections cardstock, Wausau Exact Index 110# cardstock, digital patterned papers (Summertime Designs)
Tools & Embellishments: Scalloped Scallop edge punch (EK Success), Medallion Chain edge punch (EK Success), Zig glue pen, edge distressing tool (Heidi Swapp), bakers twine (Divine Twine), glitter (Craft Decor), pencil crayons (Crayola, Roseart), oms, copics (R35), button (Steam Trunk Craft Works)
To make the background on the image, I wanted to have sky & clouds. Its a technique that is very easy to do with ink but I didn't feel like pulling out my ink and finding a sponge so I used my light blue pencil crayon & oms. I cut a scrap piece of cardstock in a cloud shape. I held the shape down on the image and then coloured along the edge of the cloud - colouring on the image and the cloud shape both. Then I took my blending stump with oms on it and blended the blue pencil crayon. Once it was blended, I took away the cloud shape and that left the subtle cloud shapes. The only other "special" thing I did with the card is took my new Medallion Chain edge punch and punched one of the shapes on a small piece of patterned paper. I then cut the individual shape away from the rest of the "chain". I used my Zig glue pen and glitter on the edge of the image. Other than that, its a pretty basic card.
I hope you liked it. Don't forget to check out the challenge still going on at the ADFD blog - there's still time. The new images are available in the ADFD shop now, so go on over and check out the new store. You'll love the new set up.
That's my card for this week. Unfortunately, I have some sad news. I've had to make the sad decision to give up my spot on the ADFD design team. I've really enjoyed working with all the girls on the team and, of course, Tammy. I will still love ADFD images and will probably spend way too much money on the new images as they come out. Its getting to be the time that I'll have to go back to work so I don't think I will have the time to devote to the DT commitments. I'm truly grateful to Tammy for giving me my first position on a DT. Its been a great experience. :)
That's all for today.
Cat
Thursday, March 24, 2011
IBFD - Challenge #20 - Birthdays
This week's challenge over at the Brakefast Club is to make a Birthday card. I've always loved the Freddie Frog images - they're so much fun - so I just had to use one for this challenge. Here's my take on the challenge:
Supplies:
Stamps: Senior Freddie (I Brake for Digis), sentiment (Create with TLC)
Papers: American Crafts cardstock, Bazzill cardstock, Wausau Exact Index 110# cardstock, digital patterned paper (Summertime Designs)
Tools & Embellishments: coloured pencils (Crayola), oms, Studio G ink, tearing ruler, ZigZag Stitch edge punch (EK Success)
You still have time to get in on this week's challenge over at The Brakefast Club. A new challenge will be posted on Sunday if you miss this one. You can find Senior Freddie over at the IBFD shop. Don't forget to grab your 10% off discount code in my sidebar before you go shopping. :)
That's all for today. See you later...
Cat
Friday, March 18, 2011
IBFD - Brakefast Challenge card
Hi again! My second post of the day. :) I can't believe I have so much to say lately. Well, I want to share a little card I made for the Brakefast Club challenge this week. The theme is SPRING - and its about time it got here. Its been a lovely couple days here in Calgary and I sure hope it stays that way now. I used the Bunnies & Watering Can image available at the IBFD shop for this card. I hope you all like it. :)
Supplies:
Stamps: Bunnies & Watering Can (I Brake For Digis), alpha stamp (Dollar Store)
Papers: digital patterned paper (Sweet Springtime collection - Summertime Designs), Bazzil, red shimmer cardstock (Recollections), Wausau Exact Index 110#, matte finish brochure paper (Staples)
Embellishments & Tools: Ribbon (dollar store), brad (Recollections), buttons (unknown), pencil crayons (Crayola, Roseart), oms, pink craft ink (Studio G), bakers twine (Canadian Tire)
If you haven't yet, you should get in on this week's challenge before it ends tomorrow. A new challenge will be posted at the Brakefast Club on Sunday. And, of course, you can get the image I used and so many more at the I Brake For Digis shop.
Thats it for cards for today. Talk to later...
Cat
ADFD New Release & A New Challenge
Hi everyone! Its time again for another great new release from A Day for Daisies and another new challenge starts today on the blog. The challenge this time is to Go Green! It will be a lot of fun, so hop over to the blog and join the activities. You will get a chance to win a great image from ADFD and there is an awesome freebie this time to get you going.
Here's a little sneak peek of what in new in store today at the ADFD store:
I also want to congratulate Wendy C. She is the winner of our last challenge. Way to go Wendy!
So, here's the card I made for this new release and challenge. I love love love peacock images. They give you the chance to use so many beautiful colours and just dress them up however you like.
Supplies:
Stamps: Peacock Fairy (A Day For Daisies)
Papers: patterned paper (Amy Buttler Belle collection - K&Company), cardstock (Recollections, Bazzil, Wausau Exact Index 110#)
Tools & Embellishments: Pencil crayons (Roseart, Crayola), oms, glitter (Jones Tones), glue pen (Zig), Floral Vine deep edge punch (Martha Stewart), Leave it to Weaver edge punch (Fiskars), striped grosgrain ribbon (Michaels)
That's it for now. I'll be back later with a couple different posts. :)
Cat
Friday, March 11, 2011
ADFD New Release Cards
I'm a blogging fool this week. :) I think I've made 4 or 5 posts this week. Well, here I am again to show you the card I made with this week's new release from A Day for Daisies. This new release is, without doubt, one of the cutest Tammy has put out. Here's a peek of what she has for you in the store today:
Aren't they adorable? You can get them in the new ADFD shop. AND, just for the grand re-opening of the store, there is 10% off all digital stamps now till March 14! How great is that? Also, don't forget about the challenge going on at the ADFD blog. You could win an image from ADFD and there is a free image so you can play along (if you don't already have soooo many of Tammy's creations already like me.).
So without any further dilly-dallying, here is the card I made for this week:
Supplies:
Stamps: Little Fish Child 2 (A Day for Daisies), Pretty Sea Shells Collection (A Day for Daisies)
Papers: patterned papers (unknown), blue cardstock (Stampin Up), white cardstock (Wausau Exact Index 110#), craft cardstock (The Paper Company)
Tools & Embellishments: CraftRobo, Silhouette fern cutting file, Dimensional Magic (Plaid - Mod Podge), white Liquid Pearls, Stardust Stickles, copics, Scalloped Scallop edge punch (EK Success), Quick Dry Tacky Glue (Aileen's)
The ruffled flowers that are so much the craze these days inspired me to create the large scallop shell that the baby mermaid sits in. I used a scallop edge punch along a strip of paper (2" wide), then fan folded it at each scallop. I opened it to create a 1/2 circle and glued that to a piece of scrap cardstock so it would keep its shape. It was quick and a lot easier than it looks. The trick is using a glue that will dry quickly so that it doesn't pull apart. I like the Aileen's quick dry tacky glue, but you could use a glue gun too.
Well, that's all for now. I'll be back again soon with something else.
Cat
Thursday, March 10, 2011
Miscellaneous stuff I've been doing...
Just thought I would put up some picture of stuff I've made over the last little while. It seems lately that I've only been posting my DT stuff, which is great because I love the stamps, but I have done a few other things that I think turned out really nice. Here's the pictures:
Valentine Cards for Ronald Macdonald house:
Before you all starting oohing and awing over how lovely my cards are
they're all cased from the Splitcoast gallery. I don't take credit for these lovely designs. I just used whatever paper & stamps I had handy. But, honestly, I think they did turn out lovely and I hope they were able to use them at the Ronald Macdonald house.
So, that's all for now. I'll be back again in a day or two to put up a few other things. Hope you liked them. And remember, I'd love to hear what you think about my work, so leave me a comment.
Talk to you later...
Cat
Valentine Cards for Ronald Macdonald house:
Before you all starting oohing and awing over how lovely my cards are
they're all cased from the Splitcoast gallery. I don't take credit for these lovely designs. I just used whatever paper & stamps I had handy. But, honestly, I think they did turn out lovely and I hope they were able to use them at the Ronald Macdonald house.So, that's all for now. I'll be back again in a day or two to put up a few other things. Hope you liked them. And remember, I'd love to hear what you think about my work, so leave me a comment.
Talk to you later...
Cat
Wednesday, March 09, 2011
I Brake For Digis - Brush Horse
Back again with a picture of the card I made with the Brush Horse image from I Brake for Digis. I used this week's challenge (Challenge #18 - Animals) over at The Brakefast Club as inspiration. Its a very elegant image, very simplistic, and very versatile I think. I chose a western theme for this card, but I know that it would work well with just about any theme. Here's the card:
Supplies:
Stamps: Brush Horse (I Brake for Digis)
Papers: patterned paper (unknown), brown cardstock (Recollections), tan cardstock (Bazzil), white cardstock (Wausau Exact Index 110#)
Tools & Embellishments: Craft Robo, Ribbon (Michaels), Mistral font (sentiment), copics, edge distresser tool (Heidi Swapp)
Thats it for today. See ya tomorrow. :)
Cat
Subscribe to:
Posts (Atom)