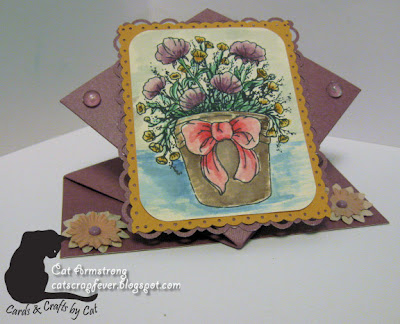
Woohooo! I'm ahead of schedule this week with this card. Last week was a disaster for me trying to get caught up. I got through it and now I've hit the pavement running. The Brakefast Club's challenge this week is to use a "fancy fold" - something other than your plain card. The I Brake For Stamps shop has a Technique CD you can purchase that has tutorials and examples of a lot of different card folds. Here is my card for this week's challenge:
Supplies:
Stamps: Pot of Flowers (I Brake for Digis)
Papers: DCWV, Recollections, Office Depot (cream cardstock for the image)
Tools & Embellishments: Dotted Scallop edge punch (EK Success), Scallop Trim edge punch (Stampin' Up)generic dew drops (Dollar Store), paper flowers (Dollar store), Marvy markers, fine paint brush
This is called a spring card because of the way its folded the card springs up. I altered the dimensions a little from a tutorial I found on the Splitcoast Stampers. For the card base, I cut my cardstock 5" wide and 9" long. I cut and folded according to the following dimensions:
Both fold lines going straight across the cardstock are valley folds, and the lines that make the "x" are mountain folds. The top two triangles are cut off to create a diamond. Put adhesive on the bottom triangle formed by the folds and adhere it to the very bottom rectangle. You should have a diamond that stands up on the base. (If my instructions aren't clear to you, you can search for the tutorial in the Splitcoast resource section of their website - it haqs pictures you can follow along with & a video).
I hadn't used my Marvy markers for a little while, so I decided to use them to colour this image. But I didn't want the dark bold colours they would create by colouring directly to the paper with them, so I decided to use them to watercolour with. I got a very thin fine paint brush and a little cup of water and a small acetate sheet I had left over from a stamp set (any piece of plastic will do) to use as a palette. I scribbled the colour I wanted to use on the acetate and then wet my brush and picked up some of the ink off the acetate, then painted my image. You can't use too much water on regular cardstock (which is what I used) since it will warp quite a bit from the water. If you use watercolour paper, you could probably do quite a bit more shading than what I was able to achieve with the paper I used.
To make the matting around the image, I cut my first colour cardstock 1/2" larger on both sides, then the second colour 1" larger on both sides than the dimensions of the image. On the first mat layer, I used the dotted scallop punch, and on the second layer mat I used the scallop trim punch. Glued all the layers together, then adhered it to the top diamond of the card base, centering it on the diamond. To finish it off, I used a couple generic dew drops on either side of the image on the points of the diamond, and layered a couple paper flowers together with a matching brad, and adhered those to the sides on the base.
Once you get the way the folds are suppose to go, this card is very easy to do. If you're going to give this card a try, I would suggest practicing on a piece of copy paper first so that you can practice the folds and not ruin your good cardstock. If you want to use the same image I did for this card, you can get it at the I Brake For Digis shop. They have a lot of great images.
Well, that's all I have for today. Take care...
Cat
Tuesday, February 08, 2011
Subscribe to:
Post Comments (Atom)


2 comments:
This is DELIGHTFUL! Great fancy fold, Cat! Thanks for playing along!
Great fancy fold card. Neat instructions too.
Post a Comment