Hey everyone. I just wanted to stop by and let you know that I'm not dead, but I feel like it. I put my back out on Sunday and haven't been able to walk for a couple days. I've only been able to sit up for about 5 minutes at a time with the aid of some groovy pain killers :). I have a few projects I want to post, so hopefully, I'll be able to do that early next week.
Take care & talk to you later...
Cat
Thursday, May 19, 2011


Friday, May 06, 2011
Last Card for I Brake for Digis...
This will be my last "official" DT card for I Brake For Digis. Unfortunately, Della has decided to close the shop. Its too bad. I really like the digis she has available, but if things aren't working out, then she needs to take care of her interests. The good thing is that the I Brake for Stamps shop is still going strong, so you can still get some of the images in rubber. And she just introduced some of the Freddie the Frog images in rubber. They're too cute.
I made this card for the challenge #26 over at the Brakefast Club (which will still be up and running as far as I am aware). The challenge is to use things on your card that start with the letter "B". Here's my card with all my "B"s:
 Supplies:
Stamps: Wedding Cake (I Brake For Digis)
Papers: coloured cardstock (Recollections), white cardstock (Wausau Exact Index 110#)
Tools & Embellishments: butterfly trio punch (Martha Stewart), corner ticket punch (SU), embossing folder (Floral Flourishes & Vines set by Sizzix), "Love" brad (Dollar Store), mini flat back pearls (Recollections), rhinestones (Walmart), satin ribbon (Michaels), pop up adhesive squares (Dollar Store), Gloo (KI Memories), ATG, pencil crayons (Martha Stewart), oms, Star Dust glitter glue (Stickles)
The card is pretty basic in design. When I purchased my MS colouring pencils, the info on the box said that they are blendable pigment pencils. So I tested it out on the image. I first used a base of a light peachy skin colour, then near the bottom, I used a darker peach colour, then I used brown along the bottom of the layers of the cake. I guess I'm not that good at blending because I had to go back in with my oms and a blending stump to smooth out the colours and blend them to get the lines to blend away. But I do like the way the colour graduates to a darker colour. The last thing I did was put some stickles on the image. So my "B"s for the challenge are: brown, bling, butterflies, and brads. I hope you like it.
The IBFD shop is still open at the time I am writing this post. If you're at all interested in the image I used for this card, or any of the other images, hurry - no, RUN! - over to the shop to snag it before they're gone for good. Della didn't have a specific time/day she was going to shut down the site. The 10% off discount code is also still available in my sidebar and still valid. Don't miss out on your last chance to get some of the great digis offered in the IBFD shop.
Well, I had a great time working with Della - she's so nice. And I loved working with the images I got to use for my DT assignments. Good luck to the rest of the DT team and I'm sure I'll see you around the blogosphere. :) I still have a ton of I Brake for Stamps rubber stamps I haven't had a chance to play with yet, so I'll still participate in the occasional challenge over at The Brakefast Club.
Take care & talk to you later...
Cat
I made this card for the challenge #26 over at the Brakefast Club (which will still be up and running as far as I am aware). The challenge is to use things on your card that start with the letter "B". Here's my card with all my "B"s:

Stamps: Wedding Cake (I Brake For Digis)
Papers: coloured cardstock (Recollections), white cardstock (Wausau Exact Index 110#)
Tools & Embellishments: butterfly trio punch (Martha Stewart), corner ticket punch (SU), embossing folder (Floral Flourishes & Vines set by Sizzix), "Love" brad (Dollar Store), mini flat back pearls (Recollections), rhinestones (Walmart), satin ribbon (Michaels), pop up adhesive squares (Dollar Store), Gloo (KI Memories), ATG, pencil crayons (Martha Stewart), oms, Star Dust glitter glue (Stickles)
The card is pretty basic in design. When I purchased my MS colouring pencils, the info on the box said that they are blendable pigment pencils. So I tested it out on the image. I first used a base of a light peachy skin colour, then near the bottom, I used a darker peach colour, then I used brown along the bottom of the layers of the cake. I guess I'm not that good at blending because I had to go back in with my oms and a blending stump to smooth out the colours and blend them to get the lines to blend away. But I do like the way the colour graduates to a darker colour. The last thing I did was put some stickles on the image. So my "B"s for the challenge are: brown, bling, butterflies, and brads. I hope you like it.
The IBFD shop is still open at the time I am writing this post. If you're at all interested in the image I used for this card, or any of the other images, hurry - no, RUN! - over to the shop to snag it before they're gone for good. Della didn't have a specific time/day she was going to shut down the site. The 10% off discount code is also still available in my sidebar and still valid. Don't miss out on your last chance to get some of the great digis offered in the IBFD shop.
Well, I had a great time working with Della - she's so nice. And I loved working with the images I got to use for my DT assignments. Good luck to the rest of the DT team and I'm sure I'll see you around the blogosphere. :) I still have a ton of I Brake for Stamps rubber stamps I haven't had a chance to play with yet, so I'll still participate in the occasional challenge over at The Brakefast Club.
Take care & talk to you later...
Cat
Wednesday, May 04, 2011
Long time no see!
Hi everyone! Well, I've been MIA for a couple weeks here. Life is taking its toll and I haven't been keeping up with blogging lately. I finally said enough is enough and I took some time to create something. It felt really good to play with my paper again. I have two cards I want to show you.
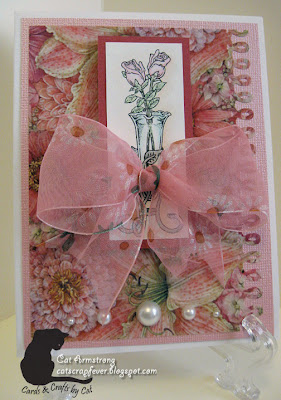
This first card is one I started a couple weeks ago for the Brakefast Club Challenge #24. I got as far as punching the edge along the patterned paper and printing off the image. But that's all I got done. So tonight I picked everything up again and finally finished the card. Its amazing how quickly it came together. Sometimes, a card can take me hours - yes hours... I've been known to spend 8 hours making one card - and this one came together in about 40 minutes once I pulled out the papers and tools. Here's the card:
 Supplies:
Stamps: Rosebud Vase (I Brake For Digis)
Papers: patterned paper (K&Company), linen texture cardstock (American Crafts), white cardstock (Wausau Exact Index 110#)
Tools & Embellishments: colouring pencils (Martha Stewart), oms, ribbon (Michaels), flat back pearls (Recollections), Loops border punch (Martha Stewart), Gloo (KI Memories), pop up adhesive squares (Dollar Store), Glue Dots, ATG
I don't remember who the patterned paper is made by - it was in my scraps. The image is coloured with pencil crayons & oms. I've been experimenting with using different colours as a shadow around the image other than the usual grey. For this image, I used a pinky peach colour and I don't think the picture shows it well, but it does look nice with all the pink paper and ribbon.
The second card came together really quickly as well. I always told people I worked well under pressure, so I think I actually proved that to myself tonight. This card really only took about an hour to do. I made this card for the Brakefast Club challenge #25: One for the Kids. Here it is:
 Supplies:
Stamps: Jack in the Box (I Brake for Digis)
Papers: Digital Paper (Jeanelle Paige - A Cherry on Top), Presentation paper (Epson), coloured cardstock (Recollections), white cardstock (Wausau Exact Index 110#)
Tools & Embellishments: Pencil crayons (Martha Stewart), oms, buttons (Walmart), Cornice edge punch (Martha Stewart), Corner decorative scissors (Fiskars), Gloo (KI Memories), pop up adhesive squares (Dollar Store), ATG, red Stickles
I changed the line colours of the image in my graphics program to blue so that it would match the papers I chose. After colouring it with my Martha Stewart pencil crayons, again, I used a colour other than grey for the shadow around the image. I used a light bluish green that I thought complimented the colours nicely. I used red Stickles on the crown to give it a little zing. Other than that, the card is pretty straight forward.
Well, its pretty late here and I have an early start tomorrow. Thanks for popping by. I'll have another card or two to show you by the end of the week, so come and visit again. If you're interested in either of the images I used for my cards, they're available in the I Brake For Digis shop. Don't forget to grab your 10% discount code in the sidebar before you head off shopping.
See you later...
Cat
This first card is one I started a couple weeks ago for the Brakefast Club Challenge #24. I got as far as punching the edge along the patterned paper and printing off the image. But that's all I got done. So tonight I picked everything up again and finally finished the card. Its amazing how quickly it came together. Sometimes, a card can take me hours - yes hours... I've been known to spend 8 hours making one card - and this one came together in about 40 minutes once I pulled out the papers and tools. Here's the card:

Stamps: Rosebud Vase (I Brake For Digis)
Papers: patterned paper (K&Company), linen texture cardstock (American Crafts), white cardstock (Wausau Exact Index 110#)
Tools & Embellishments: colouring pencils (Martha Stewart), oms, ribbon (Michaels), flat back pearls (Recollections), Loops border punch (Martha Stewart), Gloo (KI Memories), pop up adhesive squares (Dollar Store), Glue Dots, ATG
I don't remember who the patterned paper is made by - it was in my scraps. The image is coloured with pencil crayons & oms. I've been experimenting with using different colours as a shadow around the image other than the usual grey. For this image, I used a pinky peach colour and I don't think the picture shows it well, but it does look nice with all the pink paper and ribbon.
The second card came together really quickly as well. I always told people I worked well under pressure, so I think I actually proved that to myself tonight. This card really only took about an hour to do. I made this card for the Brakefast Club challenge #25: One for the Kids. Here it is:

Stamps: Jack in the Box (I Brake for Digis)
Papers: Digital Paper (Jeanelle Paige - A Cherry on Top), Presentation paper (Epson), coloured cardstock (Recollections), white cardstock (Wausau Exact Index 110#)
Tools & Embellishments: Pencil crayons (Martha Stewart), oms, buttons (Walmart), Cornice edge punch (Martha Stewart), Corner decorative scissors (Fiskars), Gloo (KI Memories), pop up adhesive squares (Dollar Store), ATG, red Stickles
I changed the line colours of the image in my graphics program to blue so that it would match the papers I chose. After colouring it with my Martha Stewart pencil crayons, again, I used a colour other than grey for the shadow around the image. I used a light bluish green that I thought complimented the colours nicely. I used red Stickles on the crown to give it a little zing. Other than that, the card is pretty straight forward.
Well, its pretty late here and I have an early start tomorrow. Thanks for popping by. I'll have another card or two to show you by the end of the week, so come and visit again. If you're interested in either of the images I used for my cards, they're available in the I Brake For Digis shop. Don't forget to grab your 10% discount code in the sidebar before you head off shopping.
See you later...
Cat
Wednesday, April 13, 2011
The Brakefast Club Challenge #23 - Three
I'm back with a new project to show you all. That was quick eh? (Yes, I'm Canadian...) This week's challenge over at the Brakefast Club is to use 3 of something on your project. Three buttons, three different papers... you get the gist of it. I had an Easter card to make for a fellow member on the Stampin' Canada board, so I kinda cheated and combined both projects into one. Here is my card for this week's challenge:
 Supplies
Stamps: Lilies (I Brake For Digis), sentiment (SU! Well Scripted set)
Papers, coloured cardstock (SU!), white cardstock (Wausau Exact Index 110#)
Tools & Embellishments: Craft Robo, Elegant Bouquet embossing folder (SU!), embossing ink (VersaMark), clear embossing powder (Stampendous), Copic markers, Liquid Pearls, Onyx ink pad (Stampology - Autumn Leaves), embossing stylus
To create the background on the yellow cardstock, I first embossed it with the Elegant Bouquet embossing folder. Then I took my VersaMark re-inker and used a paint brush to paint on the ink over the design. Initially, I tried to use the ink pad and rub it on so that it only hit the high spots, but that was a disaster. Painting the ink on worked sooooo much better. Then I poured on the embossing powder, shook off the excess, and hit it with the heat gun. I like the way it turned out. I cut my "faux nesties" with my CraftRobo. To finish off the image, I put three little "pearls" with the Liquid Pearls on the bottom side. Its pretty simple in design, but I really like the colour combo. And it also fits into the challenge - 3 colours (also the 3 little "pearls" works too).
Thanks for stopping by today. I'll be back soon with something new to show you again.
Take care...
Cat

Stamps: Lilies (I Brake For Digis), sentiment (SU! Well Scripted set)
Papers, coloured cardstock (SU!), white cardstock (Wausau Exact Index 110#)
Tools & Embellishments: Craft Robo, Elegant Bouquet embossing folder (SU!), embossing ink (VersaMark), clear embossing powder (Stampendous), Copic markers, Liquid Pearls, Onyx ink pad (Stampology - Autumn Leaves), embossing stylus
To create the background on the yellow cardstock, I first embossed it with the Elegant Bouquet embossing folder. Then I took my VersaMark re-inker and used a paint brush to paint on the ink over the design. Initially, I tried to use the ink pad and rub it on so that it only hit the high spots, but that was a disaster. Painting the ink on worked sooooo much better. Then I poured on the embossing powder, shook off the excess, and hit it with the heat gun. I like the way it turned out. I cut my "faux nesties" with my CraftRobo. To finish off the image, I put three little "pearls" with the Liquid Pearls on the bottom side. Its pretty simple in design, but I really like the colour combo. And it also fits into the challenge - 3 colours (also the 3 little "pearls" works too).
Thanks for stopping by today. I'll be back soon with something new to show you again.
Take care...
Cat
Tuesday, April 12, 2011
Blog Candy Update
I just got a message from Laura and she did get the blog candy - yay! I'm always worried about sending things through the mail. If they get lost, there's really no way to recover the items. So anyway, here's what she said:
"I did get the package. Thank you so much.I love everything you sent.I can use it all. thanks again..."
I'm glad she likes what was in the package. Ok, Laura, lets see what you make out the shtuff!
Till next time...
Cat
"I did get the package. Thank you so much.I love everything you sent.I can use it all. thanks again..."
I'm glad she likes what was in the package. Ok, Laura, lets see what you make out the shtuff!
Till next time...
Cat
Sunday, April 10, 2011
The Brakefast Club Challenge # 22 - Primary Colours
Hi everyone! Today I want to show you my project for the Brakefast Club challenge that ran last week. I know I'm a little late with this, but this project took waaaaayyyy longer than I had expected. The challenge was to create something using primary colours. I love bright colours, and I thought this would be a great combination for a project that had something to do with kids. So I decided to do a scrapbook page with pictures of my niece. Here it is:
 Supplies:
Stamps: Beach Toys (I Brake for Digis)
Papers: Coloured cardstocks (Recollections), Domtar Cougar 130# white cardstock (picture matts), Wausau Exact Index 110# white cardstock (journalling), Matte finish photo paper (Kodak), Glossy finish photo paper (Canon), Digital patterned paper (Summertime Designs)
Tools & Embellishments: Craft Robo, Silhouette cutting files, Sharpie Markers, Zig Memory Writer markers, red, green, & gold Stickles, Mod Podge Dimensional Magic, paper crimper, plastic wave template, foam letter stickers, rhinestones, pop dots
The title is some foam letter stickers I've had in my stash for about 5 years (finally used them - yay!) and all the other embellishments were cut with my CraftRobo. The sunglasses have Mod Podge dimensional magic on the lenses to make them shiny. I added a little bit of stickles on the rims to glam them up a little bit. The digi stamp was coloured with Sharpie markers and traced & cut on my CraftRobo. I also created a white mat around it so it would stand out a bit and adhered it to the page with pop dots. The patterned paper is a digi paper from Summertime Designs and cut in a large square scallop on my CraftRobo. The little flipflops (Silhouette cutting file) have rhinestones glued to the strap at the toe. I used a plastic template to trace and cut the wave design, and I used my wavy paper crimper on the banner going across the page. The journalling block is, again, another Silhouette shape.
Here are a few close up pics of the different elements on the page:


Well, that's all I have for today. You can pick up the Beach Toys digi stamp in the I Brake For Digis shop. Its a great stamp to have for all those summer projects I know you'll all be creating here shortly. :) Don't forget to grab the discount code in my sidebar before you head off shopping. Another challenge starts today over at the Brakefast Club. So pop on over there too to join in this week's fun.
Take care & talk to you later...
Cat

Stamps: Beach Toys (I Brake for Digis)
Papers: Coloured cardstocks (Recollections), Domtar Cougar 130# white cardstock (picture matts), Wausau Exact Index 110# white cardstock (journalling), Matte finish photo paper (Kodak), Glossy finish photo paper (Canon), Digital patterned paper (Summertime Designs)
Tools & Embellishments: Craft Robo, Silhouette cutting files, Sharpie Markers, Zig Memory Writer markers, red, green, & gold Stickles, Mod Podge Dimensional Magic, paper crimper, plastic wave template, foam letter stickers, rhinestones, pop dots
The title is some foam letter stickers I've had in my stash for about 5 years (finally used them - yay!) and all the other embellishments were cut with my CraftRobo. The sunglasses have Mod Podge dimensional magic on the lenses to make them shiny. I added a little bit of stickles on the rims to glam them up a little bit. The digi stamp was coloured with Sharpie markers and traced & cut on my CraftRobo. I also created a white mat around it so it would stand out a bit and adhered it to the page with pop dots. The patterned paper is a digi paper from Summertime Designs and cut in a large square scallop on my CraftRobo. The little flipflops (Silhouette cutting file) have rhinestones glued to the strap at the toe. I used a plastic template to trace and cut the wave design, and I used my wavy paper crimper on the banner going across the page. The journalling block is, again, another Silhouette shape.
Here are a few close up pics of the different elements on the page:


Well, that's all I have for today. You can pick up the Beach Toys digi stamp in the I Brake For Digis shop. Its a great stamp to have for all those summer projects I know you'll all be creating here shortly. :) Don't forget to grab the discount code in my sidebar before you head off shopping. Another challenge starts today over at the Brakefast Club. So pop on over there too to join in this week's fun.
Take care & talk to you later...
Cat
Monday, April 04, 2011
Baking Sour Dough Bread
One of the things I've been trying to learn to do lately is to bake bread. There's something about the satisfaction of soft, hot bread out of the oven smothered in melting butter that just transports you to heaven. I had really good success with white bread thanks to a recipe I found on the Our Best Bites site. They have loads of information that really helped make my attempts a success. I had tried to make bread quite a few years ago (over 20 years ago) and my loafs of bread were more like brick doorstops. So, I didn't try it again. My husband actually got me into it. We bought a big new top of the line Kitchen Aid for ourselves for Christmas. My husband always makes pizza dough from scratch and he was getting tired of kneading it by hand all the time, so he wanted the Kitchen Aid. Then he started to experiment with bread. Well, a few loafs turned out, but for the most part, they weren't that great. So, I thought I would try to see if I could do it (kind of a little bit of competition). Well, I researched how to make good bread first on the internet and that's where I found the Our Best Bites recipe. My first attempt with that recipe was so successful, that I thought, hey this is easy. Yeah right. My next two batches weren't that great. They were heavy - but still soft - so that meant I used too much flour. Then I thought I'd change gears a little bit and try making sour dough bread. I had watched a show years and years ago about a woman who's sour dough starter was from one that had been passed down for a couple generations and was purportedly a hundred years old. I have since read that it is true that some old family recipes today are using starters that their grandmothers started. Well, my first starter started great, but I wasn't ready to make the bread yet, and when I tried to make the sponge, it just didn't work. I was a little disappointed, so I started over. This time, I made sure I didn't have anything happening for a few days and made a starter which worked great, then the sponge and that went like crazy. It was great. It was all going a lot faster than what I had read, so I thought I'm going to have a loaf of sour dough by the next day (it can take up to three days to get a loaf of sour dough). I mixed up the dough and left it to rise. And left it. And left it. It took forever! Then I had to punch it down and let it rise again! It took 2 1/2 days from start to finish to get one loaf of sour dough bread. But it was so satisfying taking it out of the oven. And it looked so perfect. But the best part was cutting off big slices and lathering on the butter. OMG! It was good! Here's a picture of the perfectly formed loaf just after it came out of the oven.

It doesn't look very big in the picture, but that's an XL pizza pan its on, so the loaf was probably a good 10" across. It was enough bread to last us all week. Good thing, because it took 1/2 the week to make it. :)
If you're interested in learning how to make sour dough bread, I found this site (click here) to be a great resource. Of course, if you google it, you'll find hundreds of sites that will help you learn how to make great sour dough bread.
That's it for today.
Cat

If you're interested in learning how to make sour dough bread, I found this site (click here) to be a great resource. Of course, if you google it, you'll find hundreds of sites that will help you learn how to make great sour dough bread.
That's it for today.
Cat
Friday, April 01, 2011
The Brakefast Club Challenge #21 - Sewing
Hi again! I have a little card I made up for this week's challenge over at The Brakefast Club to share with you. The them is sewing - anything that has to do with sewing. So you could use actual sewing, faux stitching, pins, thread, etc., etc. You get the idea. I have a friend who is turning 50 in a couple weeks (I'm not long behind her - yikes!) and I also needed to make a card for her so I combined my efforts and killed two birds with one stone. The image is called Two Friends (how could I not use this image) and its available in the IBFD shop.
Here's my card:
 Supplies:
Stamps: Two Friends (I Brake for Digis), faux stitching stamp (Hanging by a Thread set, Technique Tuesday)
Papers: Recollections cardstock, digital papers (Summertime Designs), Wausau Exact Index 110# cardstock, matte presentation paper (Epson)
Tools & Embellishments: pencil crayons (Crayola, Roseart), oms, French Script font, edge distresser (Heidi Swapp), brads, edge punch (Recollections)
I thought the image was so appropriate for my friend since we have been friends since we were about 11 or 12 years old - like FOREVER. Even though we don't keep in regular contact, we do send the occasional email and I go visit her when I go to Winnipeg. Its nice to have a friend that you can pick up right where you left off the last time you talked - even if it has been a year or so. I am actually quite lucky to have two friends like that.
Well, that's it for today. I'll be back in a couple days with something new. Until then, take care...
Cat
Here's my card:

Stamps: Two Friends (I Brake for Digis), faux stitching stamp (Hanging by a Thread set, Technique Tuesday)
Papers: Recollections cardstock, digital papers (Summertime Designs), Wausau Exact Index 110# cardstock, matte presentation paper (Epson)
Tools & Embellishments: pencil crayons (Crayola, Roseart), oms, French Script font, edge distresser (Heidi Swapp), brads, edge punch (Recollections)
I thought the image was so appropriate for my friend since we have been friends since we were about 11 or 12 years old - like FOREVER. Even though we don't keep in regular contact, we do send the occasional email and I go visit her when I go to Winnipeg. Its nice to have a friend that you can pick up right where you left off the last time you talked - even if it has been a year or so. I am actually quite lucky to have two friends like that.
Well, that's it for today. I'll be back in a couple days with something new. Until then, take care...
Cat
Friday, March 25, 2011
ADFD New Releases - Birdwatching & Spring
Another fabulous set of images released today by ADFD. They are super sweet and you will just love them. Here's a peek at the new images:


For this weeks release, I used one of the birdhouse images. I don't know what it is, but I just adore birdhouse images. I don't particularly like having one in my yard because I have two cats and that just means dead birds in my yard - not good. So, I'll stick to pictures of birdhouses. :) Here's the card I made for this week's release:
 Supplies: Birdhouse image (A Day for Daisies), sentiment (Create With TLC)
Papers: Recollections cardstock, Wausau Exact Index 110# cardstock, digital patterned papers (Summertime Designs)
Tools & Embellishments: Scalloped Scallop edge punch (EK Success), Medallion Chain edge punch (EK Success), Zig glue pen, edge distressing tool (Heidi Swapp), bakers twine (Divine Twine), glitter (Craft Decor), pencil crayons (Crayola, Roseart), oms, copics (R35), button (Steam Trunk Craft Works)
To make the background on the image, I wanted to have sky & clouds. Its a technique that is very easy to do with ink but I didn't feel like pulling out my ink and finding a sponge so I used my light blue pencil crayon & oms. I cut a scrap piece of cardstock in a cloud shape. I held the shape down on the image and then coloured along the edge of the cloud - colouring on the image and the cloud shape both. Then I took my blending stump with oms on it and blended the blue pencil crayon. Once it was blended, I took away the cloud shape and that left the subtle cloud shapes. The only other "special" thing I did with the card is took my new Medallion Chain edge punch and punched one of the shapes on a small piece of patterned paper. I then cut the individual shape away from the rest of the "chain". I used my Zig glue pen and glitter on the edge of the image. Other than that, its a pretty basic card.
I hope you liked it. Don't forget to check out the challenge still going on at the ADFD blog - there's still time. The new images are available in the ADFD shop now, so go on over and check out the new store. You'll love the new set up.
That's my card for this week. Unfortunately, I have some sad news. I've had to make the sad decision to give up my spot on the ADFD design team. I've really enjoyed working with all the girls on the team and, of course, Tammy. I will still love ADFD images and will probably spend way too much money on the new images as they come out. Its getting to be the time that I'll have to go back to work so I don't think I will have the time to devote to the DT commitments. I'm truly grateful to Tammy for giving me my first position on a DT. Its been a great experience. :)
That's all for today.
Cat


For this weeks release, I used one of the birdhouse images. I don't know what it is, but I just adore birdhouse images. I don't particularly like having one in my yard because I have two cats and that just means dead birds in my yard - not good. So, I'll stick to pictures of birdhouses. :) Here's the card I made for this week's release:

Papers: Recollections cardstock, Wausau Exact Index 110# cardstock, digital patterned papers (Summertime Designs)
Tools & Embellishments: Scalloped Scallop edge punch (EK Success), Medallion Chain edge punch (EK Success), Zig glue pen, edge distressing tool (Heidi Swapp), bakers twine (Divine Twine), glitter (Craft Decor), pencil crayons (Crayola, Roseart), oms, copics (R35), button (Steam Trunk Craft Works)
To make the background on the image, I wanted to have sky & clouds. Its a technique that is very easy to do with ink but I didn't feel like pulling out my ink and finding a sponge so I used my light blue pencil crayon & oms. I cut a scrap piece of cardstock in a cloud shape. I held the shape down on the image and then coloured along the edge of the cloud - colouring on the image and the cloud shape both. Then I took my blending stump with oms on it and blended the blue pencil crayon. Once it was blended, I took away the cloud shape and that left the subtle cloud shapes. The only other "special" thing I did with the card is took my new Medallion Chain edge punch and punched one of the shapes on a small piece of patterned paper. I then cut the individual shape away from the rest of the "chain". I used my Zig glue pen and glitter on the edge of the image. Other than that, its a pretty basic card.
I hope you liked it. Don't forget to check out the challenge still going on at the ADFD blog - there's still time. The new images are available in the ADFD shop now, so go on over and check out the new store. You'll love the new set up.
That's my card for this week. Unfortunately, I have some sad news. I've had to make the sad decision to give up my spot on the ADFD design team. I've really enjoyed working with all the girls on the team and, of course, Tammy. I will still love ADFD images and will probably spend way too much money on the new images as they come out. Its getting to be the time that I'll have to go back to work so I don't think I will have the time to devote to the DT commitments. I'm truly grateful to Tammy for giving me my first position on a DT. Its been a great experience. :)
That's all for today.
Cat
Thursday, March 24, 2011
IBFD - Challenge #20 - Birthdays
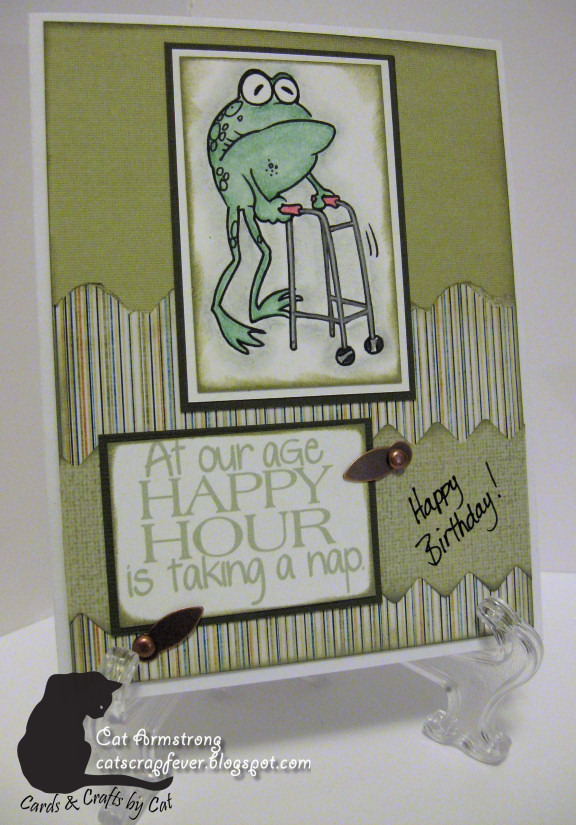
This week's challenge over at the Brakefast Club is to make a Birthday card. I've always loved the Freddie Frog images - they're so much fun - so I just had to use one for this challenge. Here's my take on the challenge:
 Supplies:
Stamps: Senior Freddie (I Brake for Digis), sentiment (Create with TLC)
Papers: American Crafts cardstock, Bazzill cardstock, Wausau Exact Index 110# cardstock, digital patterned paper (Summertime Designs)
Tools & Embellishments: coloured pencils (Crayola), oms, Studio G ink, tearing ruler, ZigZag Stitch edge punch (EK Success)
You still have time to get in on this week's challenge over at The Brakefast Club. A new challenge will be posted on Sunday if you miss this one. You can find Senior Freddie over at the IBFD shop. Don't forget to grab your 10% off discount code in my sidebar before you go shopping. :)
That's all for today. See you later...
Cat
Stamps: Senior Freddie (I Brake for Digis), sentiment (Create with TLC)
Papers: American Crafts cardstock, Bazzill cardstock, Wausau Exact Index 110# cardstock, digital patterned paper (Summertime Designs)
Tools & Embellishments: coloured pencils (Crayola), oms, Studio G ink, tearing ruler, ZigZag Stitch edge punch (EK Success)
You still have time to get in on this week's challenge over at The Brakefast Club. A new challenge will be posted on Sunday if you miss this one. You can find Senior Freddie over at the IBFD shop. Don't forget to grab your 10% off discount code in my sidebar before you go shopping. :)
That's all for today. See you later...
Cat
Friday, March 18, 2011
IBFD - Brakefast Challenge card
Hi again! My second post of the day. :) I can't believe I have so much to say lately. Well, I want to share a little card I made for the Brakefast Club challenge this week. The theme is SPRING - and its about time it got here. Its been a lovely couple days here in Calgary and I sure hope it stays that way now. I used the Bunnies & Watering Can image available at the IBFD shop for this card. I hope you all like it. :)
 Supplies:
Stamps: Bunnies & Watering Can (I Brake For Digis), alpha stamp (Dollar Store)
Papers: digital patterned paper (Sweet Springtime collection - Summertime Designs), Bazzil, red shimmer cardstock (Recollections), Wausau Exact Index 110#, matte finish brochure paper (Staples)
Embellishments & Tools: Ribbon (dollar store), brad (Recollections), buttons (unknown), pencil crayons (Crayola, Roseart), oms, pink craft ink (Studio G), bakers twine (Canadian Tire)
If you haven't yet, you should get in on this week's challenge before it ends tomorrow. A new challenge will be posted at the Brakefast Club on Sunday. And, of course, you can get the image I used and so many more at the I Brake For Digis shop.
Thats it for cards for today. Talk to later...
Cat

Stamps: Bunnies & Watering Can (I Brake For Digis), alpha stamp (Dollar Store)
Papers: digital patterned paper (Sweet Springtime collection - Summertime Designs), Bazzil, red shimmer cardstock (Recollections), Wausau Exact Index 110#, matte finish brochure paper (Staples)
Embellishments & Tools: Ribbon (dollar store), brad (Recollections), buttons (unknown), pencil crayons (Crayola, Roseart), oms, pink craft ink (Studio G), bakers twine (Canadian Tire)
If you haven't yet, you should get in on this week's challenge before it ends tomorrow. A new challenge will be posted at the Brakefast Club on Sunday. And, of course, you can get the image I used and so many more at the I Brake For Digis shop.
Thats it for cards for today. Talk to later...
Cat
ADFD New Release & A New Challenge
Hi everyone! Its time again for another great new release from A Day for Daisies and another new challenge starts today on the blog. The challenge this time is to Go Green! It will be a lot of fun, so hop over to the blog and join the activities. You will get a chance to win a great image from ADFD and there is an awesome freebie this time to get you going.
Here's a little sneak peek of what in new in store today at the ADFD store:


I also want to congratulate Wendy C. She is the winner of our last challenge. Way to go Wendy!
So, here's the card I made for this new release and challenge. I love love love peacock images. They give you the chance to use so many beautiful colours and just dress them up however you like.
 Supplies:
Stamps: Peacock Fairy (A Day For Daisies)
Papers: patterned paper (Amy Buttler Belle collection - K&Company), cardstock (Recollections, Bazzil, Wausau Exact Index 110#)
Tools & Embellishments: Pencil crayons (Roseart, Crayola), oms, glitter (Jones Tones), glue pen (Zig), Floral Vine deep edge punch (Martha Stewart), Leave it to Weaver edge punch (Fiskars), striped grosgrain ribbon (Michaels)
That's it for now. I'll be back later with a couple different posts. :)
Cat
Here's a little sneak peek of what in new in store today at the ADFD store:


I also want to congratulate Wendy C. She is the winner of our last challenge. Way to go Wendy!
So, here's the card I made for this new release and challenge. I love love love peacock images. They give you the chance to use so many beautiful colours and just dress them up however you like.

Stamps: Peacock Fairy (A Day For Daisies)
Papers: patterned paper (Amy Buttler Belle collection - K&Company), cardstock (Recollections, Bazzil, Wausau Exact Index 110#)
Tools & Embellishments: Pencil crayons (Roseart, Crayola), oms, glitter (Jones Tones), glue pen (Zig), Floral Vine deep edge punch (Martha Stewart), Leave it to Weaver edge punch (Fiskars), striped grosgrain ribbon (Michaels)
That's it for now. I'll be back later with a couple different posts. :)
Cat
Wednesday, March 16, 2011
Blog Candy Claimed ! Yay!
I heard back from Laura and the blog candy is now on route - I can't really say whisking its way because we're talking about the postal service here! I'm glad it was claimed and I hope you enjoy it Laura. And let's see what you do with it, ok? Well, I'll be back tomorrow with a new project (or two). I've been working on something and my other life got in the way of getting it done. You know that unfortunate part of our lives that involve laundry, dishes, cooking... that kind of stuff.
Talk to you tomorrow. :)
Cat
Talk to you tomorrow. :)
Cat
Saturday, March 12, 2011
New Winner drawn for the blog candy...
Unfortunately, Lisa didn't contact me by the deadline so I have re-drawn for the blog candy. Here's the picture of what # was drawn:

and that # corresponds to ...............................................
LAURA CAMACHO
I've emailed Laura and hopefully she will email me back shortly and claim her prize.
Again, I'll give it a few days and if the prize isn't claimed, I'll just keep drawing until someone claims the prize. :)
Talk to you all later...
Cat
and that # corresponds to ...............................................
LAURA CAMACHO
I've emailed Laura and hopefully she will email me back shortly and claim her prize.
Again, I'll give it a few days and if the prize isn't claimed, I'll just keep drawing until someone claims the prize. :)
Talk to you all later...
Cat
Friday, March 11, 2011
Calling Lisa Cox! Calling Lisa Cox!
Just a post to Lisa.
Lisa, if you stop by, please email me your address so you can claim your prize! You have until tomorro evening - Saturday, March 11/11. I will leave it to you until 6:00pm MST, after which I will draw again and award the blog candy to a new winner.
So, please Lisa, email me! You can use the contact form in my sidebar.
Cat
Lisa, if you stop by, please email me your address so you can claim your prize! You have until tomorro evening - Saturday, March 11/11. I will leave it to you until 6:00pm MST, after which I will draw again and award the blog candy to a new winner.
So, please Lisa, email me! You can use the contact form in my sidebar.
Cat
ADFD New Release Cards
I'm a blogging fool this week. :) I think I've made 4 or 5 posts this week. Well, here I am again to show you the card I made with this week's new release from A Day for Daisies. This new release is, without doubt, one of the cutest Tammy has put out. Here's a peek of what she has for you in the store today:


Aren't they adorable? You can get them in the new ADFD shop. AND, just for the grand re-opening of the store, there is 10% off all digital stamps now till March 14! How great is that? Also, don't forget about the challenge going on at the ADFD blog. You could win an image from ADFD and there is a free image so you can play along (if you don't already have soooo many of Tammy's creations already like me.).
So without any further dilly-dallying, here is the card I made for this week:
 Supplies:
Stamps: Little Fish Child 2 (A Day for Daisies), Pretty Sea Shells Collection (A Day for Daisies)
Papers: patterned papers (unknown), blue cardstock (Stampin Up), white cardstock (Wausau Exact Index 110#), craft cardstock (The Paper Company)
Tools & Embellishments: CraftRobo, Silhouette fern cutting file, Dimensional Magic (Plaid - Mod Podge), white Liquid Pearls, Stardust Stickles, copics, Scalloped Scallop edge punch (EK Success), Quick Dry Tacky Glue (Aileen's)
The ruffled flowers that are so much the craze these days inspired me to create the large scallop shell that the baby mermaid sits in. I used a scallop edge punch along a strip of paper (2" wide), then fan folded it at each scallop. I opened it to create a 1/2 circle and glued that to a piece of scrap cardstock so it would keep its shape. It was quick and a lot easier than it looks. The trick is using a glue that will dry quickly so that it doesn't pull apart. I like the Aileen's quick dry tacky glue, but you could use a glue gun too.
Well, that's all for now. I'll be back again soon with something else.
Cat


Aren't they adorable? You can get them in the new ADFD shop. AND, just for the grand re-opening of the store, there is 10% off all digital stamps now till March 14! How great is that? Also, don't forget about the challenge going on at the ADFD blog. You could win an image from ADFD and there is a free image so you can play along (if you don't already have soooo many of Tammy's creations already like me.).
So without any further dilly-dallying, here is the card I made for this week:

Stamps: Little Fish Child 2 (A Day for Daisies), Pretty Sea Shells Collection (A Day for Daisies)
Papers: patterned papers (unknown), blue cardstock (Stampin Up), white cardstock (Wausau Exact Index 110#), craft cardstock (The Paper Company)
Tools & Embellishments: CraftRobo, Silhouette fern cutting file, Dimensional Magic (Plaid - Mod Podge), white Liquid Pearls, Stardust Stickles, copics, Scalloped Scallop edge punch (EK Success), Quick Dry Tacky Glue (Aileen's)
The ruffled flowers that are so much the craze these days inspired me to create the large scallop shell that the baby mermaid sits in. I used a scallop edge punch along a strip of paper (2" wide), then fan folded it at each scallop. I opened it to create a 1/2 circle and glued that to a piece of scrap cardstock so it would keep its shape. It was quick and a lot easier than it looks. The trick is using a glue that will dry quickly so that it doesn't pull apart. I like the Aileen's quick dry tacky glue, but you could use a glue gun too.
Well, that's all for now. I'll be back again soon with something else.
Cat
Thursday, March 10, 2011
Miscellaneous stuff I've been doing...
Just thought I would put up some picture of stuff I've made over the last little while. It seems lately that I've only been posting my DT stuff, which is great because I love the stamps, but I have done a few other things that I think turned out really nice. Here's the pictures:
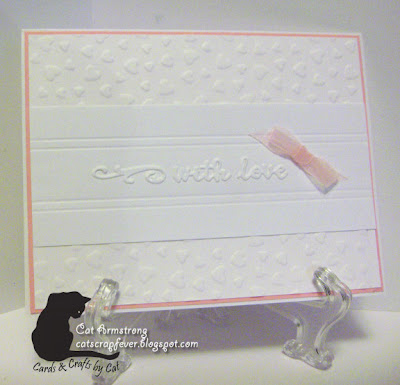
Valentine Cards for Ronald Macdonald house:
Before you all starting oohing and awing over how lovely my cards are they're all cased from the Splitcoast gallery. I don't take credit for these lovely designs. I just used whatever paper & stamps I had handy. But, honestly, I think they did turn out lovely and I hope they were able to use them at the Ronald Macdonald house.




So, that's all for now. I'll be back again in a day or two to put up a few other things. Hope you liked them. And remember, I'd love to hear what you think about my work, so leave me a comment.
Talk to you later...
Cat
Valentine Cards for Ronald Macdonald house:
Before you all starting oohing and awing over how lovely my cards are
they're all cased from the Splitcoast gallery. I don't take credit for these lovely designs. I just used whatever paper & stamps I had handy. But, honestly, I think they did turn out lovely and I hope they were able to use them at the Ronald Macdonald house.


So, that's all for now. I'll be back again in a day or two to put up a few other things. Hope you liked them. And remember, I'd love to hear what you think about my work, so leave me a comment.
Talk to you later...
Cat
Wednesday, March 09, 2011
I Brake For Digis - Brush Horse
Back again with a picture of the card I made with the Brush Horse image from I Brake for Digis. I used this week's challenge (Challenge #18 - Animals) over at The Brakefast Club as inspiration. Its a very elegant image, very simplistic, and very versatile I think. I chose a western theme for this card, but I know that it would work well with just about any theme. Here's the card:
 Supplies:
Stamps: Brush Horse (I Brake for Digis)
Papers: patterned paper (unknown), brown cardstock (Recollections), tan cardstock (Bazzil), white cardstock (Wausau Exact Index 110#)
Tools & Embellishments: Craft Robo, Ribbon (Michaels), Mistral font (sentiment), copics, edge distresser tool (Heidi Swapp)
Thats it for today. See ya tomorrow. :)
Cat

Stamps: Brush Horse (I Brake for Digis)
Papers: patterned paper (unknown), brown cardstock (Recollections), tan cardstock (Bazzil), white cardstock (Wausau Exact Index 110#)
Tools & Embellishments: Craft Robo, Ribbon (Michaels), Mistral font (sentiment), copics, edge distresser tool (Heidi Swapp)
Thats it for today. See ya tomorrow. :)
Cat
Blog Candy - 50 Followers Celebration
I just got back from shopping. I told my hubby that I may reconsider what I'm giving away the next time I decide to have blog candy. I had to buy two of everything! I couldn't buy something and just give it away. I had to have one for me too. :) So, I took a couple pictures of the goodies I'm giving to Lisa. Its all new stuff, except for the ribbon & the paper. I've had these in my stash for a while. There are some 6x6 papers, and one sheet of each design from the October Afternoon Seaside 8x8 paper pack. Here's the pictures:


I've sent Lisa a message letting her know she's the winner. If I don't hear from her by Saturday, I'll pick another random follower, and so on until I get some one to claim the prize. :)
I'll be back in a bit with another post, so talk to you later...
Cat


I've sent Lisa a message letting her know she's the winner. If I don't hear from her by Saturday, I'll pick another random follower, and so on until I get some one to claim the prize. :)
I'll be back in a bit with another post, so talk to you later...
Cat
Tuesday, March 08, 2011
WHOOOHOOOO! I hit 50 followers
So in honour of this milestone, I have decided to pick one random follower and send them some goodies. I haven't figured out what they are yet, but I will head off to the store tomorrow and get some stuff. :)
So here is the results of the random number generator from Random.org

Follower #40 is.....
drum roll....
LISA COX!!! Yay!! Lisa, I'll contact you through your google profile to get your address!
Congratulations. :)
Have a good night everyone!
Cat
So here is the results of the random number generator from Random.org
Follower #40 is.....
drum roll....
LISA COX!!! Yay!! Lisa, I'll contact you through your google profile to get your address!
Congratulations. :)
Have a good night everyone!
Cat
Subscribe to:
Posts (Atom)




 Posts
Posts


